We all know that Microsoft has just recently launched its new Windows version in the market, i.e., Windows 11, which we have been creating hype for the last one or two years. Well, a lot of users have updated their System to the latest version, but there are still some users who haven’t got the new update officially.
Regardless, users like me already flashed the new OS before its official launch. But, I personally felt that after the recent patch update, my Windows 11 PC wouldn’t work properly. So, I’ve decided to restore it to the previous version. Well, that’s where we get the idea to bring a guide on this. That’s why we are here with a new guide to help you guys to enable and create a restore point in Windows 11 PC. So, make sure to follow this guide till the end.
What is System Restore Point?
If your Windows 11 computer stops working after you’ve installed a program or an update, you probably wish it had an Undo button. Well, it does, and it’s called System Restore. Talking about this, then every time you install a program, Windows takes a snapshot of your computer’s settings.
Suppose the program causes serious problems like the computer turning off for no reason or getting strange error messages. Then, you should be able to turn the clock back to when the snapshot was made, and everything should work again. It also protects you whenever you install updates, programs, or new hardware.
Also Read- How to Start Windows 11 in Safe Mode
How To Enable And Create a Restore Point in Windows 11
This guide is divided into two sections. In the first part, we will explain to you the necessary steps to enable this option on your Windows 11 PC. At the same time, the second half will cover the steps to create a restore point. So, now without wasting out time talking, let’s directly get started with the steps:
Steps to Enable Restore Point
- Firstly, click on the Search button and search for sysdm.cpl.

- Now, click on the appropriate one from the search result to open the system properties dialog box.
- After that, switch to the System Protection tab. Then, you’ll notice a list of Drives present on your PC under the Protection settings section.

- Now, if able to check for your system drive (C drive), the System Restore option is turned on or not, as shown in the picture below. If not, you need to turn it on manually.
- To turn on the System Restore option, you need to first select the drive and then click on the Configure button.

- Then, simply select Turn on System Protection. Now, if you wish, you can allocate the disk space by moving the slider. But, keep in mind that 2% of the drive space is automatically get reserved for the System Restore feature.

- That’s it. Now, finally, hit the Apply button followed by the Ok button and close that window.


Steps to Create a Restore Point
- Initially, you need to click on the Windows Search and search for Create a Restore Point.

- Then, click on the appropriate one from the result. This will open the System Properties option.
- After that, you’ll notice a list of Drives present on your PC under the Protection settings section. So, select the drive that you recently enabled this option for.
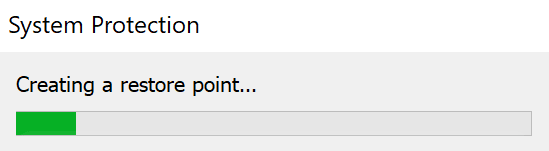
- Now, once you select your drive, you’ll see Create option below the configure button.

- Then, on the next page, hit the Create button and wait until you get the message “The restore point was created successfully.”


- That’s it. Now, close the Windows because you’ve now created it for your Windows 11 PC.


So, that’s all we have for you on how to enable and create a Restore Point on your Windows 11 PC. We hope that this guide has helped you. But, it is still possible that there’s confusion in your mind regarding the topic; let us know in the comment section.


