As the demand for work from home continues to be widespread, workers today can cooperate across cities, countries and even multiple time zones. But remote working needs a good internet connection and a powerful PC so that you can easily access your office system remotely.
However, after the recent Windows 11 update, users are facing regular issues while working, especially office workers. Yes, as per the recent reports, many users complained that their Windows 11 PC keeps disconnecting from the WiFi after the new patch update.
Well, this is really a serious issue because, due to this pandemic, you have no other choice except to fix it on your own. But now you need not worry more because we have a guide with us to help you guys fix if your Windows 11 WiFi Keeps Disconnecting. So, let’s get started.
How to Fix Windows 11 WiFi Keeps Disconnecting
This new Windows 11 update probably brings some bugs that cause this issue. However, there might be lots of reasons behind this error, such as your ISP servers being down for maintenance, problems in your router, corrupted network adapter, etc. But don’t worry, as we have fixes for them. So, let’s start with them.
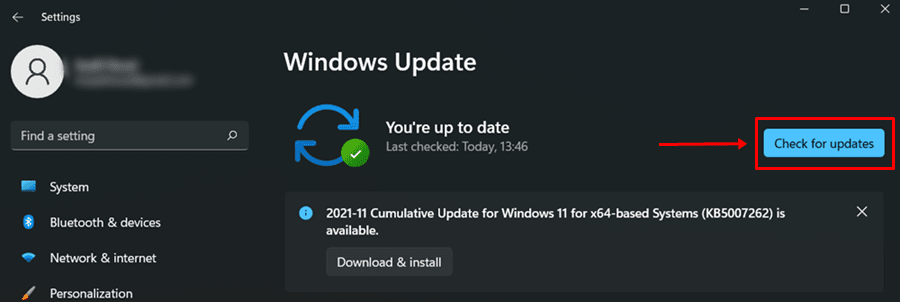
1. Check For Windows Update
The first thing comes first; this is the first trick that you need to try. After that, you can simply check if any OS patch update is available for your PC.
However, in case you don’t know how to check for the Windows update, follow the steps given below:
- Firstly, go to the Windows search bar and search for Windows Update.
- Then, hit the Check for updates and wait until it searches for a new update.

- Now, if there is any update available a Download Now, then hit that button.
- Finally, select the Install Now button once it gets downloaded and reboots your PC.
2. Check With The ISP
Now, in the case of checking for the update, if you find some difficulty, then it is possible that your ISP servers may get down due to maintenance.
So, now you can simply contact your ISP provider and ask them if there’s any maintenance going on. However, if you find no issue from your service provider’s end, don’t worry! You can simply follow our next fixes.
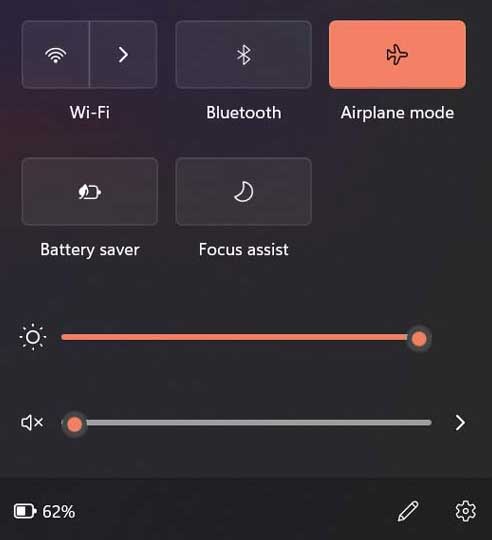
3. Disable The Flight Mode
Did you check if you accidentally enabled the flight mode? If not, then we recommend you check it once and disable it. To do so, follow the steps given below:
- First of all, you have to click on the taskbar section where you generally access the Network.
- After that, click on the Airplane Mode option in case it is enabled.
- That’s it. Now, connect to the WiFi Network as per your choice and check if it fixes the WiFi keeps disconnecting issue.

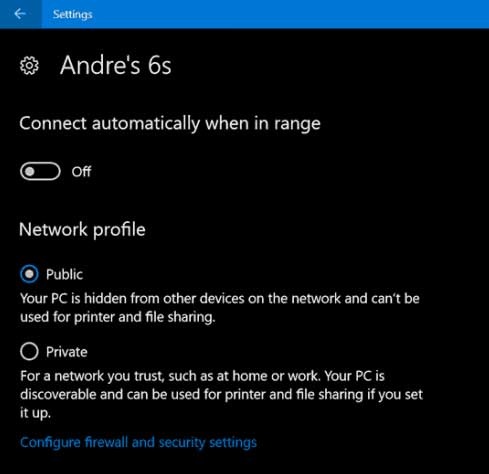
4. Switch To The Private Network Profile
Now, in case the issue is still there, then try switching the network profile from public to private. So, here are the guidelines that you require to perform:
- Firstly, you have to click on the taskbar section where you generally access the Network.
- After that, tap on the WiFi icon. This will open the list of available networks.
- Then, right-click on the Network that you won’t be able to connect to.
- Now, choose the Properties option and select the Public option under the Network Profile Type.

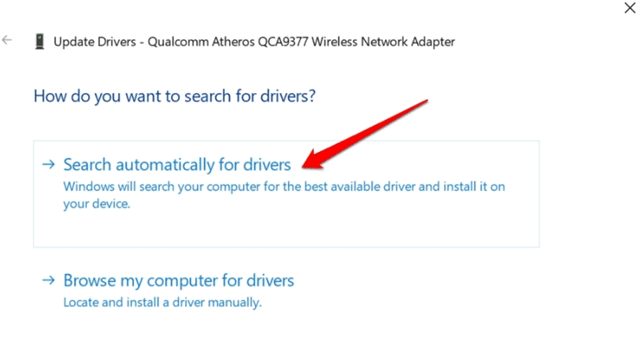
5. Check For Driver Update
It may be possible that your driver may have any pending updates. So, for assurance, you can check if there is any network driver update available for your PC or not. To do so, follow the guidelines given below:
- Initially, you need to press the Win+X button altogether.
- Then, select the Device Manager from the drop-down menu
- After that, hover over to the Network Adapter.
- Then, right-click on it and hit the Update Driver button from the drop-down list.
- Now, select the Search Automatically for Drivers option on the next page.

- That’s it. Now, if there is any update available, it will automatically download and install it on your Windows 11 PC.
6. Forget And Reconnect To The Network
Many users previously reported that this helped them fix other network issues. So, why not try this to fix if you are also getting the same error as mentioned in this article? Well, we highly suggest you first forget and reconnect to the same network and check if it helps. Here are the steps:
- To get started, press Win+A and click on the WiFi.
- Now, from the opened list of networks, simply select your Network.
- Right-click on it and select Forget. That’s it. Now, again reconnect it using your password.
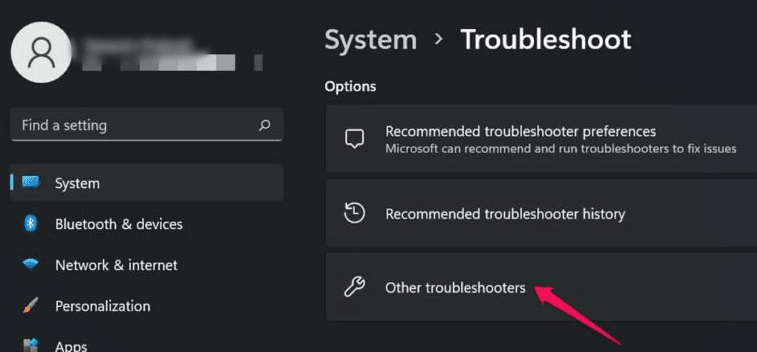
7. Use The Windows Troubleshooter
You can also use the Windows Troubleshooter to fix if your Windows 11 PC keeps disconnecting from the WiFi network. So, here are the steps that you can perform to use this option:
- First of all, you can follow the path:
Windows Settings > System > Troubleshoot.
- Then, hover over to the Other Troubleshooters.

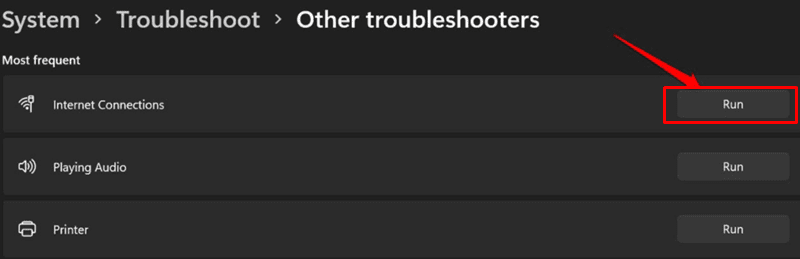
- Now, from the Internet Connection tab, hit the Run button.

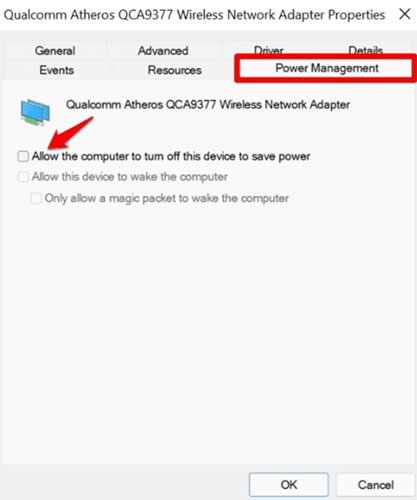
8. Tweak Some Changes to Network Driver
This will definitely help you fix this issue, as it has the potential, and many users previously claimed that this method is to make your WiFi network workable again. So, here are the steps that you must have to follow:
- First of all, press the Win+x, then select the Device Manager from the opened list.
- Now, expand the Network Adapter and double-click on the driver related to your WiFi.
- Now, a properties dialog box will appear. So, from that, switch to the Power Management tab.
- Then, uncheck the box located before Allow the computer to turn off this device to save power option.

9. Change DNS
We regret if none of the methods mentioned here in this guide helped you. But, there’s another method that has been used by many users before and reported positively.
So, you can also try this out and see if it helps to fix if WiFi keeps disconnecting on your Windows 11 PC. Therefore, let’s start with the steps:
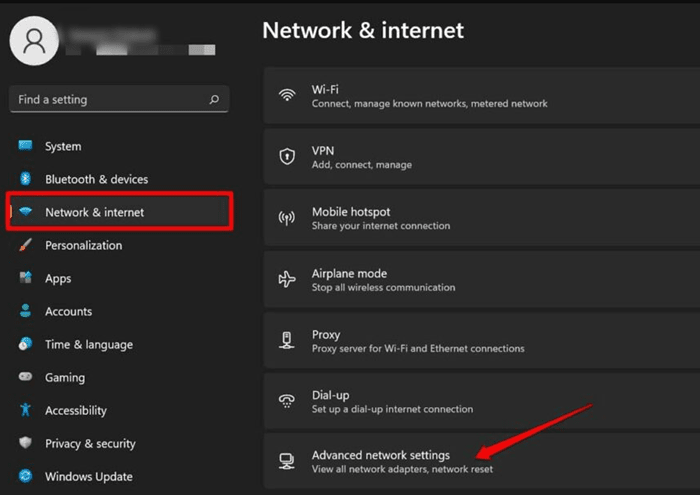
- Initially, press the Win+I button. This will open the settings window.
- After that, click on the Network And Internet.
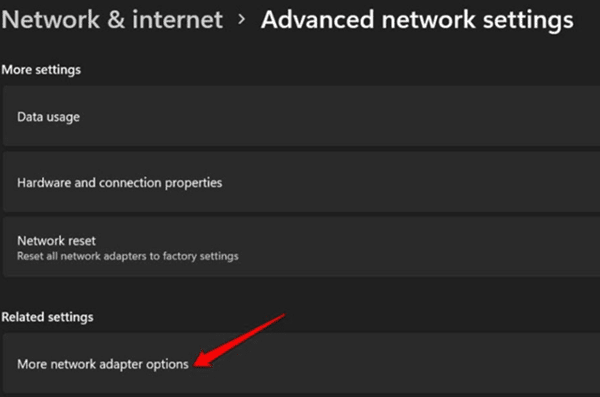
- Then, select the Advance Network Settings option.

- Now, click on the More Network Adapter Options.

- Then, select the WiFi network for which you require to change DNS settings and right-click on it.
- After that, choose the properties option.
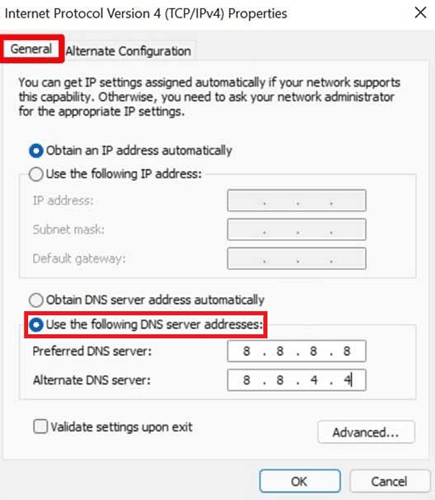
- Now, locate and double click on the Internet Protocol Version 4 under the Networking tab.
- Then, switch to the General tab and select Use the Following DNS Server Addresses. Then, use the following DNS and hit the Ok button.
Preferred DNS Server - 8.8.8.8

Alternate DNS server - 8.8.4.4
10. Reset Network Settings
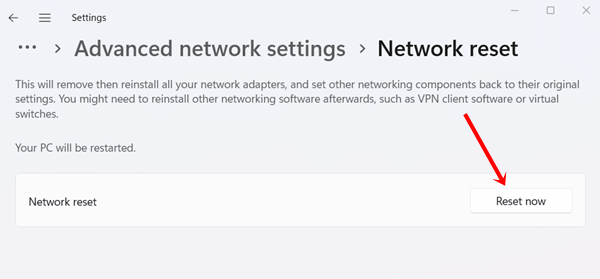
Since WiFi keeps disconnecting, one of the best ways to fix it is by reverting to the default network settings. Let’s follow this:
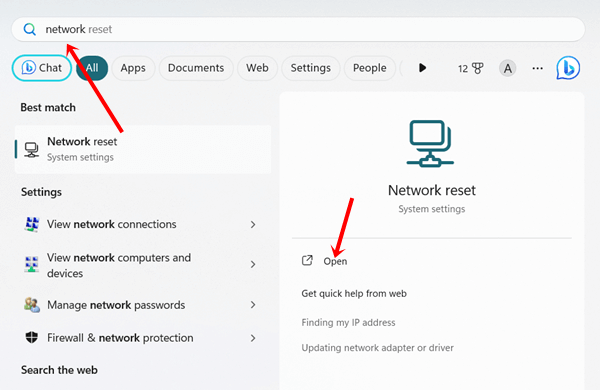
- Click on the Windows button, search for Network reset, and open it.

- Then simply click on the Reset Now button. The system will restart automatically to go back to the default network settings.

Conclusion
So, these are some actions that you can take if your Windows 11 wifi keeps disconnecting. We hope this comprehensive guide has helped you. Well, in case you have any doubts regarding the fixes mentioned above, feel free to ask us in the comment section.


