On PC, WiFi is the only feature that we use in our daily life for internet surfing. But, sometimes, due to random technical bugs and glitches, we may have to suffer a connection problem.
However, as we know, Windows 11 is currently in the beta phase; therefore, it is evident why in the Reddit forum, many users complained that the WiFi is not working on their Windows 11 PC after the recent patch update.
Nevertheless, we hope that these unexpected issues may get fixed in the stable version of Windows 11. But, right now, we have to work on it to fix this issue.
So, our team gathered some information to fix the WiFi issue that may work for you. Therefore, make sure to read and perform the methods mentioned in this fixing guide. So, now let’s dive into it.
Ways To Fix Windows 11 WiFi Not Working Issue
There might be various reasons behind this error, but I’m sure that if you follow this guide till the end, you can easily get rid of this. So, here are the methods:
1. Check Your WiFi Connection
Generally, a loose wire connection will cause this type of issue. So, you must first check if your WiFi is turned on and working properly. Also, check if all the wires are tightly plugged in. If everything is fine, but still your WiFi is not working, head towards the next method.
2. Restart Windows 11
It may sound silly to restart Windows while WiFi not working, but it’s surely a worthy fix to try before any other advanced methods.
We have been using Windows 11 since its release. After that, experienced WiFi didn’t work properly a hundred times. At first, we were clueless and, without knowing anything else, restarted the system. Fortunately, the WiFi problem has been resolved.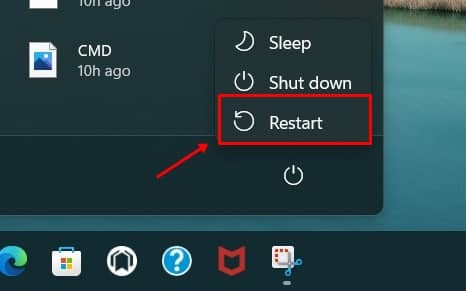
3. Power Cycle Your Router
Sometimes, random technical glitches prevent your router from working properly. So, in that case, rebooting your router will be the best option available.
So, you can turn off your router and plug out all the wires. Then, after waiting for 30-40 seconds, turn it on. Now, you’ll see that your WiFi starts working again.
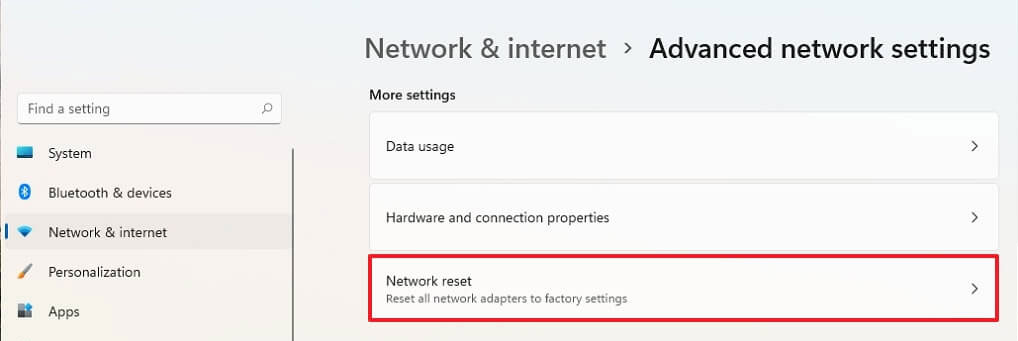
4. Reset WiFi Network Adapter
Here are the steps that you require to perform to reset your Windows 11 PC’s WiFi network adapter:
- Firstly, press the Win+I button to open the Windows Settings.
- Then, click on the Network and Internet followed by the Advanced network settings option.
- Now, locate and click on the “Network reset” option.

- After that, select the “Reset now” option. Then, hit the Yes button to proceed.
- Then, a notification will be prompted that says, “Windows will shut down in 5 minutes.” So, after that, close the window and reboot your PC.
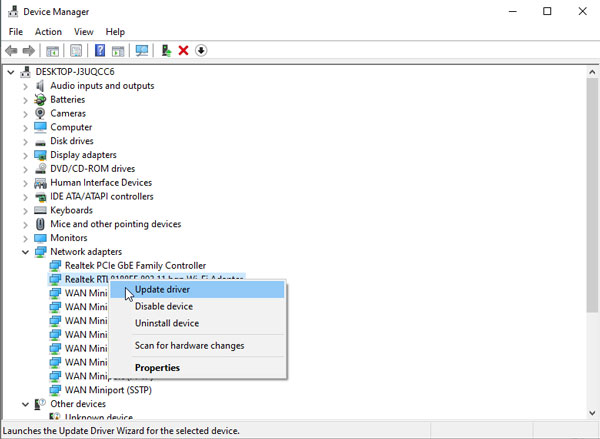
5. Update Network Driver
Did you check for a network driver update recently? If not, then you must have to check. So, here are the steps for that:
- First of all, press the Win+X button altogether, and from the opened menu, select the Device Manager.
- After that, expand the Network Adapters. Then, find your WiFi driver’s name.
- That’s it. Now, right-click on it and choose the Update Driver option. If there is any update available, it will automatically download and install it.

6. Reset DNS Server Problem
If just updating your network driver doesn’t solve the issue, you can try changing your Windows 11 DNS server. So, to do so, you are required to follow some simple steps mentioned below:
- Initially, search for Cmd and open it using run as administrator.
- Now, use the following commands:
netsh wiL nsock reset
ipconfig /release
ipconfig /renew
netsh int ip reset
ipconfig /flushdns
- That’s it. Now, restart your PC and check if now your WiFi has started working or not.
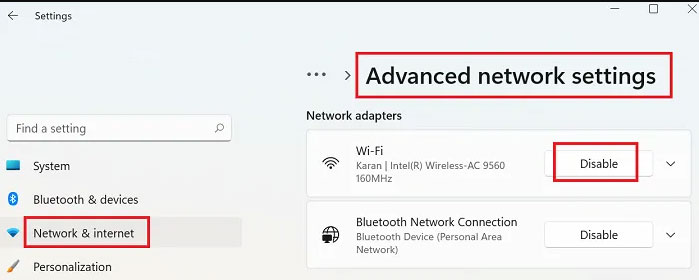
7. Disable and Enable WiFi Adapter
You can also try this out, as many users reported that this helps them permanently fix the WiFi not working issue. So, here are the guidelines that you are required to take:
- Firstly, press the Win+I button to open the Settings.
- Now, hover over to the Network and Internet option and hit the Advanced network settings.
- That’s it. Now, select the disable it first. After that, wait for some time and enable it again.

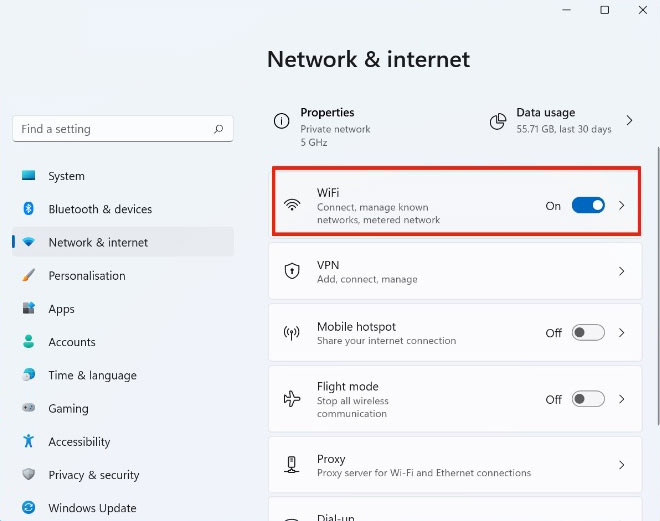
8. Disable Metered Connection
This is one of the common reasons you cannot use your WiFi connection on your PC. So, if you also set your WiFi settings to Metered Connection, we recommend you disable it. However, in case you don’t know how to do this, follow the steps given below:
- Press Win+I to open the Windows settings.
- Now, switch to the Network & Internet and select the WiFi.

- After that, on the next page, toggle the button located in front of Metered Connection.


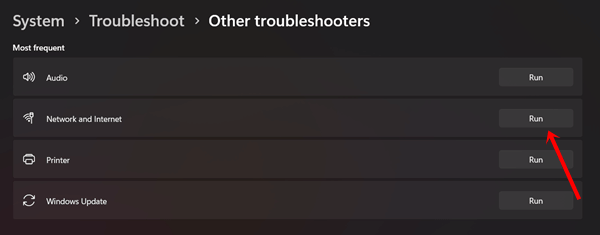
9. Perform Internet Troubleshooter
Windows 11 comes with an inbuilt internet troubleshooter that helps to find any type of network-related problems and fix them.
- Click on the Windows start icon, and select Settings app.
- Then select System > Troubleshoot.

- Next, click on the Other troubleshoot.

- Now simply click on the Run button of Network and Internet. After that, you have to follow the on-screen instructions.


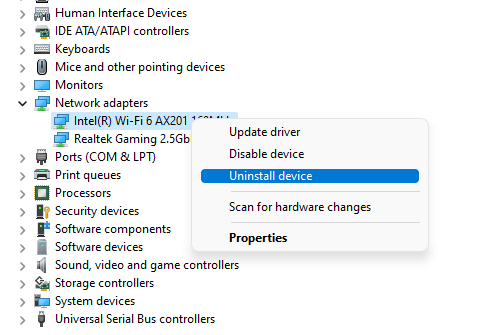
10. Reinstall WiFi Driver
A faulty WiFi driver could be a reason for WiFi not working in Windows 11. Therefore, reinstalling the driver remains one of the best solutions to get a functional WiFi driver and fix the problem completely.
- Right-click on the Windows icon and select Device Manager.
- Now double-click on the Network adapter.
- Then right-click on the WiFi driver, and select Uninstall.

- Next, confirm the Uninstall.
- Lastly, restart your system, functional WiFi driver will be installed automatically.
Conclusion
So, that’s all we have for you to fix if WiFi is not working on your Windows 11 PC. We hope you find this guide helpful. Furthermore, if you have any other option that will help our viewers fix this issue, please let us know in the comment section.


