Let us know how to backup your iPhone to Mac. This means creating a copy of the data present on the iPhone and transferring it to the Mac. These days we use iPhones for storing photos, important documents, contact details, and much more.
Unfortunately, if one piece of data on the iPhone gets corrupted or, worst, the iPhone gets stolen, all data will be lost. So, it is crucial to have a copy of this data on other devices, preferably a computer. [Mac in this case]
How to Backup iPhone to Mac?
I have mentioned the various easy ways to create a backup of iPhone to Mac. Most methods involve only the iPhone and the Mac and no other tools. Of course, if you want to explore the scope of creating and managing backups, there are several third-party apps that you can use as well.
1. Use iCloud to Backup iPhone to a Mac
Here is one of the most sought-after and easiest methods to create a backup. Simply enable regular backup to iCloud on your iPhone. You can then access, copy or retrieve the same backup or any of its content on your Macbook. You do not even have to connect your iPhone and Mac for this.
Here are the steps for you to follow.
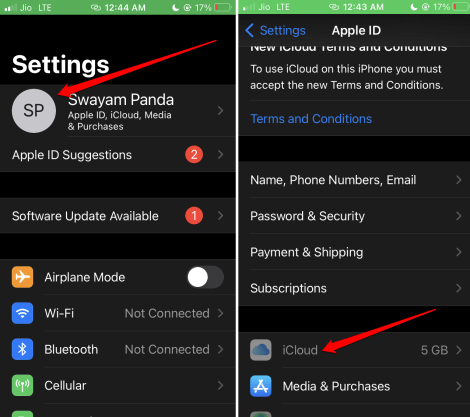
- Launch the Settings app on your iPhone.
- Tap your Apple ID profile at the top.
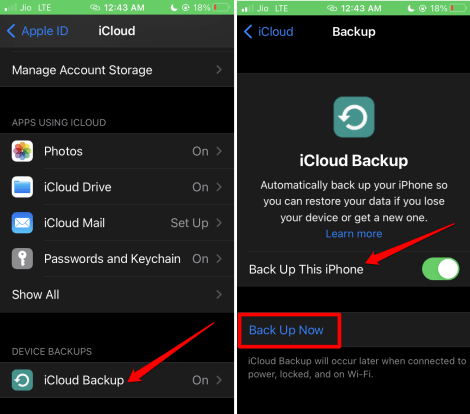
- Tap iCloud > tap iCloud Backup.
- Tap the switch beside the option Back Up This Phone.
Also, if your iPhone is connected to WiFi, another option Back Up Now will be available. Tap on that to start a fresh backup of data to iCloud. Later, to access the same backup, access iCloud on your Mac. Restore all the data from the backup or any certain data per your requirement.
By default, Apple offers only 5GB of free cloud storage on iCloud. When you run out of 5 GB of cloud storage, you can purchase more cloud storage. Otherwise, you can use iTunes to create a backup of more volume of data for free and store them on your Mac. In the next method, I have described the same.
2. Create a Backup Using iTunes and Save it on Mac
If you’re using a Mac with macOS Mojave or an earlier version of macOS, you can back up your iPhone with iTunes. Otherwise, with the MacOS Catalina and other latest macOS versions, backing up iPhone with iTunes is not possible.
Here are the steps to back up the iPhone to your Mac via iTunes if you use MacOS Mojave.
- Launch iTunes on your Macbook.
- Connect your iPhone to your MacBook with the designated lightning/USB cable.
- Allow the iPhone to trust the computer and enter the passcode when asked.
- Click on the iPhone icon.
- On the next page, follow the on-screen instruction and start creating a backup to your Mac.
3. Backup iPhone to Mac Without iCloud
Without iCloud, you can also create a backup of your iPhone to iCloud. Additionally, you can even encrypt your backup data to keep it secure. Here are the steps for that.
- Start by connecting your iPhone to your Mac using a lightning cable. If it is the first time you are connecting them, you may have to enter the code sent on your iPhone to trust the Mac.
- Launch Finder on your Mac.
- On the left-hand side panel of Finder, select your iPhone under Locations.
- Next, click on General.
- Under Backups, select Back up all of the data on this iPhone to this Mac.
- Click on Back Up Now. This will initiate a backup immediately.
4. Create a Backup from iPhone Using WiFi Network
To eliminate the need to physically connect the iPhone and the Mac, there is a facility to create a backup while both devices are connected to the same network. You have to connect the iPhone and the Mac to the same network.
- Launch the Finder on Mac.
- Select the iPhone > click on General.
- Scroll down to Options
- Next, select the option Show this iPhone when on Wi-Fi.
- Click on Apply.
As both the iPhone and the Mac are connected to the same Wi-Fi network, you can view your iPhone model in the Finder app on your MacBook. Create the backup while the devices are now connected.
5. How to Restore iOS Backups on a Mac?
Now, let us know how to restore the backups we created using any of the above methods.
- Start by connecting your iPhone and your Mac.
- Launch Finder on Mac.
- On the left-hand side panel, click on the iPhone under Locations.
- Select General > go to Backups.
- Now, select Restore Backup.
- Select the latest backup from the drop-down list.
- Enter the password to authenticate and proceed.
- Select Restore to grab the concerned backup.
6. Using Third-Party App to Manage Backups of iPhone
The above methods we discussed are the native and free methods available within the Apple ecosystem to create backups. Apart from that, there are several third-party apps present on the internet that can help create unlimited backups of iPhone to Mac and also help in efficiently managing the backup data.
Some apps may not be free and a few may be fake. Make sure to check the user reviews of the app that you want to download. It may not be worth spending a lot on an app that doesn’t stand up to its claim.
Wrapping Up
That’s all about how to back up iPhone to Mac. Now, you have many easy methods to instantly create an iPhone backup. Try any of these methods and that should work for you. I hope this guide was informative.


