Virtual memory is a feature of the Windows operating system that allows the system to access and use disk space on physical drives as if it were memory (RAM) to store data while you’re using your computer temporarily. If you encounter a High Memory Usage error on Windows 11, you need to change the Virtual Memory Size.
What is Virtual Memory?
Virtual memory is referred to as virtual RAM stored on the hard disk by the Windows operating system. It will be used temporarily when high memory usage occurs.
This technology enables you to have large memory space for running large applications or multiple programs simultaneously in a computer with a small RAM size (mostly less than 4GB).
What Causes High Memory Usage in Windows 11?
A variety of reasons can cause high memory usage. If you are facing lag or freezing, it’s most probably because of high memory usage. It can also be caused by various programs that are running in the background.
- Running large applications
- RAM capacity is not sufficient to hold all running processes
- The registry might be misconfigured
- Too many programs running at startup
- Malware/virus
How to Check If My Computer Is Low On Memory?
Press the ‘Ctrl+Shift+Esc’ key to bring up Windows Task Manager on your computer. Alternatively, you can right-click the taskbar at the bottom of your screen and then click the ‘Task Manager’ icon from the context menu.
Once Windows Task Manager appears, click the ‘Performance’ tab. Here, you will see the CPU and Memory Usage graph at the top of the window.
Now let’s head to how to change virtual memory size in Windows 11.
How To Change Virtual Memory Size in Windows 11?
- Open settings from the start menu, or you can press Windows + I together to open settings.
- Click on System from the left sidebar.
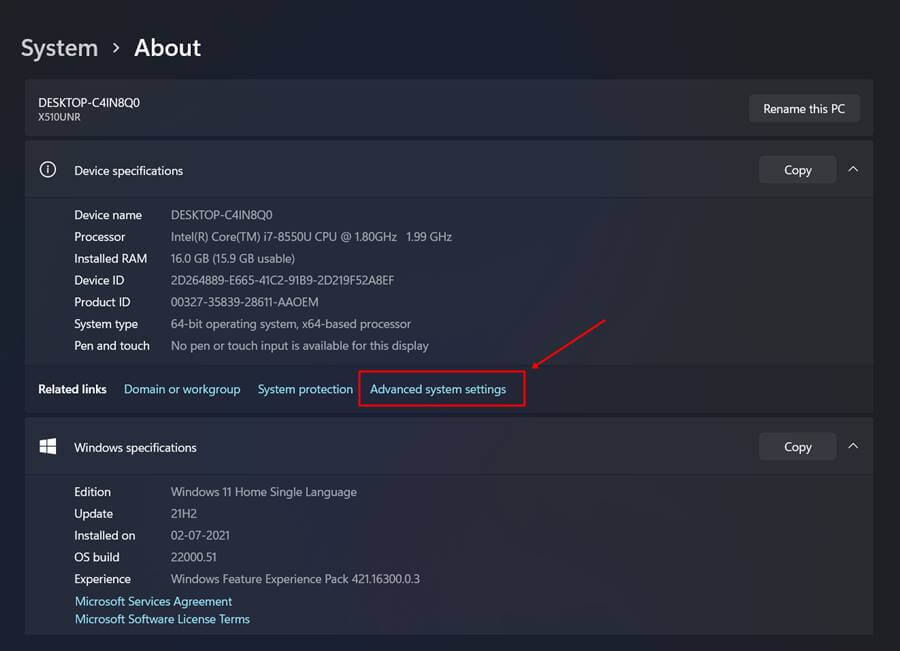
- Click on About, and then click on Advanced System Settings.
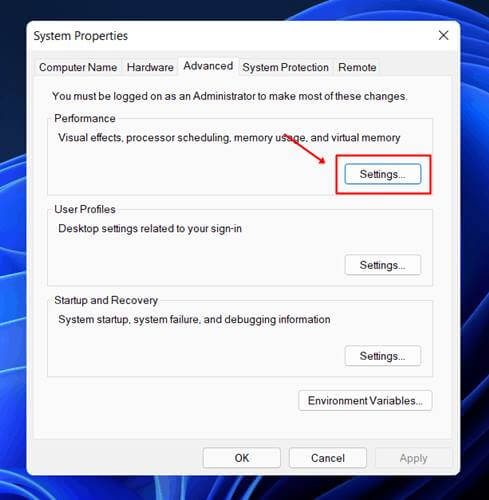
- Now, in the performance section, click on Settings.
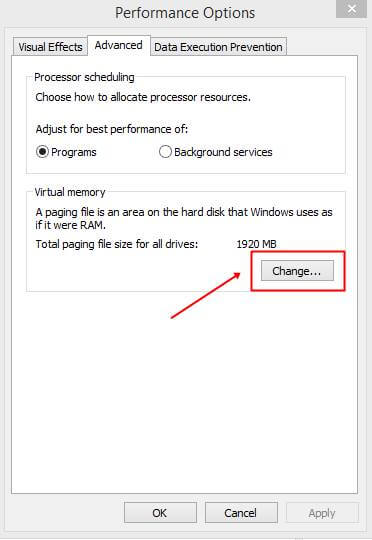
- Now switch to the Advanced tab.
- You’ll find the virtual memory section there, and now you need to click on the change option.
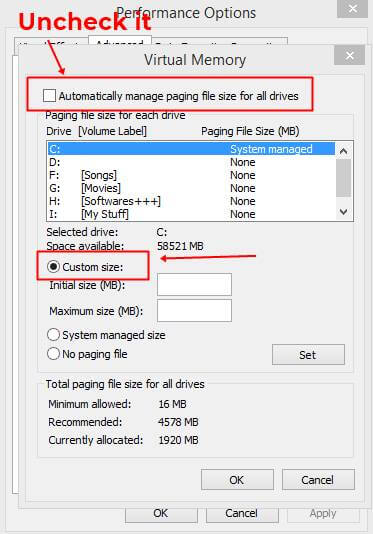
- You’ll find the default setting as automatically manage paging file size for all drives; Uncheck it. Next, you need to select the partition and then select the custom size option.
- Enter the size there in MB, click on “Set,” and then click “OK” and restart your system.
- Once your computer restarts, your system will be optimized for better performance.
Changing the Virtual memory size will resolve the high memory usage issue and apps crashing, lagging, and freezing.
If you’d like to revert the changes to the default one, you can select the “Automatically manage paging file size for all drives” and set and then restart your system.
Note: Don’t set the memory size too high if you don’t have enough memory. It will slow down your computer or even crash it.
It was all about changing the virtual memory size or increasing page file size in Windows 11, and the article will surely be helpful to those facing High Memory Usage and who want to change the virtual memory size in Windows 11.


