Snipping Tool on Windows comes in handy when you want to take a screenshot of an entire window or parts of the screen. Although we use the snipping tool to take screenshots for this article you are reading right now.
However, not everyone wants to use the built-in Snipping tool for some reason, such as they already use another screenshot capture tool or don’t use any. This means it’s best to disable or uninstall it totally. Here’s how you can do it.
Also Read- How to Enable Dark Mode in Windows 11
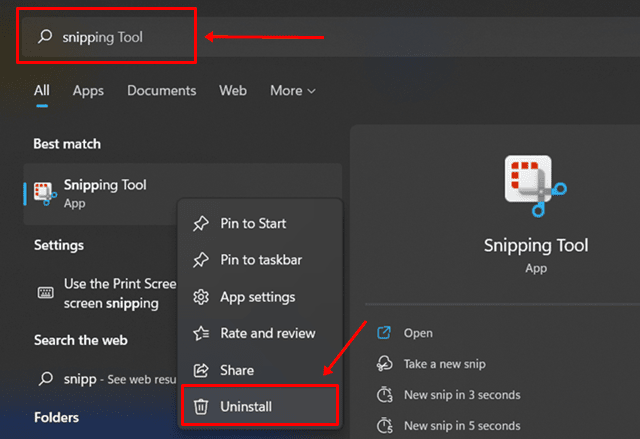
1. Uninstall Snipping Tool
This is a very simple and easy method where you simply uninstall the snipping tool from your Windows 11-powered PCs. Here’s how it works.
- Tap the Windows button to open Start Menu.
- Search for Snipping Tool.
- Right-click on the listing, select Uninstall from the menu.
- The system will prompt you to confirm uninstalling the app or not. Select Uninstall.

2. Disable Snipping Tool Using Registry Editor
This specific method lets you keep the Snipping Tool on your PC but in a disabled state unless you want to revive it.
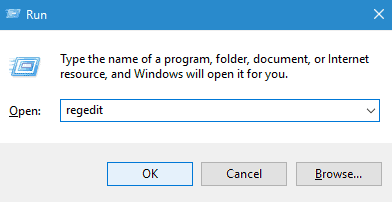
- Press Win+R on your PC that will open the Run command. Type command Regedit and hit enter.

- A prompt will appear on the screen asking you to confirm entering Registry Editor. Tap on “OK.
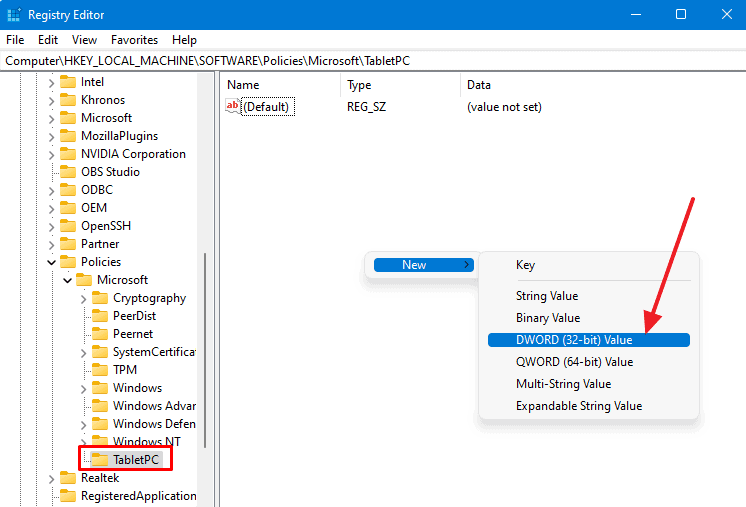
- You need to follow the given path in the tree menu: HKEY_LOCAL_MACHINE\SOFTWARE\Policies\Microsoft
- Right-click on the Microsoft folder and select New >> Key.

 Value")
- Next, enter the name of the key as TabletPC and hit Enter to save.
- Tap on the TabletPC folder on the left to open it on the right half of the screen.
- Right-click in a black space and select New >> DWORD (32-bit) Value from the menu.

- Highlight the new value you added and change the name to DisableSnippingTool

- You need to change the value of the recently created key to 1. Here, click on DisableSnippingTool twice to open a dialog box. Then, head over to Edit DWORD(32-bit) Value.
- Next, check out for Value Data and set the value as “1”.
- Select Hexadecimal under Base, press Enter.


 Value")
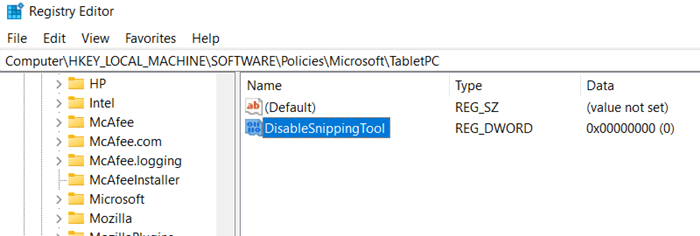

You will have to restart the PC and after that, Snipping Tool will be disabled temporarily until you enable it.
3. Disable Snipping Tool Using Group Policy Editor
This is another method that you can use to disable snipping tools on your Windows PC. Again, follow the instructions as mentioned.
- Tap on Win+R to fire a Run command and search for gpedit.msc.

- On the left side, tap and expand User Configuration >> Administrative Templates >> Windows Components >> TabletPC >> Accessories.

- Next up, look at the right half of the screen and tap on “Do not allow Snipping Tool to run,” so double-click on it.

- You will find a toggle to enable and disable it, so tap on Enable, hit OK.
- Next time you want to enable Snipping Tool, you can follow the same procedure mentioned above and click on Disable instead.


Closing Words
And with that, I have wrapped out the guide on methods you can use to disable Snipping Tool on Windows 11. Of course, the reasons you could be disabling it can be different, but you should be able to get rid of it with the mentioned methods.


