Microsoft has embedded numerous features for various types of users in its Window 10 OS, where many of them aren’t even known to a general user. Hibernation is one such feature that’s little used, and not so often by few people. While many go with sleep or shutting down their systems, hibernation has its own purpose too.
Hibernating is like a deep sleep and has thin differences between shutting down and putting your PC into sleep. When did, it stores all your current work into your drive (SSD or hard drive) instead of RAM and shuts down your PC. Thus, it fulfills both the purposes of shutting down and sleep.
A major advantage of putting your PC into hibernation is saving power. Your PC doesn’t draw any power while in hibernation since it’s shut down, yet saves your work on a hard drive for later use. Thus, it’s a useful feature worth trying. Here’s how;
Also Read- 100+ Windows 10 Run Commands You Should Know
Steps to Enable Hibernate Mode on Windows 10
1.) Open Command Prompt with admin privileges. For this, type “cmd” in Windows Search, spot the Command Prompt result, right-click on it to open the options. Now click on “Run as Administrator.”
2.) Once the Command Prompt is opened, type as below to check whether your system supports hibernation or not.
powercfg /availablesleepstates
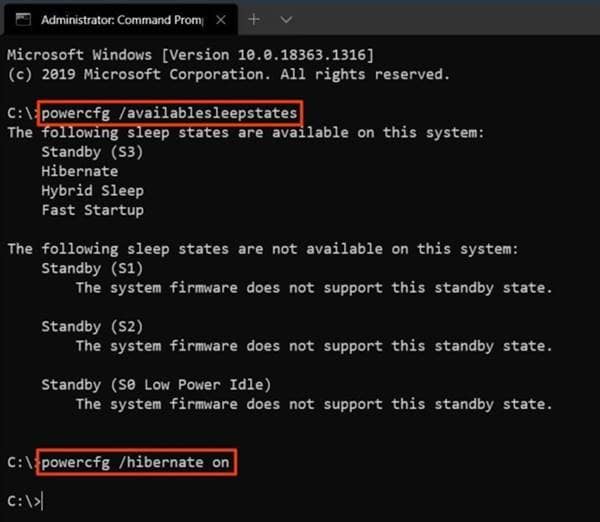
3.) This shows all the available power configurations (and not) your PC supports. And if it shows Hibernation in the available options, you’re eligible to activate this function.
4.) Now, type in as below to active the hibernation function.
powercfg /hibernate on
This would then hibernate your PC, as said above. Waking up from this mode is simple, too; press any key on the keyboard or the CPU’s power button to wake it up. And to turn this function off, go through the same process, and type in “off” instead of “on” in step 2 of the command prompt.


