Windows 11 is out now, and recently the new software patch update has been available for users. However, this is Microsoft’s one of the biggest operating system updates in a long time. However, after the recent Windows 11 patch update, many users reported that they weren’t able to see other computers on the Network.
So, how do you do this? Well, this can be tricky for some people, and there can be many reasons why computers or devices are not showing on your local Network. But don’t worry because we will show you the methods to see other computers on Network in Windows 11. So, now, why are we wasting time talking here? Therefore, let’s get started with our guide.
How to Find Other Computers on Network in Windows 11
This isn’t much difficult task to do. You can see all devices on your local network. You just need to follow some guidelines that we have discussed below. So, let’s get started with it.
1. Change Network Profile
The first steps that you need to perform if you want to see other local networks in Windows 11. So, as we know, by default, the network profile is set to a public profile on our PC, and in the public profile, you cannot communicate with another computer.
Therefore, you need to change your network profile to a private profile to make it possible. But how? Let’s see:
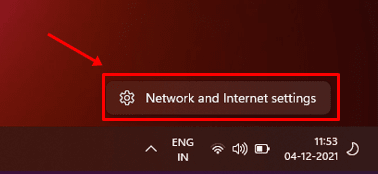
- You can press Win + I to access the settings. You can also go via right-click on the right below corner internet connection and open Network and Internet Settings.

- Then, simply click on Wi-Fi or Ethernet, whichever you are currently using.
- Now, the Wi-Fi/ethernet properties option will appear. So, simply click on it.

- After that, change the network profile from Public to Private, located under the Network profile type.


2. Enable File Sharing And Network Discovery
Now, once you have successfully changed the network profile from public to private, you need to enable file sharing and network discovery on your Windows 11 PC. So, in case you don’t know how to do this, simply follow the steps given below:
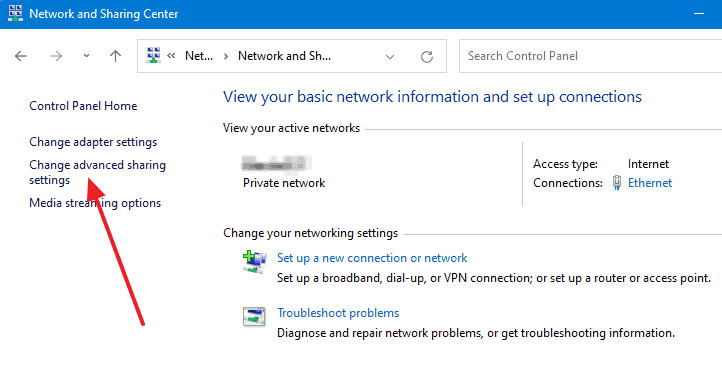
- Firstly, open the Control Panel using the Windows Search bar.
- Then, click on the Network and Internet section, followed by Network and Sharing Center.

- Now, click on the Change advanced shared settings located at the left side of the window on the next page.

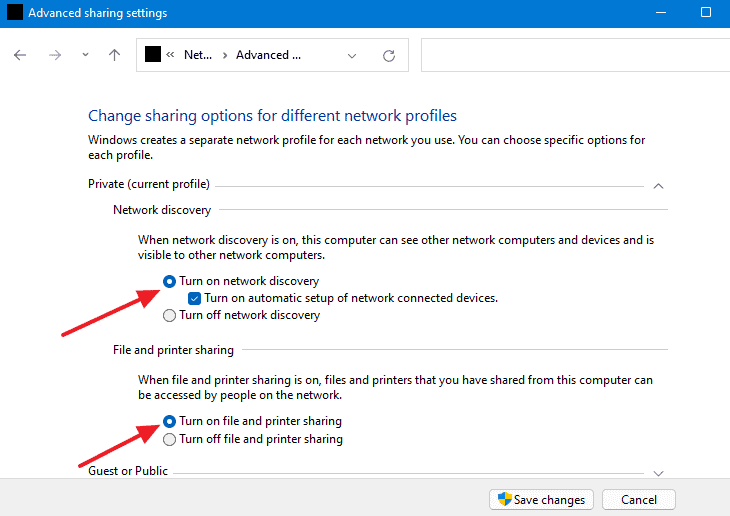
- After that, expand the Private (current profile) section and then under the Network discovery section, click on Turn on Network discovery.
- Then, select Turn on automatic setup of network-connected devices.
- Now, select the Turn on file and printer sharing option under the File and Printer sharing section.
- That’s it. Now, finally, save the changes you have made and close the control panel window.


3. Viewing Other Computers On The Same Network
We have already told you how to set the network profile to private and enable the file-sharing mode in Windows 11. So, now you can simply view other computers which are connected to the same network by following the steps given below:
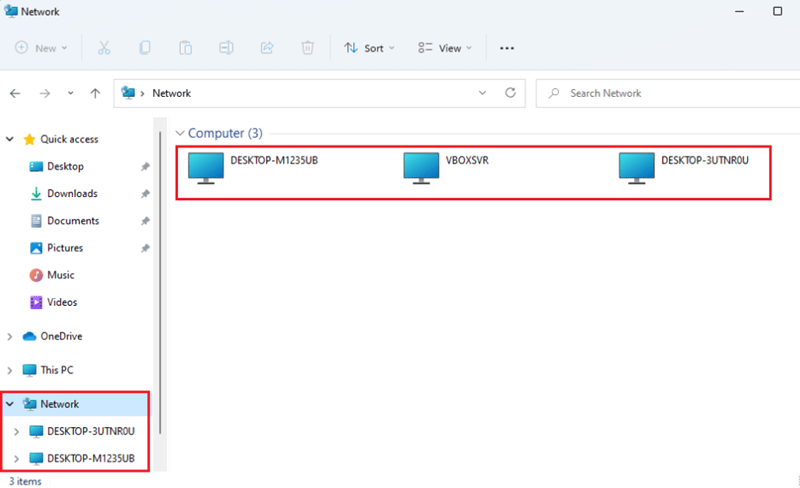
- First of all, press the Win + E to open the File Explorer.
- After that, locate and open the Network from the left sidebar on the File Explorer.

- That’s it. Now, you’ll see all the connected systems to the Network on the right-hand side of the screen.


From Editor’s Desk
So, these are some steps that you need to follow to see other computers on the Network in Windows 11. We hope you find this guide helpful. Furthermore, you can comment below if you have any other options to do the same. Also, if you are first time visiting our website, then don’t forget to check out our other latest guides.


