Sound issues in Windows aren’t always caused by a malfunctioning sound card or audio device. While this could be the case for you, it’s more likely that your sound problems are caused by software on your computer. Likewise, in Windows 11, the sound not working issue is a common problem.
Sound problems can befall for a variety of reasons. At the same time, it could be your speakers or headphones, but also your audio software or operating system, your sound card, or your driver.
Luckily, many Windows sound issues are caused by a misconfiguration, so the solution could be as simple as turning up the volume or selecting the appropriate audio device from the software you’re using.
How to Fix Sound Not Working on Windows 11 Issue
Although it is fairly simple to figure out if you don’t have any sound in Windows 11, it’s also possible that the sound only works on occasion, with specific devices, or within a specific program. Here’s how you can fix sound issues in Windows 11:
1. Check If Audio Muted / Low Volume Levels
When using Windows 11, users may think that sound is not functioning when, in fact, it is simply muted, or the volume has been turned down.
If you want to make sure your audio settings are set up properly, you may do so by simply unmuting or raising the volume. Learn the steps here.
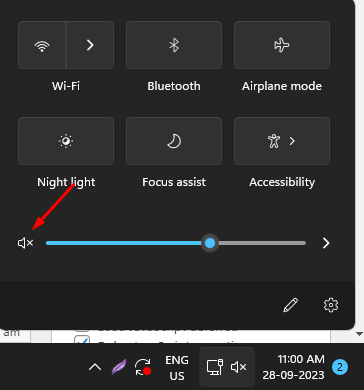
- Press the Windows + A keys to open Action Center.
- Now click on the volume button to unmute the volume.

- After that, increase the volume bar to see if the sound issue is resolved or not.

2. Fix the Sound Output
You need to choose the correct output audio source to fix sound issues on Windows. To do this, you have to follow the below steps.
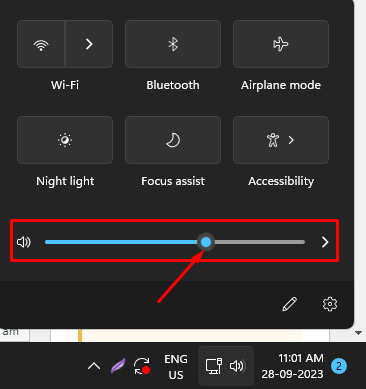
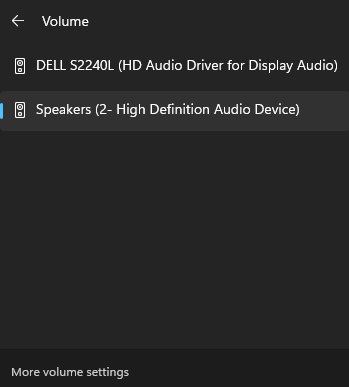
- Press the Windows + A button and click on the arrow button in from of volume.

- On the next screen, you will see all audio output sources now; choose the correct audio output.

3. Restart Your Computer
When the sound is not working on Windows 11, the simplest and most straightforward fix is to restart your computer. Some of the drivers may not be loaded properly when the system is turned on, resulting in the problem.
The drivers will have a chance to start fresh after the PC is restarted, which may resolve the audio problem.
However, the Restart should not be done in the usual way. Follow these steps to restart your computer.
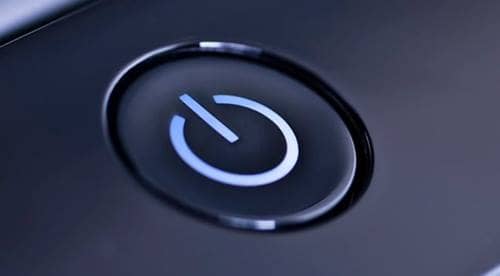
- Hold down the Power Button of your computer or laptop for around 10 seconds.

- Disconnect everything, including ethernet cables, if any.
- Now wait for 2-5 minutes and start it.
This process is known as a hard boot and is known to fix day-to-day common issues, including audio ones.
However, if this fix doesn’t seem to bring your PC’s voice back, below are more effective fixes worth giving a try.
4. Check Your Audio Device is Connected Properly
Check that your sound output device is properly connected to your computer. Check to see if the cable connection is secure. Sometimes, the USB port or the 3.5mm jack is the reason to blame for sound issues.
Further, try out with other speakers, and don’t be afraid to plug USB sound devices into different USB ports on your computer or laptop.
If your speaker, USB Port, or 3.5mm audio jack is at fault, you will be able to notice it right now. Nevertheless, if nothing seems to change, move further with the next fixes.
5. Use the Audio Troubleshooter
Windows features default troubleshooting programs to fix ongoing issues with the operating system. There are different kinds of troubleshooters built into Windows that help you solve different things. We will be using the audio troubleshooter here because our main concern is sound not working.
Follow these simple steps to run the audio troubleshooter:
- Right-click on the sound icon present at the bottom-left of your screen.

- From the pop-up menu, click on Troubleshoot sound problems.
- As soon as you click on that, a new window will appear saying Troubleshooter is detecting issues. Wait for the troubleshooter to list the issues and follow the on-screen instructions. You might need to restart your PC for the changes to take effect.


If the troubleshooter doesn’t help, you are out of luck, and now you may have to follow some advanced steps.
6. Reinstall Audio Drivers
Most PCs and laptops nowadays come with a Realtek High Definition Audio driver. However, it is still recommended that you first take a look at the motherboard.
On the other hand, if you are using a laptop, uploading your Serial Number on the laptop manufacturer’s website will give a slew of audio drivers, and you can download the best option.
Follow these steps to reinstall your PC’s audio drivers.
- Click on the Windows key, and search for Device Manager, and press Enter.
- At the top, you will find Audio inputs and outputs. Expand that by clicking the arrow next to it.

- Next, double-click on Speakers and switch to the Driver tab.
- Now click on Uninstall driver.

- Now as said earlier, you must have downloaded the audio driver from the manufacturer’s website. Proceed with the installation of the new driver.
- You might have to wait for a few minutes again, and Windows will ask you to restart your PC. Click on Restart now.


Once your computer restarts, you will be able to hear sounds like before. If not, proceed with our last fix, as that’s the final thing you could do.
7. Restart Windows Audio Service
Although it is rare, Windows Audio Service might stop working on your PC. There can be several reasons ranging from malware activities to incomplete Windows Update issues that cause this.
Follow these simple steps to restart Windows Audio Service:
- Press Windows + R together to fire up the Run dialog box and type services.msc hit enter.

- Now start scrolling down until you find Windows Audio Service.
- Right-click on Windows Audio Service, and click on Restart from the drop-down menu.

- After that, do the same thing for Windows Audio Endpoint Builder and Remote Procedure Call (RPC).
- Once you finish the above steps, make sure to restart your PC.


Now try playing an audio file and check whether the sound issue is fixed or not.
The Bottomline
Well, that’s all we have here about how you can fix the sound not working issue on Windows 11. We hope you found this guide helpful. Nonetheless, if the above fixes didn’t solve your problem, it is probably a hardware issue, and you might need to hit the service centers.


