A few months back, Microsoft’s poorly-kept secret was let out of the bag early – Perhaps intentionally. But, now as we know, they officially announce it and soon release the stable built globally. However, according to the report, the stable version of Windows 11 is not an ordinary update, but sitting through Microsoft’s dull and bug-ridden beta updates bothered us as it has many issues. But still, Microsoft isn’t aware of many of the issues.
Recently, I’ve noticed a severe issue with the OS due to which the boot speed of my PC is gradually decreasing with each new build of Windows 11. This leads my PC to slow at startup and take almost an eternity to boot up.
But, thankfully, I’ve found some tricks to fix this issue, and guess what? In this guide, I’ve mentioned all those steps that I have personally used. So, let’s hover over to the steps to fix the slow startup issue in Windows 11.
Also Read: How To Change SafeSearch Filter in Windows 11
List of Best Ways to Fix The Windows 11 Slow Startup Issue
Over the decades, Microsoft works absolutely extraordinary to provide the best experience to their users. But, this kind of issue is sometimes alarming. So, this needs to be fixed, right, but how? Let’s find out further in this guide.
1.) Update Your Windows
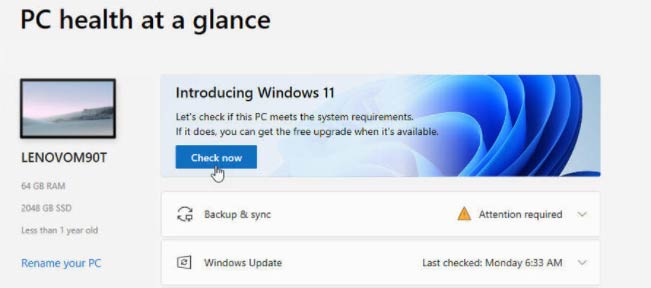
This is the very first thing that you must perform. There are chances that Mircosoft rolls out a new patch update that you may not be aware of. So, go and check out if there’s any update available. Here are the steps that need to follow to check for updates:
- Firstly, press the Win + R key to invoke the Windows setting app.
- Then, hover to the System tab and click on the Check for Updates button.

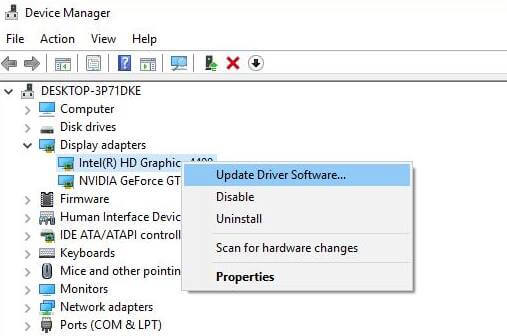
2.) Check For GPU Driver Update
Your GPU drivers also play a vital role in boosting up your System’s performance. So, it is essential to keep your GPU driver up-to-date.
- Firstly, hit the Win + X button to invoke the Quick Start Menu.
- Then, go to the: Device Manager> Display adapter> Update driver> Search automatically for drivers.

- That’s it. If there’s any update available, you must update, download, and install it.
3.) Disable Startup Programs
Another effective fix that was previously proven to resolve this type of issue. So, you may also try this once and check if it helps you fix the slow startup issue in Windows 11.
- Initially, you need to press Ctrl + Shift + Esc keys simultaneously to launch Task Manager.
- Then, switch to the Startup tab.
- After that, select the individual app or service that you wish to close.
- Finally, hit the Disable button.

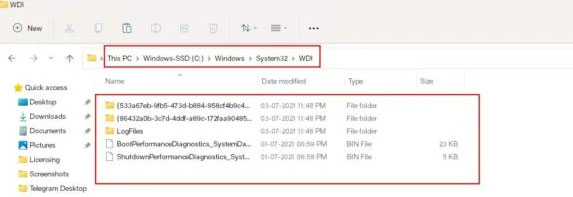
4.) Delete WDI directory Files
Many users reported previously that this method helps them to fix the startup load time issue. So, you must give it a shot. But, yeah! Be careful while deleting any WDI directory file as if by mistake you delete any wrong file, then it will cause some severe issue. So, instead of experimenting yourself, you should follow these steps:
- The first step is to open the My PC or This PC.
- Then, hover over to the Windows installation file found inside the C: Drive.
- After that, open the Windows folder and click on the System32 folder.

- Next, click on the WDI folder followed by Continue.
- Then, use Ctrl + A key combination to select all the files present inside it.
- Finally, delete them and then reboot your PC.
5.) Delete Temporary Files
The temporary files may be another option that may slow down your Windows 11 PC. So, deleting them is the best option for you to make your PC more smooth. Here are the steps that you require to follow to remove the temp files from your PC:
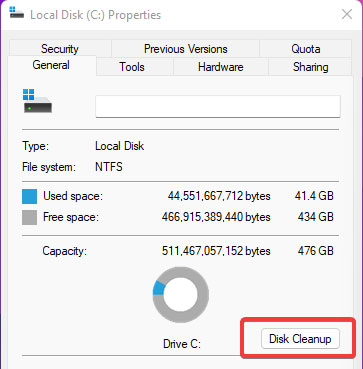
- First, open This PC and right-click on the C: drive.
- After that, select Disk Cleanup. This will scan all the junk files present on your PC.

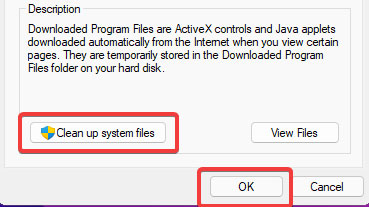
- Then, from the files to delete a section, select all the Temp files.
- After that, hit the clean-up system files button and tap on the Ok button.

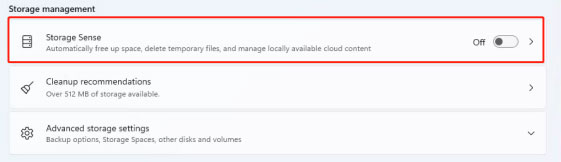
6.) Enable Storage Sense
Suppose due to partition of your Window 11 system is full, and you find it difficult to free up space to make your PC faster. So, this time Microsoft added up a new option in the Windows setting, using which it will automatically maintain your disk partition by removing the junk files from your PC. So, if you are not aware of how to enable the storage sense, follow the steps given below:
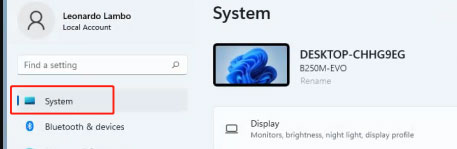
- Firstly, open the Windows Settings and click on the System tab.

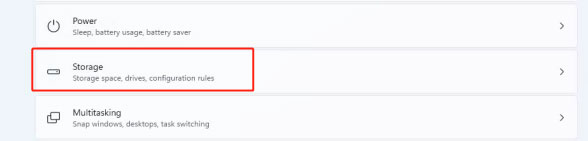
- Then, select the Storage option. This will show you the total storage space used by different categories of files in C: Drive.

- After that, click on Storage Sense to turn on this option.

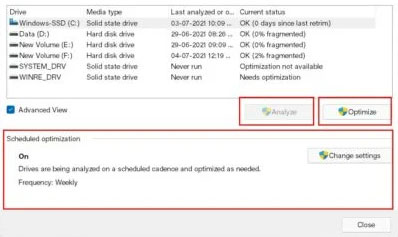
7.) Optimize Drives
Here are the steps to optimize your Windows PC Drives:
- First of all, open Windows Settings.
- Click on System followed by Storage.
- Now, select the Advanced storage settings and click on the Drive optimization.

- Thereafter, expand the Advanced View option.
- Next, hit the Analyze button. This will check if any of your selected drivers have some fragmented items.
- Now, hit the Optimize and wait until it shows the 0% fragmented status.

- You can also opt for Scheduled Optimization to automatically optimize your drives.
- Finally, reboot your PC to apply changes, and check if now your PC boot properly or not.

8.) Clear Background Running Tasks
Clearing the background running task is another option that will optimize your PC’s performance. Generally, the apps running in the background will slow down down speed of your PC as they consume a lot of resources. Therefore, killing the background process is the best choice. Here are the steps that you require to follow:
- Firstly, open the Windows Task Manager.
- Then, switch to the Processes tab and select the programs consuming a big part of your system resources.
- Finally, hit the End task button to close them all.
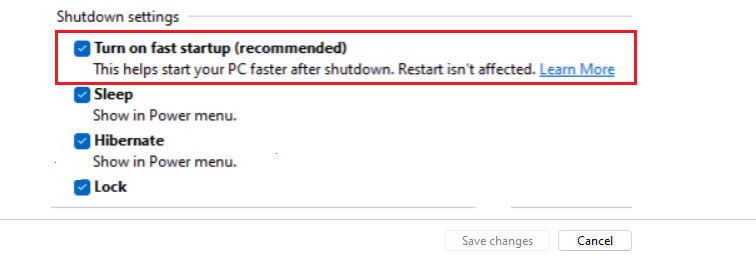
9.) Turn Off Fast Startup
This is the new feature added by Microsoft to make the boot process faster. But, it seems like this feature is currently not compatible with many devices.
So, in that case, disabling it will be the wisest choice for us. So, here are the steps to turn off the Fast startup in Windows 11
- Firstly, run the Control Panel and click on the Hardware and Sound.
- After that, select the Change what the power button does option.

- Then, in the next window, click on the Change settings that are currently unavailable.

- Finally, uncheck each box and hit the save changes button.


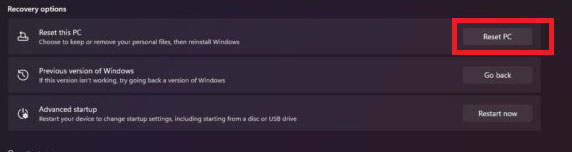
10.) Reset This PC
We regret if none of the above-mentioned methods worked for you. However, this is the last option that we recommend you follow to fix the slow startup issue on your Windows 11 PC. So, here are the steps that you need to follow to reset your Windows 11 PC:
- Initially, open the Settings app on your Windows PC.
- Now, follow the path: Windows Update > Advanced Options > Recovery.
- Then, select the Reset This PC option and hit the Reset PC.

- Finally, you’ll get two options to keep your files or remove everything on the next screen. So, select one and proceed to reset your PC.
So, these were some fixes that you can try to fix the slow startup issue on your Windows 11 PC. We hope these fixes helped you. However, if you encounter any issue regarding the same and want further assistance from us, please comment and let us know.


