In this era of innovations, the keyboard has its roots in devices that go all the way back to before electricity was mainstream. There was a period when people use to type using a typewriter. But, over time, it may be just because of business reasons keyboards are introduced that is an advanced version of the typewriter and that eventually right now dominate the world.
However, in the 90s, when Windows launched its first product, it changed the whole perception of using a keyboard. Furthermore, in the 20th century, our needs were changed.
So, Microsoft acquires this game and launches a feature in their Windows using which you can easily get an international keyboard on your Windows 10 PC. And, that’s the topic we are discussing today in this guide. So, let’s go dive into it.
Also Read- How To Fix App Process Not Closing Issue in Windows 11
How to Get An International Keyboard in Windows 10
Before we start, first let’s take a look at some exciting facts that you must know about the international keyboard. However, if you already have knowledge about this, you can hover over to the steps given down below.
Is There Any Difference Between Normal and International Keyboard?
There isn’t much difference between the regular and international keyboard layouts, but it is sometimes confusing for one who is used to the standard keyboard. Meanwhile, the placement of QUERTY keys is the same in both, but the main difference is in the Enter or Return key. Also, the ‘~‘ and ‘\‘ are different in both the regular and international keyboards.
However, in a regular keyboard, i.e., US-keyboard have a key missing that is ‘€.’ Still, there are combinations of shortcut key available using which you can easily input ‘€.’
There might be various reasons why users might want to change to the international keyboard in their Windows 10 PC. So, whatever the reason, you can simply follow the steps mentioned below and check if it helps you.
Steps To Add International Keyboard Layout in Windows 10
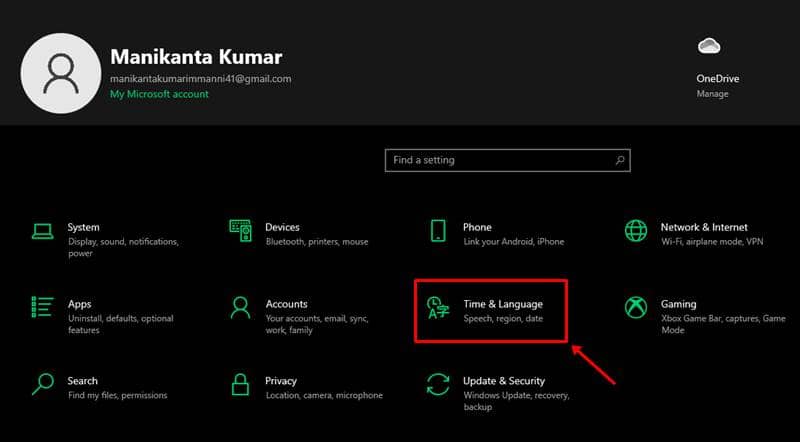
- Firstly, open the Settings > Time & Language.

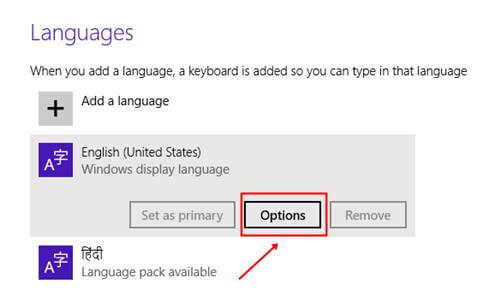
- After that, navigate to the Language.
- Now, in the Preferred languages section, click on the default language.
- Then, select the Options button.

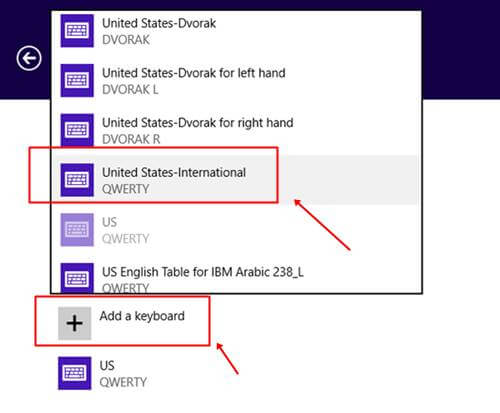
- After that, in the Keyboards section, select Add a keyboard.
- Now Choose United States – International from the list and it is all done.

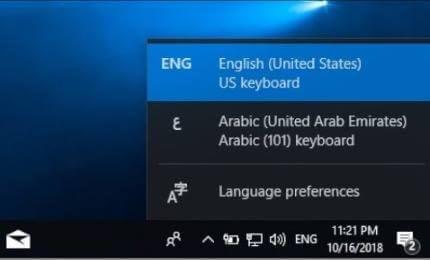
So, that’s it. Now, you can simply repeat the step 6 and 7 in order to add different keyboard layout according to your need. But now, to use this layout, you have to change it via the Taskbar. Here are the steps to make it easier for you:
- First of all, click on the Input Indicator icon located bottom right corner of the screen.

- Select the new layout that you have added.
Now, whenever you want to get back to your old layout, you can simply follow the same steps and choose your previous layout.
Enable Input Indicator:
Suppose if this Input Indicator icon does not appear in the Taskbar, then you can enable it using the steps mentioned below:
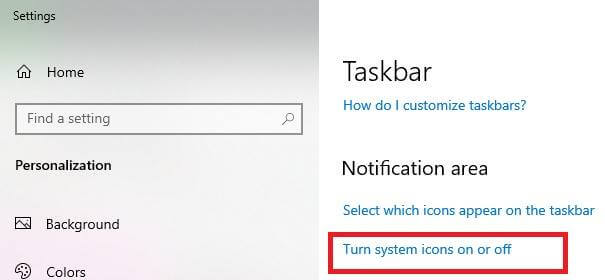
- Firstly, go to the Settings option.
- Then, select Personalization.
- After that, navigate to the Taskbar.
- Now, in the Notification area section, select the Turn system icons on or off button.

- Finally, toggle the Input Indicator button to the On position.

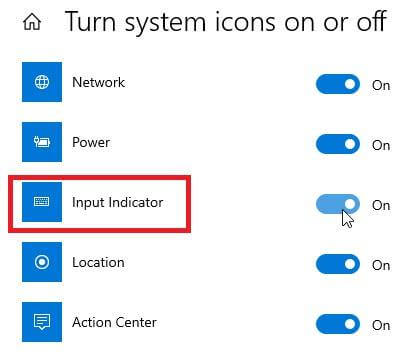
Once you follow these steps successfully, you’ll notice that the Input indicator icon is now appearing on the Taskbar. But, in case if it is still not appearing, then you can reboot your PC and check again.
So, as you can see, the given task doesn’t need any rocket science knowledge. You can do so by following the steps mentioned in this guide. We hope this guide helped you. Furthermore, if you are a new visitor, don’t forget to leave a comment in the comment box down below.


