High CPU Usage issue is one of the most known issues in the Windows operating system and it also happens in Windows 11. So when your CPU usage is high, it leads to problems like system crashes, lagging, blue screen of death, etc. So it degrades your system performance and affects your system in the long run.
It is a broad issue, so any specific reason does not cause it; there are multiple scenarios behind it. So you need to find out which is the main problem that your high CPU usage. So below, we mention different reasons. Then, you just need to apply our methods and see which one works best.
What Causes High CPU Usage in Windows 11?
A variety of other factors can cause high CPU usage. Therefore, we’ve compiled a list of the most common ones to assist you in determining the root of your problem.
- Antivirus software is overburdening the CPU.
- Malware or a virus has infected your computer.
- Using multiple high-end applications at the same time
- There are too many applications running in the background.
Multiple Ways to Fix High CPU Usage in Windows 11
As we mentioned, there are various reasons and scenarios behind this issue and you need to detect and apply a suitable fix to your Windows 11 PC. We include basic and advanced ways to solve this error, so don’t worry; you can get your solution here.
1. Restart Your Computer
First, the basic troubleshooting to this issue is to restart your computer PC because 40% of Windows errors are resolved after rebooting the computer. So if your PC is unstable or unresponsive and you cannot work, you need to apply the first fix to your PC.
You can simply press the restart button located on your CPU machine, or if you can, use your computer option so you can follow the below steps to restart your PC.
- First, click on the Start button.
- Now hold the Shift key and click on Restart.


Let your computer restart at its own pace. After Restart, you will see some improvement in CPU usage. However, if this doesn’t help, keep reading.
2. Check for Windows Updates
It is an old concept that if you are connected to the internet, there is a new update available for your Windows PC. Unfortunately, the old build cause issue like this, or Windows will force you to update your computer, so you need to fix these issues.
Follow these simple steps to update Windows:
- Click on the Start button and go to settings. Either way, press the Windows + I keys together. This will open the settings window.

- If your operating system is in dire need of an update, you will be able to find it in the top right corner. However, if that doesn’t show up, follow the next steps.

- Click on Windows Update on the left panel.
- Next, click on check for updates. If Windows finds any available update, it will begin downloading it and updating.


After installing a new update on your Windows 11 pc, your PC will be restarted and after that, most of your common issues are resolved in the new update. If updating Windows won’t fix this, let’s try another one.
3. Disable or Uninstall Third-Party Antivirus or VPN Service
Sometimes, third-party apps and software cause high CPU usage issues because they consume most CPU power and lead to high usage. Most antivirus and VPNs have multiple processes. So if you have a background running antivirus or VPN, then there may be a chance that uninstalling will fix the issue.
Follow these steps to uninstall the same:
- First, press Windows + R button to open the Run dialog box.
- In the text box, type appwiz.cpl This will open the list of installed applications.

- Now, find your third-party antivirus and VPN, and proceed with uninstallation one by one. Right-click on antivirus and tap on Uninstall option.


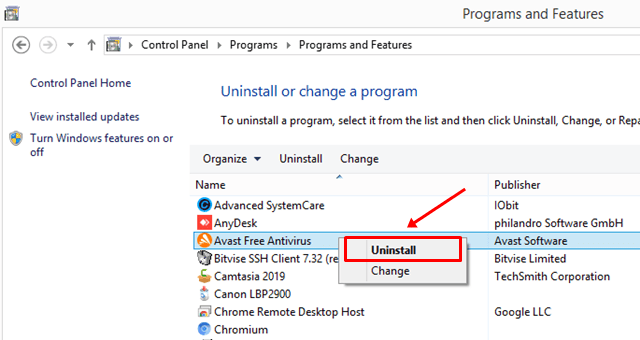
Following the uninstall, restart your system.
4. Disable SysMain Service
Superfetch or SysMain is one of the critical services running in Windows 11 that improves a PC’s overall performance by preloading apps that frequently use and load into the RAM., so sometimes it can start creating issues for some users consuming more CPU than usual.
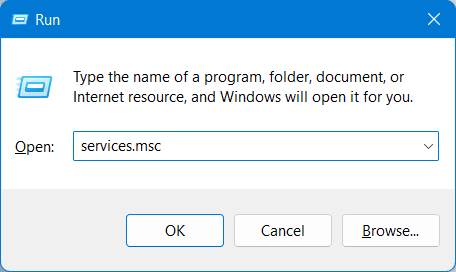
- Press Windows + R button to open the run dialog box.
- In the text box, type services.msc and hit enter.

- Now in the Services window, scroll down and find SysMain.
- Right-click on SysMain, and click on Stop.

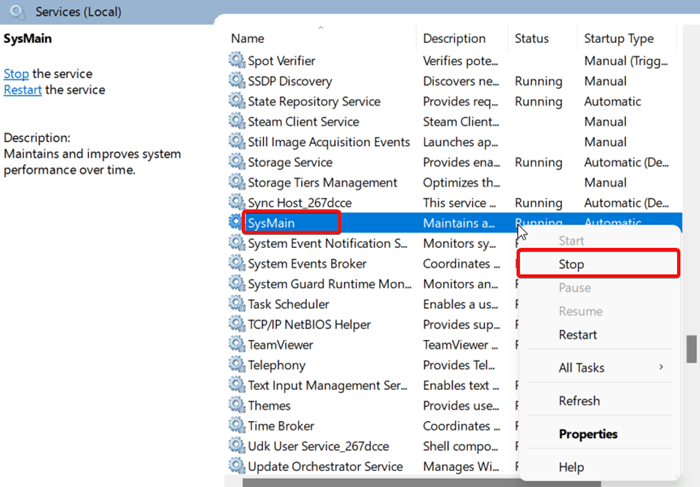
That’s it. Now restart your device and check whether the issue is resolved or not.
5. Find High CPU Consumption Program and Restart
Finding the most CPU-consuming program is very easy using Task Manager. So, if you notice any app or program consuming more resources than usual, consider restarting the app.
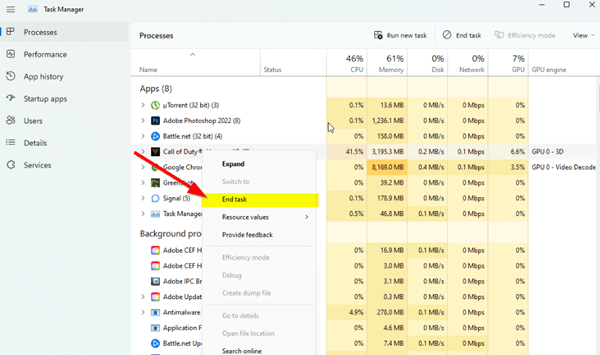
- Search for Task Manager in the Windows search bar, and Open it.

- Now find the app that consumes more CPU, right-click on it, and select End task.

- Next, open the app again.

In the last, we guarantee that After following the above fixes in this guide, you will fix Windows 11 high CPU usage. If you face any difficulty performing the above fixes, leave a comment below.


