When trying to scan documents on their PC with HP Scanner, users have encountered issues with it. Users have reported that the HP scanner stopped working on Windows 11 when they were scanning their documents with it. Issues with scanner mostly occur due to reasons like services not running, issue with the driver, issue with related software, and such.
Facing such issues isn’t something new, and if you are facing this issue then there is nothing to worry about it. There are some troubleshooting steps that we have listed in this article, that you can go for to fix the HP scanner not working in Windows 11.
Also Read- Fix Google Chrome Slow to Open on Windows 11
Fix HP Scanner Not Working in Windows 11
Given below are the steps to help you fix HP Scanner not working in Windows 11-
1. Basic Troubleshooting Steps
Before you continue with actual troubleshooting steps, you must ensure a few things. Check whether the printer or the scanner is turned on properly or not. You must also check whether all the cables connecting your scanner to your PC are connected properly.
You can also try restarting your scanner/printer as well as your PC. Also, try connecting the cable again and then check if you still face the issue. If the issue is not on the hardware end, then you are most likely to face it because of software-related reasons.
2. Run Hardware Troubleshooter
If you face the issue with the HP scanner then you should try running the hardware troubleshooter. To run the hardware troubleshooter, follow the steps given below-
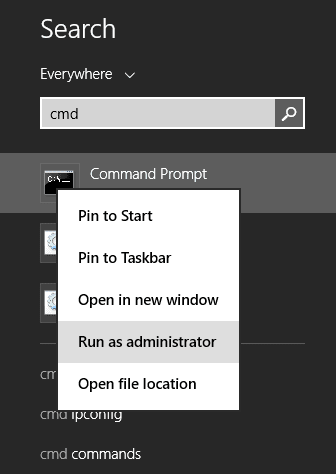
- Open Start Menu, search for CMD, right-click on it and select Run as administrator.

- In the Command Prompt, type and execute the command
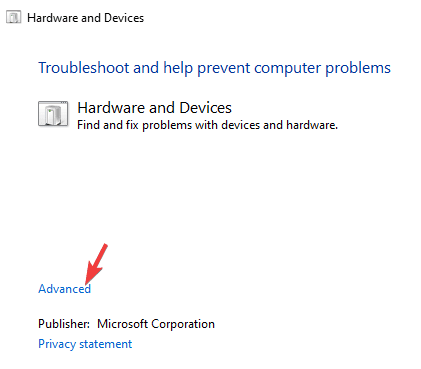
msdt.exe -id DeviceDiagnostic
- Now in the Hardware and devices troubleshooter window, click on Advanced.

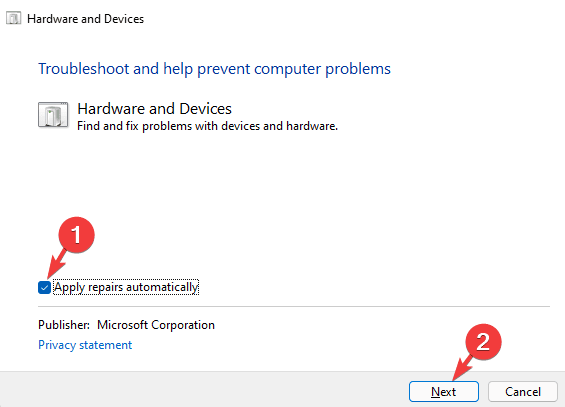
- Now, check the checkbox for Apply repairs automatically and click on Next to run the hardware troubleshooter.


3. Ensure Related Services Are Running
If you are facing an issue with the HP scanner on your PC then you must ensure that all the related services are running. To do so, follow the steps given below-
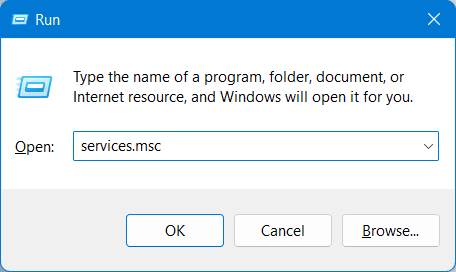
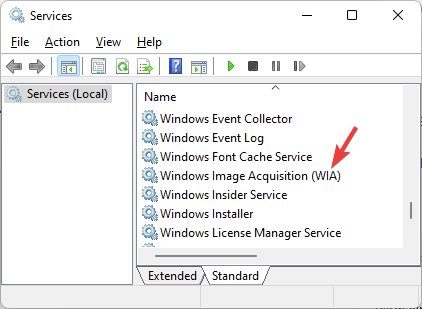
- Open Start Menu and search for Services and open it.

- Now in the Services app window, search for Windows Image Acquisition (WIA) service.

- Right-click on it, and then click on Properties.
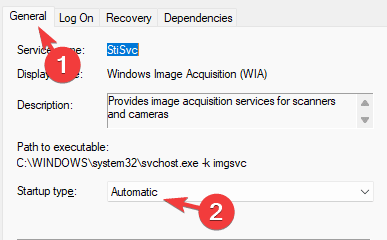
- Here, set the Startup type to Automatic and click on Start to start the service.

- Click on Apply and then on OK to save the changes.
- Do the same for DCOM Server Process Launcher, Remote Procedure Call, RPC Endpoint Mapper, and Shell Hardware Detection services.
- After you have done the changes, restart your PC and then check if you still face the issue or not.
4. Run Scanner in Compatibility Mode
Another thing that you can try doing is running the HP scanner in compatibility mode. You can do so by following the steps given below-
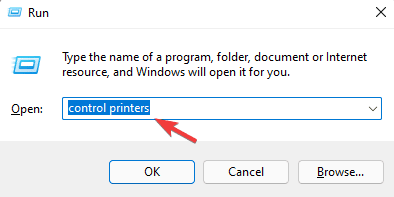
- Press the Windows + R key combo. In the run dialog box type Control Printers and click OK to open it.

- Now, right-click on the HP scanner in the Devices and Printers window, and then click on Properties.

- Head to the Compatibility tab in the Properties window.
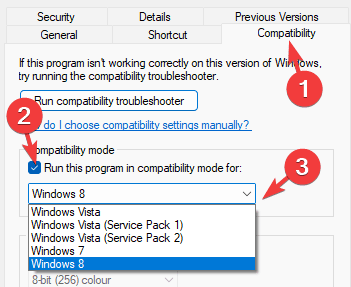
- Here, check the checkbox for Run this program in compatibility mode for.

- Now, from the drop-down menu, select any older version of Windows, preferably Windows 7 or Windows 8.

5. Update Scanner Driver
You may also face this issue due to an outdated scanner driver. Try updating the scanner driver and then check if you still face the issue or not. To update the scanner driver, follow the steps given below-
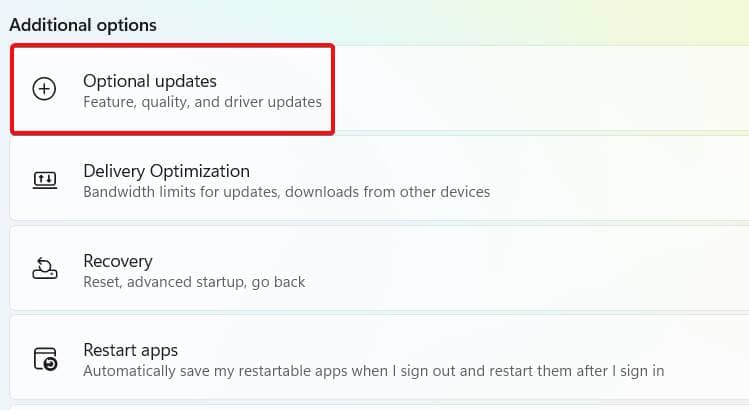
- Open the Settings app on your PC by pressing the Windows + I key combo.
- In the Settings app, head to the Windows Update section from the left sidebar.
- Here on the right side, click on Advanced Options and then on Optional Updates.


- Next, click on Driver Updates.
- Now, download and install the driver updates for the HP scanner and restart your PC.


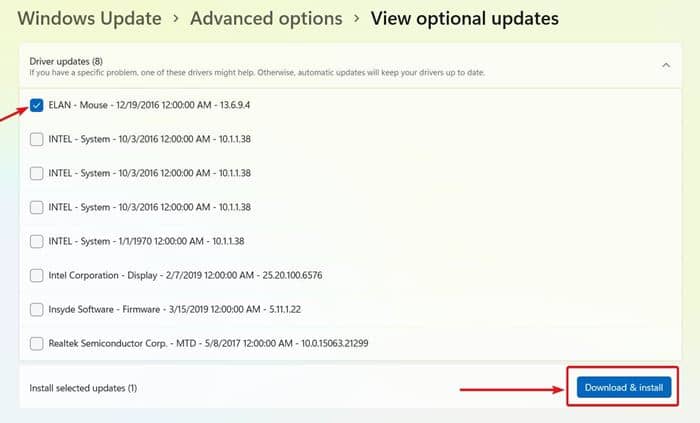
This should most probably fix the issue. You can also manually download the HP scanner driver from the official webpage of the HP and install it on your PC.
6. Reinstall HP Scanner
If you still face the issue with the HP scanner, then you can try reinstalling the HP scanner. Given below are the steps to reinstall the HP scanner on your PC-
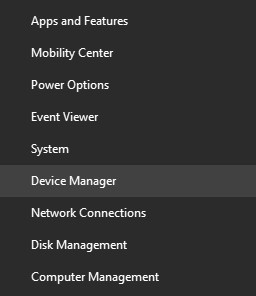
- Press the Windows + X key combo and click on Device Manager.

- Expand the Print Queues section by double-clicking on it.
- Here, select your HP scanner. Right-click on it, then click on it and then click on Uninstall Device.

- Click on Uninstall to confirm uninstalling the device.
- After uninstalling the device, restart your PC.
- Now, download and install the latest HP scanner driver and try using the scanner again.

Final Words
If you are facing issues with the HP scanner then this article will help you with it. We have discussed some troubleshooting steps to help fix the HP scanner not working in Windows 11.


