Telnet is a client application server program that is also a standard TCP/IP protocol. This program is used for virtual terminal protocol service. However, in the easy word, if we explain the Telnet, it basically enables the substantiation of a connection to a remote system so that the local terminal resembles a terminal at the remote system.
It is enabled or installed by default on Windows PC. But, many users recently reported that the Telnet feature is missing after they updated to the latest Windows 11 patch. Well, that’s why we are here with our latest guide in which we explain to you the different methods to install the Telnet on your Windows 11 PC. So, let’s get started.
Also Read: How to Open an EPS Image File in Windows 10/11
What Are The Different Methods That You Can Use To Install Telnet on Windows 11?
By using various methods, you can install the Telnet service on your Windows 11. But, here in this guide, we have mentioned some of the best and easiest ways to do so. Therefore, make sure to follow them.
#1 Method: Enable It On Your Windows 11 PC
It might be possible that you have the Telnet, but it is not enabled by default on your PC. So, in that case, you need to enable it from the control panel. So, in case you don’t know how to do it, follow the steps mentioned below:
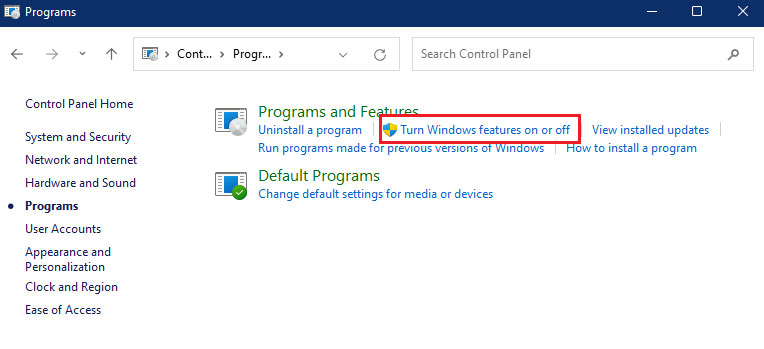
- Firstly, go to the start menu and search for Control Panel. Then, open it.
- Then, go to Programs and click on Turn Windows Features On or Off option.

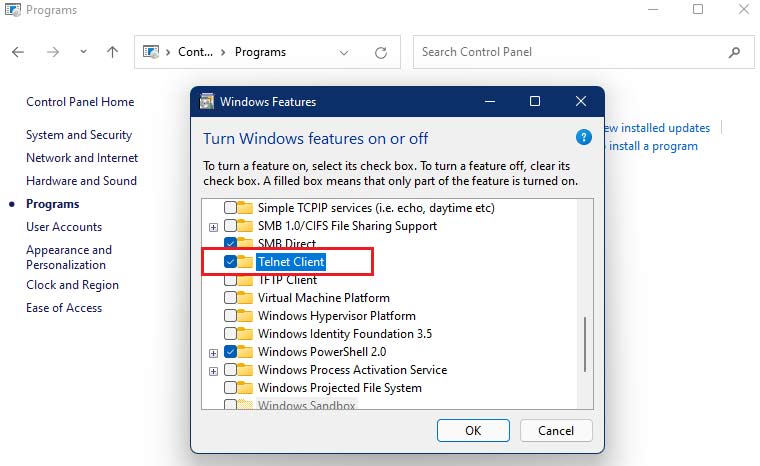
- A windows feature list will appear; from that list, select the Telnet Client and hit the Ok button. That’s it. Now, open the Command Prompt and start using the Telnet.

#2 Method: Use PowerShell to Install Telnet
Now, this is also an easy method like a command prompt. So, in this method, you have to run the PowerShell with admin rights. The method is the same as you followed in method 2, but instead of searching Cmd, search for Powershell. However, once you run it as administrator, use the command given below and hit enter key:
Install-WindowsFeature -name Telnet-Client
#3 Method: Install Using Command Prompt
To install Telnet using the command prompt, you must first search for the command prompt in the windows search bar and open it as an administrator. After that, use the command and hit enter key: 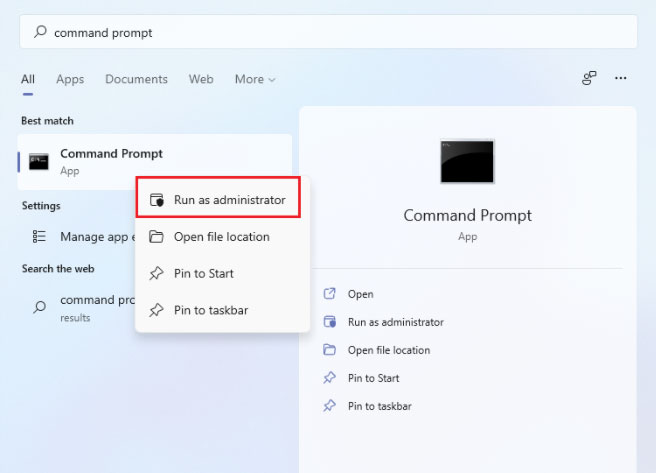
dism /online /Enable-Feature /FeatureName:TelnetClient
How We Use Telnet?
There is three-way of using the Telnet, i.e., default, character, line mode. However, in default mode, the client sends only one line to the server and waits for the go-ahead (ga) character before accepting a new line from the user.
On the other hand, in the character mode, the client sends only one character at a time to the server. Now, talking about the line mode, the client sends one line at a time to the server, but there is no need to wait for the go-ahead signal before sending the other one.
Now, how do you use the Telnet? You can use the Telnet in various activities such as Editing files, Running various programs, checking emails, etc. However, some servers enable remote connection using Telnet to access the public data to play games or give you a weather report, etc.
So, these are some methods that will help you install the Telnet on your Windows 11 PC. We hope you find this guide helpful. Meanwhile, if you know of any other method, please let us know in the comment section.


