If you want to use Linux on your PC without making a dual boot setup on your hardware, then you can do it through Windows Subsystem for Linux. WSL is a feature of Windows 11 that allows users to run Linux Distros on compatible hardware without any hassle. WSL basically kills the need for a traditional virtual machine as well as a dual boot system.
With WSL, you can not only run the Linux Distro but also use most of the tools, apps, and utilities provided by the OS. By default, it is disabled on all systems, and you will have to install Windows Subsystem for Linux on Windows 11. Let’s go through all the ways in which you can do it.
Ways to Install Windows Subsystem for Linux
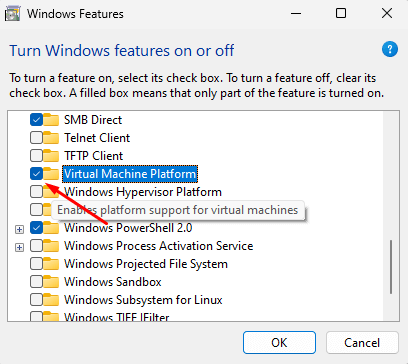
WSL allows you to run Linux Distro on your Windows PC. There are multiple ways to install Windows Subsystem for Linux, but before we discuss the steps, you must enable the Virtual Machine Platform on your PC. To enable it, follow the steps given below-
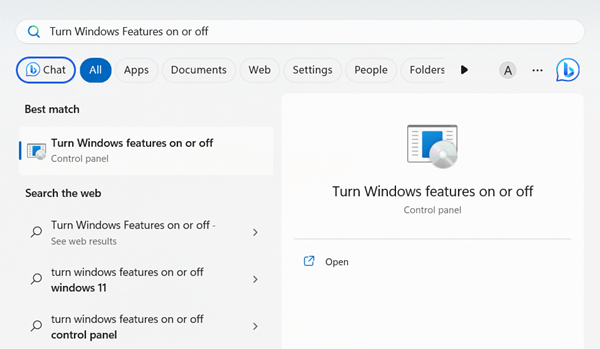
- Open the Start Menu, search for Turn Windows Features On or Off and press Enter.

- Now, check the checkbox next to Virtual Machine Platform.
- Once done, click on OK.

- You will be asked to restart your PC to save the changes.
Once you have enabled the Virtual Machine Platform, you can follow the different methods given below to install Windows Subsystem for Linux on Windows 11-
1. Through Command Prompt
The first way to install WSL on Windows 11 is through the Command Prompt. To do so, follow the steps given below-
- Press the Windows key, and type CMD in the Start Menu. Right-click on the Command Prompt and then click on Run as Administrator.
- When the UAC prompt appears on your screen, click on Yes.
- In the CMD window, type and execute the following command-

-
wsl –install
-
- After executing the above command, close the Command Prompt and restart your PC.
- This will install WSL on your PC.

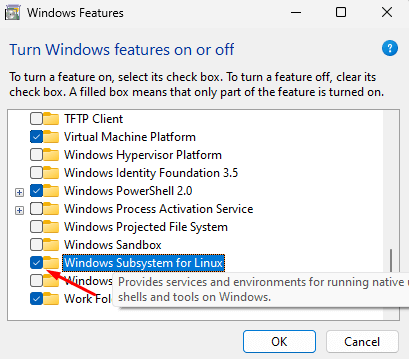
2. Through Windows Features
Another way to install Windows Subsystem for Linux is through the Windows Features. Here’s how to do that-
- Open the Start Menu, search for Turn Windows Features On or Off, and open it.
- Here, search for Windows Subsystem for Linux, and check the checkbox next to it.
- Click on OK once you are done with the above changes.

- After this, restart your PC to save the changes and complete the installation process.
3. Through Microsoft Store
You can also install the WSL through the Microsoft Store. To do so, follow the steps given below-
- Open the Microsoft Store from the taskbar.
- Now, in the Microsoft Store, click on the search icon at the top search for Windows Subsystem for Linux, and open it from the search results.
- Now, click on the Get button.
- You will get a UAC prompt; click on Yes.
- Once done, this will start downloading the WSL on your PC and it will be installed on your device.
Ways to Install Linux Distro on Windows 11
Once you are done with installing the WSL on your system, you can continue with installing the Linux Distro. You can install Linux Distro on your Windows PC through the Command Prompt or the Microsoft Store.
1. Through Command Prompt
If you want to install Linux Distro on your Windows PC through Command Prompt, then follow the steps given below-
- Press Windows + R, type CMD in the run dialog box and press Ctrl + Shift + Enter keys together.
- In the CMD window, execute the following command-
-
wsl --list --online
-
- This will list all the Linux Distro that you can install on your Windows PC.
- After this execute the command given below to install the Linux Distro-
-
-
wsl --install -d DISTRO-NAME
-
Note- In the above command, replace DISTRO-Name with the name of the Linux Distro you want to install.
2. Through Microsoft Store
You can also install the Linux Distro from the Microsoft Store after you have enabled WSL. To do so, follow the steps given below-
- Press the Windows key, and click on the Microsoft Store to open it.
- Now, using the search bar at the top, search for the Linux Distro you want to install. For instance, Ubuntu.
- Click on the relevant Linux Distro from the search results, and then click on Get to install it.
How to Update WSL Kernel?
If you want to update the WSL kernel to the latest version, then you will be able to do it by following the steps given below-
- Click on the Start icon, search for Command Prompt, and run it as administrator.
- Type the command given below and press Enter to execute it-
-
wsl –update
-
- This will download and install the latest WSL kernel update on your system.
Bottom Line
As discussed, there are several ways to install Windows Subsystem for Linux on Windows 11. You can continue with any of the methods listed above to get WSL. Also, we have listed the steps to get Linux Distro on Windows; you can follow the steps to install Linux Distro after you have installed WSL on your system.


