Security is such a thing which has become very important in today’s world. But, day by day, we are surrounded by heinous violations like cybercrime, hacking, malware attack, etc. So to solve this issue, Microsoft in 2006 introduced Windows Defender, which stands like a wall to protect our data and privacy.
However, there’s another feature called Windows Security Application. It keeps track of our activities and sends them directly to Microsoft to enhance our data security. It is not an antivirus or anti-malware; it’s just an application that collects the data from Windows defender and sends them to Mircosoft itself.
But, recently, many users complained that after the new build of Windows 11, the Windows Security application started crashing or freezing. After investigation, our team found some fixes for this issue, and all of them are mentioned in this guide. So, let’s take a look at them.
Also Read: How To Turn On/Off Keyboard Autocorrect on Windows 11
Best Methods to Reset Windows Security Apps in Windows 11
Here We Have Three Methods using which you can reset your Windows Security apps in Windows 11. So, it’s upon you which method you find more convenient. So, let’s get started with our first method:
#1. Reset Via Command Prompt
The first method you can try is via command prompt. If you think this requires good knowledge to perform, you are wrong because doing this is so easy. You require to follow the given steps:
- First of all, press the Win + R altogether to open the Run dialog box.
- Now, type CMD and hit Enter. This will open the command prompt on your screen.
- That’s it. Now, use the command given below:
PowerShell -ExecutionPolicy Unrestricted -Command "& {$manifest = (Get-AppxPackage *Microsoft.Windows.SecHealthUI*).InstallLocation + '\AppxManifest.xml' ; Add-AppxPackage -DisableDevelopmentMode -Register $manifest}"
So, that’s it. Now, this will reinstall and re-register Windows Security App on your Windows 11 PC. However, if this method won’t work in your case, then you can try out the other method.
#2. Reset From Start Menu
This method is the simplest method, but it will surely help you reset it if you don’t know how to use the start menu. Follow the steps given below:
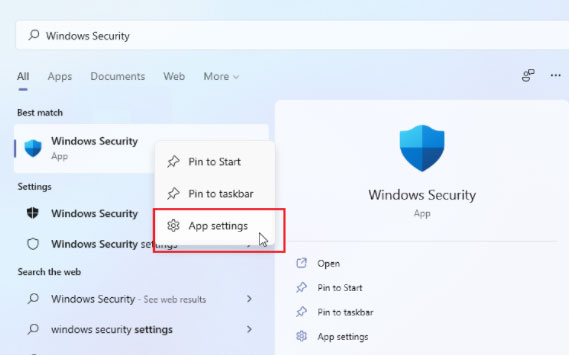
- First of all, hover over to the Windows Start menu and search for Windows Security.

- Then, right-click on it and go to More.
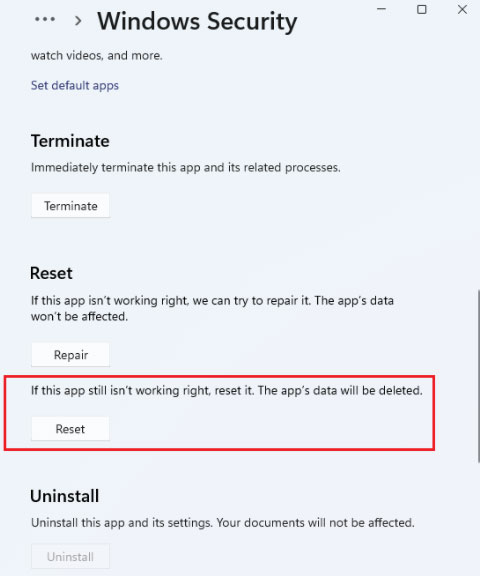
- Now, head towards the App settings and hit the Reset button.

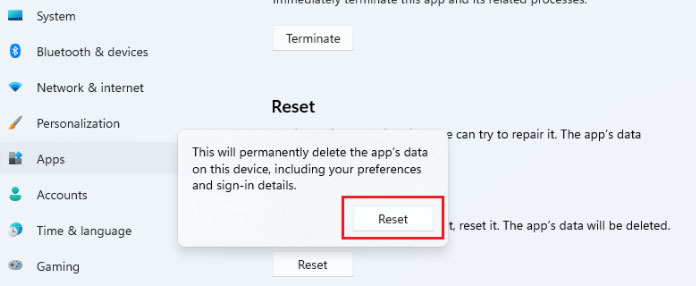
- Finally, if prompted, then hit the Reset button again.

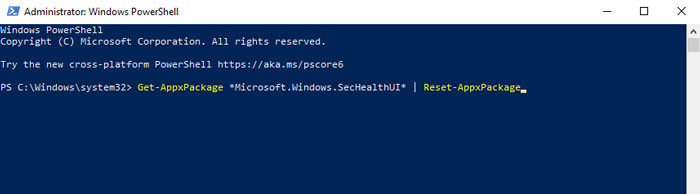
#3. Reset Via PowerShell
Suppose the command prompt doesn’t work in your case, then you can rely on this method. And here are the steps that you require to follow:
- Initially, press and hold the Windows key + X. This will pop-ups the Power User Menu.
- After that, press the I button to launch PowerShell.
- Now, finally, execute the command below in the PowerShell:
Get-AppxPackage *Microsoft.Windows.SecHealthUI* | Reset-AppxPackage

So, these are some methods that you need to follow if you want to reset your Windows Security application on your Windows 11. Of course, we hope you are now successfully able to reset it. Meanwhile, if you have any other method that helps our viewers do this, please share it with us in the comment section.


