Microsoft is enhancing its operating system day by day and adding more functionalities. However, some features came a long way and helped users the most. Today, we will discuss the CHKDSK (Check Disk) feature that enables users to check file system errors.
You can find this feature on almost every windows OS. You know there are situations when you face hard drive issues that need to repair or diagnose. If not, that creates a total mess and causes hardware damage. Most of the drives come with their own utility tool, but if you are using an old drive, you can use this guide to scan your hard drive for bad sectors and make necessary fixes to your drive.
You can perform check disk with various methods. We listed two ways to use windows explorer the easiest way and the other is to use a command-line interface. You can choose as per your need. Without wasting time, let’s jump into the steps.
Also Read- How to Allow App Through Firewall in Windows 11
Best Ways to Use Disk Error Checking in Windows 11
Disk Error Checking, also known as CHKDSK utility, helps you to resolve your hard drive errors such as bad sectors, file system errors, lost clusters, etc. So below, we demonstrate methods that anyone can use, whether tech-savvy or not.
1. Run CHKDSK Using File Explorer
The first and easiest way to use the CHKDSK utility is using file explorer because you can perform all the procedures in a graphical interface that could be easy for anyone. Let’s check out the steps.
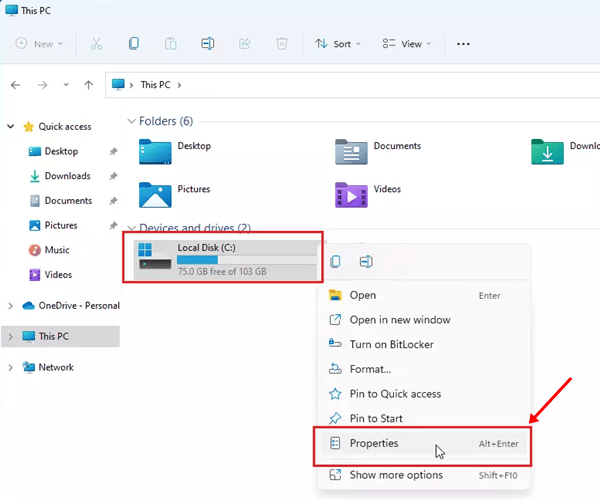
- Click on This PC or you can also use the Windows + E key to open windows file explorer.
- Locate the Local Disk (C:) drive and right-click on it and go to Properties from the menu.

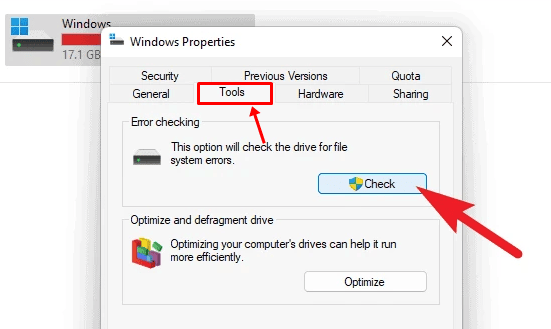
- After that you will see a pop-up window of Local Disk (C:) properties, Now go to Tools Tab.
- Now you need to click on Check Button under Error-checking.

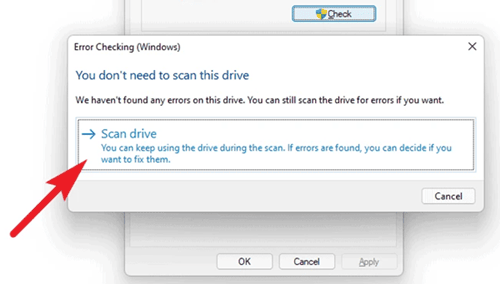
- on the next prompt, you need to click on Scan Drive to begin scanning the drive and fix your file system errors.

You can alternatively use Check Disk Utility using the command prompt. If You are tech-savvy and familiar with the command prompt in windows, then this method looks easier for you. Let’s check it out.
2. Run CHKDSK Using Command Prompt
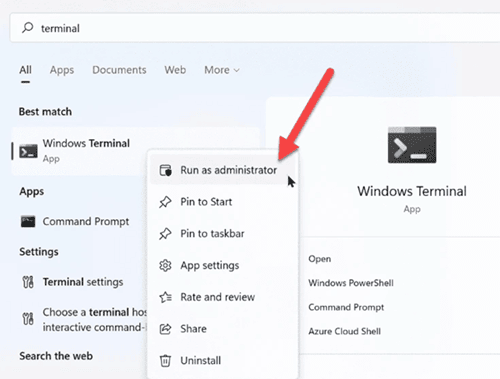
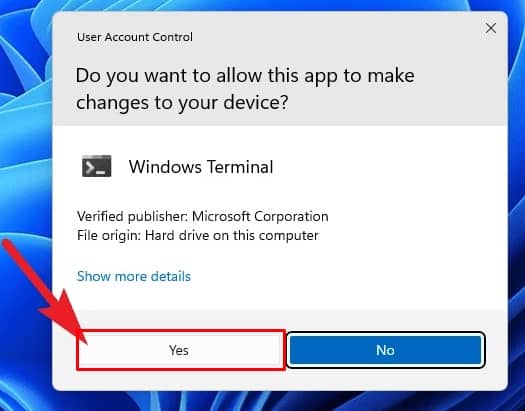
- Click on the Start Menu and type Windows Terminal in the search bar and open it with admin privileges.

- After you will see a pop-up of the UAC (User Account Control) window where they will ask you admin details. if you are logged in to admin account you need to simply click on Yes.

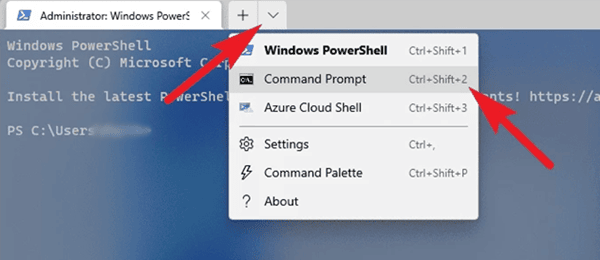
- Now windows terminal will open and click on the drop-down menu button above from the terminal windows and click on Command Prompt.

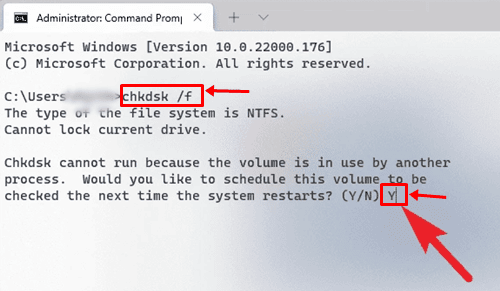
- Aftre that type chkdsk /f and hit enter.
- Next, you may see the message to schedule CHKDSK procedure to the next boot because the drive can not be in use while using this tool. so there are two options of Y & N. Type Y and hit the enter button to reboot.

- When your PC restarted, it will check for all disk and file system errors for your drive and fix them.
That’s all from our side. I hope these methods will help you resolve your file system errors, bad sector and lost clusters errors. If you still face any problem after disk error checking, let us know in the comments, so we can find your solution and post a guide on it.


