When you launch or run any program in Windows 10/11, it runs it with normal priority. Here normal priority means standard resource allocation, especially on the CPU side. However, Windows provides an option to change the priority for any program if you want.
Setting priority for programs makes it run a bit faster because it’s being prioritized for resource usage. However, there are certain disadvantages to doing it. Because Windows’ core system files may not get enough resources, rendering your system unstable.
You can only use it when you need to put all system power into one task like gaming, coding, etc. If the system became unstable, you could revert with a reboot or force close. Let’s jump into the guide to run windows programs at a higher priority.
Steps to Run Windows Programs at Higher Priority (Windows 10/11 Edition)
There are plenty of ways in windows which you can use to offer a high CPU and memory to a specific process. Most of the time, we use to run the program at high priority when we play games or do some dedicated task to put all the system power in one process.
Method 1: From the Task Manager
This method can be used to switch the priority of any open app in the foreground.
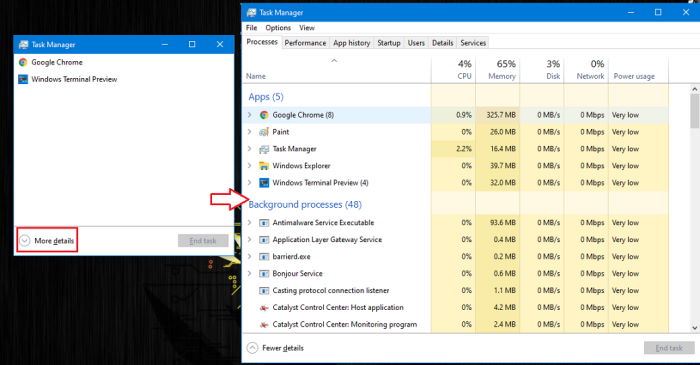
- Open Task Manager (Press Ctrl + Shift + Esc for opening it quickly).
- Click on More Details if you see only fewer items. Now you should check the list of Processes.

- Right-click on the process you wish to change the priority and click on Go to Details.

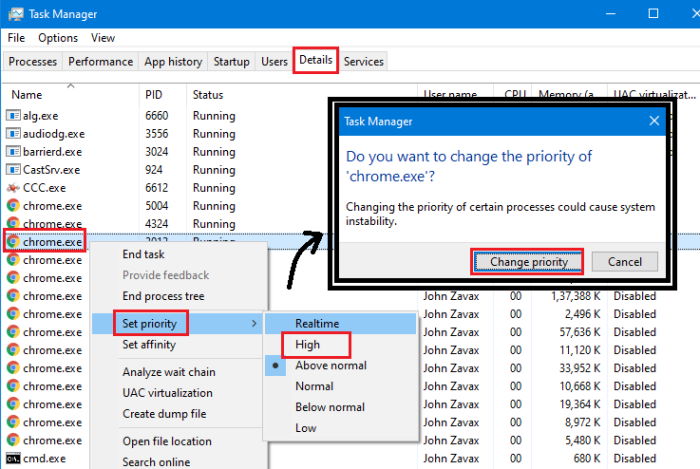
- Now it should take you to the Details tab for the process.
- Right-click on the process and click on Set priority and select the required priority for the process.

- You can choose High or Realtime to set it to the highest priority.

That’s how you set priority for a Windows Program. Although using this method is not permanent. You have to set the importance each time you re-open the app. However, there is another method that can help you to achieve the same automatically.
Also Read- Best Task Manager Alternatives for Windows
Method 2: From the Command Line
Now you can achieve the same using the command line. However, we are discussing launching the program with the highest priority here rather than switching it later.
Follow these steps to achieve it:
- First, open a command prompt as admin if the process requires admin rights.
- Type in the following command:
start "" /PriorityLevelName "Full path of application file" - Here replace /PriorityLevelName with the priority you want, and replace the “Full path of application file” with the full path of the file application you are about to launch. Then, you can right-click on the app from the start and click on Open file location to get the location info for the app.
- For example, if you’re about open Chrome with priority level “High,” this would be the command for it:
start "" /High "C:\Program Files (x86)\Google\Chrome\Application\chrome.exe
Now you can create a .cmd or .bat file to execute this command with a click to save some time.
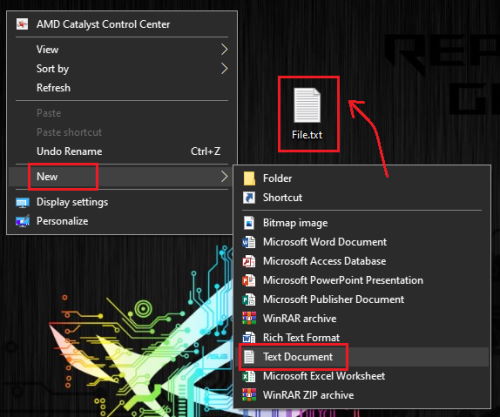
- Right-click on the empty space where you would like to create the file.
- Click on New > Text Document and give it a name of your choice.

- Now paste in the command mentioned above and save the file.
- Rename the file from file.txt to file.cmd or file.bat

- Finally, double-click on the file, and you can start the program with the specified priority.

Note: You cannot change file extensions unless you’ve enabled the option “File extensions” under View options in File Explorer.
From Editor’s Desk
As you can see, running programs in Higher priority is beneficial and easy to do. These steps will help you to save some time. Although running specific programs with higher priority can cause system stability-related issues.
So, be aware of that and do not set priority to any process unless it’s necessary. Then, however, you can give it a try.


