Nothing is more frustrating than facing the “Sorry, this Adobe app is not available” error on an Adobe app, especially when your creativity is about to transform into a significant craft. Like you, many other Adobe users facing the same issue while they are about to use any Adobe app.
The error could appear for several reasons, such as an outdated app or a poor internet connection. Whatever the cause, you don’t need to worry; we’ve found some ways to fix the issues. By applying these methods, you can use the Adobe app once again.
Why “Sorry, this Adobe app is not available” Error Appearing
Adobe app loading errors can appear for many factors. Here are some of them we’ve discovered.
- If you’ve not updated the Adobe app, you could see the error very often.
- Poor or bad internet connection can lead to this problem.
- The firewall or antivirus settings may interfere to block the Adobe app.
- If you don’t have valid license keys.
How to Fix “Sorry, this Adobe app is not available”
Even though the problem may seem overwhelming for general users, leaving them clueless about what to do, there are some workarounds that general users can perform. Here are some common fixes.
1. Some General Fixes
Before moving down to advanced troubleshooting methods, you should perform some of the effective general and basic fixes.
Restart Your System
Restart is a comprehensive solution to various problems within your system and apps. So restart your system and check whether the Adobe app is working or not.
Check Internet Connection
A poor internet connection will prevent you from opening the Adobe app and other apps. Using Speedtest, you can check that you have a stable internet connection with enough bandwidth speed.
Update the Adobe App
Outdated apps are not recommended. Because of outdated apps, your Adobe app may face compatibility issues. To fix this, you should update your Adobe app.
Reinstall Adobe App
Even after updating Adobe, some users are still stuck in the same situation. Therefore, you should reinstall the particular Adobe app.
If these basic methods don’t work for you, the time has come to apply advanced troubleshooting methods.
2. Edit the Host File on Your System
Generally, we don’t need to edit host files. Even some of us don’t know what’s that. However, editing host files may come in very handy to fix sorry, this Adobe app is not available. Let’s see what you’ve to do.
For Windows
- First, close all Adobe apps if you’ve opened any, and open File Explorer.
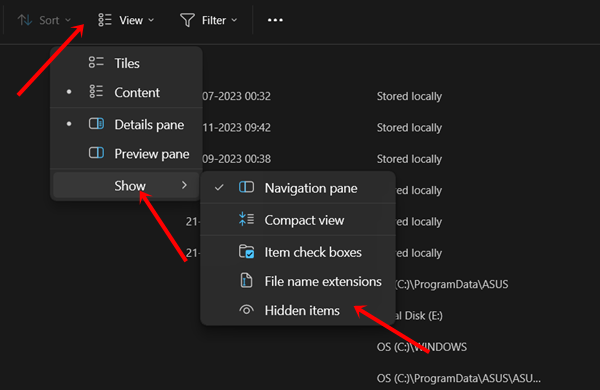
- Then from the menu bar click on View > Show > Hidden items.
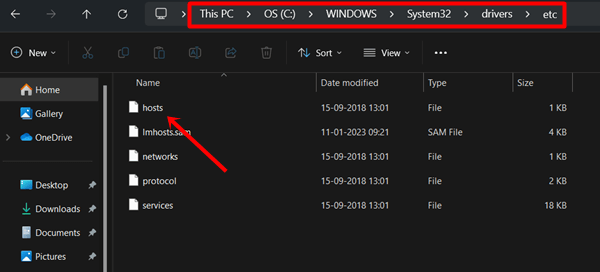
- Follow the below path:
C:\Windows\System32\drivers\etc
- Here you have to double-click on Hosts.
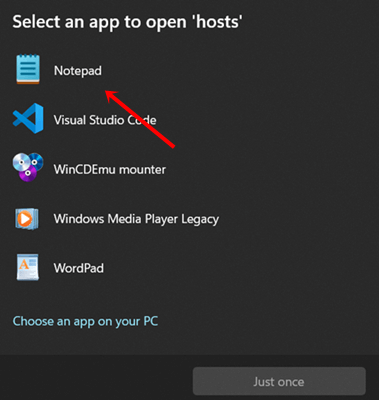
- Then choose Notepad. The system’s host files will be opened to edit.
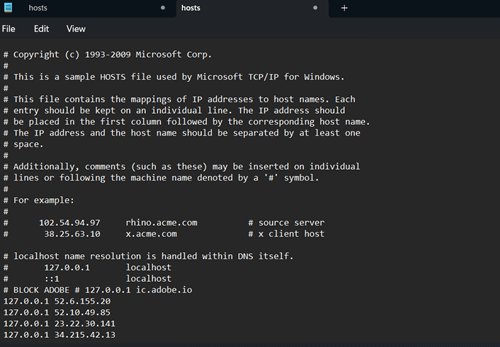
- Next, copy these shared IP addresses, paste them on host files, and save the file.
# BLOCK ADOBE #
127.0.0.1 ic.adobe.io
127.0.0.1 52.6.155.20
127.0.0.1 52.10.49.85
127.0.0.1 23.22.30.141
127.0.0.1 34.215.42.13
127.0.0.1 52.84.156.37
127.0.0.1 65.8.207.109
127.0.0.1 3.220.11.113
127.0.0.1 3.221.72.231
127.0.0.1 3.216.32.253
127.0.0.1 3.208.248.199
127.0.0.1 3.219.243.226
127.0.0.1 13.227.103.57
127.0.0.1 34.192.151.90
127.0.0.1 34.237.241.83
127.0.0.1 44.240.189.42
127.0.0.1 52.20.222.155
127.0.0.1 52.208.86.132
127.0.0.1 54.208.86.132
127.0.0.1 63.140.38.120
127.0.0.1 63.140.38.160
127.0.0.1 63.140.38.169
127.0.0.1 63.140.38.219
127.0.0.1 wip.adobe.com
127.0.0.1 adobeereg.com
127.0.0.1 18.228.243.121
127.0.0.1 18.230.164.221
127.0.0.1 54.156.135.114
127.0.0.1 54.221.228.134
127.0.0.1 54.224.241.105
127.0.0.1 100.24.211.130
127.0.0.1 162.247.242.20
127.0.0.1 wip1.adobe.com
127.0.0.1 wip2.adobe.com
127.0.0.1 wip3.adobe.com
127.0.0.1 wip4.adobe.com
127.0.0.1 3dns.adobe.com
127.0.0.1 ereg.adobe.com
127.0.0.1 199.232.114.137
127.0.0.1 bam.nr-data.net
127.0.0.1 practivate.adobe
127.0.0.1 ood.opsource.net
127.0.0.1 crl.verisign.net
127.0.0.1 3dns-1.adobe.com
127.0.0.1 3dns-2.adobe.com
127.0.0.1 3dns-3.adobe.com
127.0.0.1 3dns-4.adobe.com
127.0.0.1 hl2rcv.adobe.com
127.0.0.1 genuine.adobe.com
127.0.0.1 www.adobeereg.com
127.0.0.1 www.wip.adobe.com
127.0.0.1 www.wip1.adobe.com
127.0.0.1 www.wip2.adobe.com
127.0.0.1 www.wip3.adobe.com
127.0.0.1 www.wip4.adobe.com
127.0.0.1 ereg.wip.adobe.com
127.0.0.1 ereg.wip.adobe.com
127.0.0.1 activate.adobe.com
127.0.0.1 adobe-dns.adobe.com
127.0.0.1 ereg.wip1.adobe.com
127.0.0.1 ereg.wip2.adobe.com
127.0.0.1 ereg.wip3.adobe.com
127.0.0.1 ereg.wip4.adobe.com
127.0.0.1 ereg.wip1.adobe.com
127.0.0.1 ereg.wip2.adobe.com
127.0.0.1 ereg.wip3.adobe.com
127.0.0.1 ereg.wip4.adobe.com
127.0.0.1 cc-api-data.adobe.io
127.0.0.1 practivate.adobe.ntp
127.0.0.1 practivate.adobe.ipp
127.0.0.1 practivate.adobe.com
127.0.0.1 adobe-dns-1.adobe.com
127.0.0.1 adobe-dns-2.adobe.com
127.0.0.1 adobe-dns-3.adobe.com
127.0.0.1 adobe-dns-4.adobe.com
127.0.0.1 lm.licenses.adobe.com
127.0.0.1 hlrcv.stage.adobe.com
127.0.0.1 prod.adobegenuine.com
127.0.0.1 practivate.adobe.newoa
127.0.0.1 activate.wip.adobe.com
127.0.0.1 activate-sea.adobe.com
127.0.0.1 uds.licenses.adobe.com
127.0.0.1 k.sni.global.fastly.net
127.0.0.1 activate-sjc0.adobe.com
127.0.0.1 activate.wip1.adobe.com
127.0.0.1 activate.wip2.adobe.com
127.0.0.1 activate.wip3.adobe.com
127.0.0.1 activate.wip4.adobe.com
127.0.0.1 na1r.services.adobe.com
127.0.0.1 lmlicenses.wip4.adobe.com
127.0.0.1 na2m-pr.licenses.adobe.com
127.0.0.1 wwis-dubc1-vip60.adobe.com
127.0.0.1 workflow-ui-prod.licensingstack.com
0.0.0.0 2ftem87osk.adobe.io
After that, restart your system. Now check if the Adobe app working or not.
For MAC
- Just like Windows, close all opened Adobe apps, and open Terminal on your MAC.
- When the Terminal is open, type the below command and hit the Enter button.
sudo nano /etc/hosts
- Then confirm your MAC password and press enter to continue.
- Now can edit the document, paste the above IP address here too.
- After that, you need to go back to the Terminal main page. Press Control + X to exit from the file. A prompt will appear to save the change you have made, for this press Y and Enter.
- You will be back in the main Terminal, now type the command and hit the Enter button.
sudo killall -HUP mDNSResponder & sudo dscacheutil -flushcache
- Everything is done, hopefully, your Adobe app start working.
3. Create Firewall Rules for Adobe App (Only for GenP and Monkrus Users)
Many people use unauthorized Adobe products through methods like GenP and Monkrus to bypass license keys. However, they often encounter the message ‘Sorry, Adobe is not available.’ There is a catch to fix the issues, here’s what you need to follow.
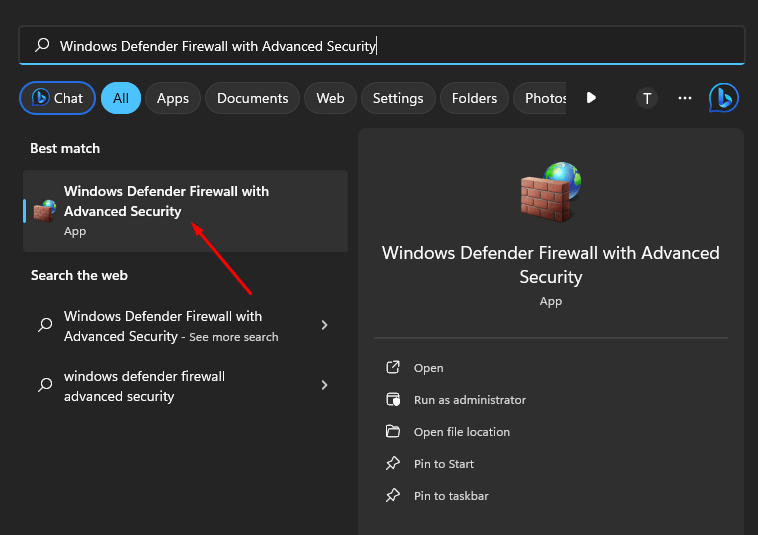
- Click on the Search icon, type Windows Defender Firewall, and click on Windows Defender Firewall with Advanced Settings.
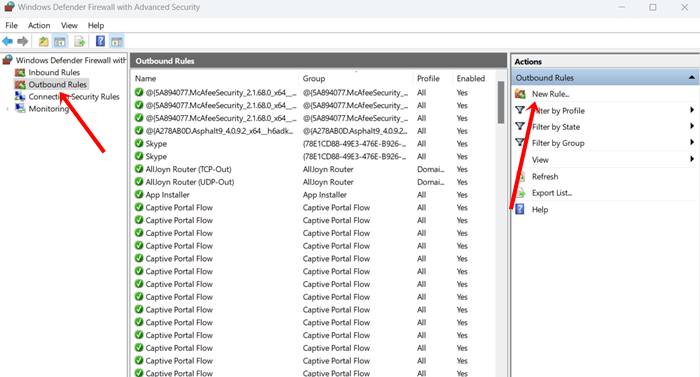
- Then click on Outbound Rules > New Rule.
- Now follow this carefully:
- On Rule Type, select Program > Next.
- Then browse the program on the Program path. To add the program, click on Browse, and select the Adobe app.
- On the Action field, select Block the connection.
- After that, tick on Domain, Private, and Public > Next.
- Now give it a name, and click on Finish.
- It will block the internet connection and you can use the Adobe app.
Note: Using such methods to use Adobe for free can lead to many problems. We recommend that you use Adobe products from the original source.
Conclusion
The above tips will help you fix Sorry, this Adobe app is not available and maintain your creative flow. If you have a license key to the Adobe app, then you should contact their support to get the ultimate solution.

 After that, restart your system. Now check if the Adobe app working or not.