Windows 11 23H2 is available as the public update on all Windows PCs running on 22H2. This is one of the major updates that was released for Windows 11 this year after the 22H2 update. This update brings a few new features and bug fixes to Windows 11.
As this update is available now, you can install it on your PC. There are multiple ways to upgrade to Windows 11 23H2, and this article will discuss how you can do it.
Ways to Upgrade to Windows 11 23H2
You can either get the 23H2 update through Windows Update or manually install the update. Whether you are currently on the Windows 11 22H2 update on Windows 10, the ways mentioned below will help you upgrade to Windows 23H2.
1. Through Windows Update
If you are currently on Windows 22H2 update, then you can use the Windows Update method. Below are the steps to do so-
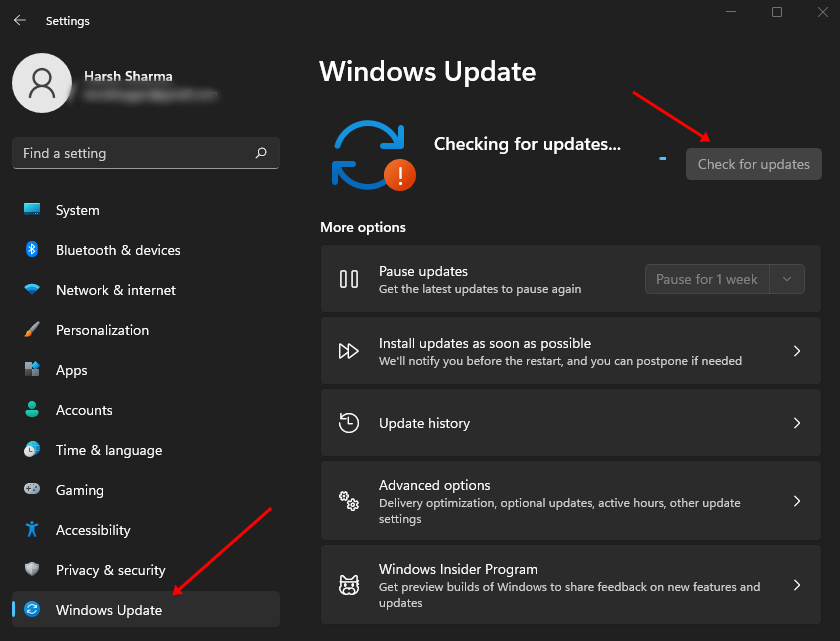
- Press the Windows + I key combo to open Settings.
- Click on Windows Update on the left pane, and then click on Check for Updates.

- See if the 23H2 update is listed here or not. If you see the update, then install it.
2. Through Windows 11 Installation Assistant
If the previous method fails to get the 23H2 update, then you can get the Windows 11 Installation assistant to upgrade to Windows 11 23H2.
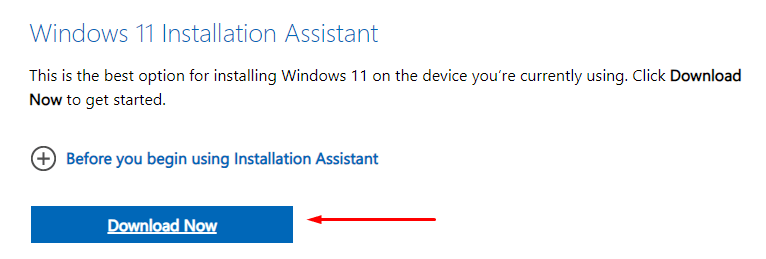
- Head to the Windows 11 download page by clicking on this link.
- Click on the Download Now button under Windows 11 Installation Assistant.

- Press the Windows + E keyboard shortcut and head to the Downloads folder.
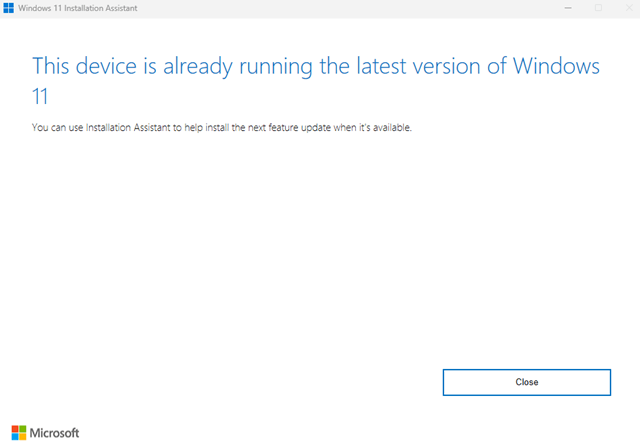
- Double-click on the installation assistant to run it.
- Windows 11 installation assistant will automatically detect if your PC is on the latest Windows version or not.

- If your PC is not on the latest version, then you will get the option to install the update; follow the on-screen instructions to upgrade to Windows 11 23H2.
3. Through Windows 11 ISO
Another way to upgrade your PC to Windows 11 23H2 is through the ISO file. The steps mentioned below should help you do that-
- Visit the Windows 11 Download page from this link.
- Scroll down to Download Windows 11 Disk Image (ISO) section, click on the drop-down menu, and then select Windows 11.
- Click on the Download Now button.
")
- You will be asked to select the product language. After selecting the language, click on Confirm.
- Finally, click on the Download button to download the ISO. This will be the latest Windows 11 23H2 ISO.
- Open the File Explorer and on the left pane click on the Downloads folder.
- Right-click on the Windows 11 ISO, and then click on Mount.
- From the left pane, click on the mounted Windows 11 ISO.
- You will see the Setup file here; double-click on it to run the setup.
- When the UAC prompt appears, click on Yes.
- In the Windows 11 Setup window, check the checkbox saying ‘I want to help make the installation better’ and click Next.
- Click on Accept to accept the license terms.
- Click on Install to continue installing the 23H2 update. This will update your PC without deleting your data.
")
4. Through Insider Program
This is another way of getting the 23H2 update. Through the Insider Program, you will be entitled to get all the latest updates before they are even pushed to the regular users.
However, the update you get may have some bugs; therefore, this method is only recommended if the previous methods didn’t help you upgrade your PC to Windows 11 23H2.
- Open Windows 11 Settings by pressing the Windows + I keys together.
- Now, click on Windows Update from the left pane, and then select Windows Insider Program.
- Click on the Get Started button.
- After this, click on the Link an account option.
- You will have to select the Microsoft account for the Insider program. If you want to use some other account then sign into that account.
- Next, you will be asked to select the Insider Channel. There will be four different channels for you to select from-
- Canary Channel- Updates released in this channel are highly unstable and are suitable for highly technical users.
- Dev Channel-Updates released in this channel will have low stability but not as low as compared to the Canary Channel.
- Beta Channel-This channel is mostly suitable for early adopters and the updates are validated by Microsoft. In Beta Channel, your feedback will be used for making changes and solving the bugs in the update.
- Release Preview- This channel can be used by anyone, even for commercial use as there will be low chances of bugs.
- Select any of the channels from the above; our recommendation will be Release Preview but you can go for any other channel as well.
- After selecting the channel, click on Continue.
- To agree to the terms and conditions, click on Continue again.
- You will have to restart your PC after this; click on Restart to do so.
- Now, press the Windows + I key combo and click on the Windows + I key combo on the left pane.
- Click on the Check for Updates button to search for the updates.
- You will now see the 23H2 update; download and install it.
Bottom Line
These were all the methods to upgrade your PC to Windows 11 23H2. Our recommendation will be to follow the conventional way of Windows Update to upgrade to 23H2 before continuing with any other method listed in this article.


