Are you confused due to seeing “Your SIM sent a text message” pop up on your iPhone display? In this guide, I have explained a few tricks and tips to fix this issue. Users have faced this strange pop-up message on various models of iPhones over the last couple of years.
This message results from some technical glitch between the network provider and the SIM card. Usually, when a SIM card is extracted and not re-inserted properly, you may see the “SIM sent a Text Message” on the iPhone.
Fix Your SIM sent a Text Message Issue on iPhone
Although the “your SIM sent a text message” doesn’t cause any other problem, it is sometimes annoying to see this message. When you enjoy browsing the internet, typing out a WhatsApp message, or trying to call someone, this pop-up may appear.
Here are some troubleshooting tips to help you fix the “Your SIM sent a text message” issue.
1. Re-insert the SIM Card into iPhone
Often the root cause of the “Your SIM sent a text message” pop-up is not inserting the SIM card properly in the SIM tray.
- Start by turning the iPhone off.
- Use the SIM ejector tool and bring out the SIM tray.
- Remove the SIM card and re-insert it into the SIM tray.
- Switch on your iPhone.
While using your iPhone, look out for the “Your SIM sent a text message” error. If it persists, try the other fixes mentioned below.
2. Restart the iPhone
Restarting the iPhone is a good way to kick-start the troubleshooting process. Random bugs can be squashed easily with a simple reboot.
- Press the power button of the iPhone. (Press Power Button + Volume Up or Down Button if not working with a single button)
- You will be redirected to the screen “Slide to Power Off“.

- Press and drag the slider to turn the iPhone off.
- After waiting a few seconds, press the power button to turn the iPhone on again.

3. Update the iPhone
Often users report that updating the iOS to a new build has stopped the “Your SIM sent a text message” problem on the iPhone. Maybe the users have been running the developer beta of iOS and that’s why they see the buggy pop-up.
To update the iOS,
- Go to Settings > General > Software Update.

- Let the device look for an available update.
- Tap on Download and Install to start installing the update.

Usually, the Apple system updates are of larger sizes. Use a Wifi network to download and install them smoothly. Let the iPhone reboot after installing the new iOS update.
Observe if the strange pop-up message is appearing. Had it been the bug with the previous version of iOS, the issue would be sorted now with the new iOS build on board.
4. Install Pending Updates for Tele-Carrier
Missing out on the carrier updates on your iPhone can lead you to see the “Your SIM has sent a text message” pop-up.
- Go to Settings > General > tap on About.

- After a few seconds of pause, you may see a message on the screen Carrier Settings Update.
- You have to tap on Update.
- Let the carrier update install properly. Do not interrupt the process.

Once the update is finished, wait and observe if you still see the “Your SIM has sent a text message” on the home screen.
5. Contact the Network Provider
If, after implementing a few of the troubleshooting tips mentioned here, you still see that Your SIM has sent a text message error, reach out to your service provider. Register a complaint regarding the issue.
You can use the official app of your service provider or even tag the ISP’s Twitter handle on Twitter. Otherwise, visit the nearest authorized network service distributor’s shop and ask for tips to resolve the problem.
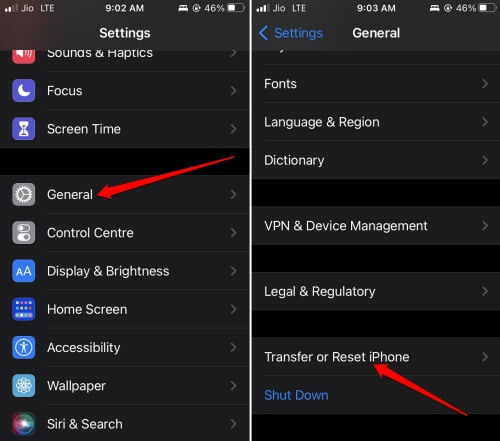
6. Reset the Network Settings
You may also opt for resetting the network settings. It is considered the last resort to fix the network issues on the iPhone.
- Go to Settings > General > Transfer or Reset iPhone.

- Tap on Reset > Select Reset Network Settings.

- Provide the passcode to proceed with the network reset.

Once the network reset finishes, the iPhone will restart. Then check whether the “Your SIM sent a text message” pop-up is still showing.
Conclusion
So, these are the basic troubleshooting tips for fixing the “Your SIM has sent text message” issue. If you cannot resolve the issue manually, you may use the ISP’s help. I hope this guide was informative.


