Most of them use 64-bit installations on Windows 10 as it has better security and can use more memory on the system. So, as compared to 32-bit, the 64-bit version runs faster. As we all know that 64-bit Windows 10 allows the user to install and run both 32-bit and 64-bit programs. But on 32-bit Windows, you cannot install 64-bit programs.
If you are a 64-bit Windows user and want to figure out the installed program is 64-bit or 32-bit, it is quite easy. To help you out with this, we have brought three ways to check the installed program is 32-bit or 64-bit on Windows 10.
Also Read- How to Customize Program Icons in Windows 10
How to Check If Installed Program is 64-bit Or 32-bit In Windows 10?
These given methods are mostly for Windows 10, but you can try it on Windows 7 and 8 as it works with them also.
Method 1: Use Task Manager and check the Program is 64-bit or 32-bit
If you are using Windows 10 build 19541 or later, you can easily check the program’s architecture. As it displays program architecture, so you don’t need to do much to check the program is 64-bit or 32-bit.
- Do right-click on the space and click on Task Manager on the taskbar.
- If you see the small version, click on More details and expand it.
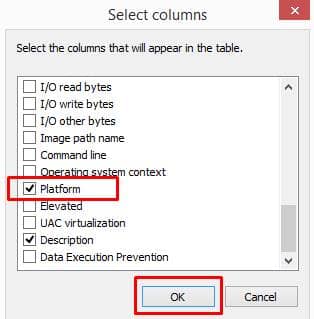
- Click on the Details tab and right-click on the blank area, and Tap on Select Column.

- Now, select Platforms from the list. Under the platform column, you will see a program on your system that is 32-bit or 64-bit.


OR
Follow the same process till the Select Columns option. There, from the list, select Platform or Architecture. You will see the architecture tab that displays all the running programs’ architecture. Then launch the program whose architecture you want to see and look at the column to check the details.
Method 2: Use File Explorer and check if a program is 64-bit or 32-bit
You can also check the program by using file explorer, follow the steps given below.
- First, open the File Explorer and go to This PC.
- Check the installed Program Files and Program Files (x86) folders by double-clicking on the drive.
- Now, check both Program files and program files (x86) folders for the programs you want to check 64-bit or 32-bit.
- If the app folder or app is available in the program files, then the installed program is 64-bit.

Note: Program files (x86) can be created only in 32-bit.
So, whenever you find any app under the Program Files (x86) folder, then it’s a 32-bit app on 64-bit Windows 10. You can check if the app is available in the 64-bit version, then you can uninstall the 34-bit and install the 64-bit.
Method 3: Use Sigcheck Utility
- Download the free command-line utility called Sigcheck from Microsoft Sysinternals.
- The file will be downloaded in a ZIP file, extract it and go to the extracted folder.
- Now, open the elevated Command Prompt window.
- Here, type the following command and press enter.
sigcheck.exe "full-path-to-EXE"

- The output is seen where you can see your EXE is 32-bit or 64-bit. Check the last line, “MachineType,” it will show the exe.


