Recently, our tech team ran a benchmark test on Windows 11 to compare its performance with our beloved OS, Windows 10. However, although the new OS wins with a huge gap, my favorite is Windows 10. When it comes to gaming, we know that not many games are currently compatible with Windows 11, as developers said they are working on it. So, it is also applicable in the case of device drivers.
In the meantime, there is no necessary requirement to know the Windows 11 version. Still, sometimes while updating the device drivers manually from the manufacturer website, it asks you to select the Windows 11 version for which you need the drivers.
In that case, it is very crucial to select the proper Windows 11 version that your PC has. If you don’t know how to check the Windows 11 version on your PC, don’t worry because we have mentioned different tricks that will help you know it.
Also Read- Windows 11 Keyboard Shortcuts
What Are The Different Methods To Check Windows 11 Version?
We all know that Windows 11 is still under testing, so many enthusiastic users want to use different versions of Windows 11, such as Home, Professional, SE, etc., that were available in Windows 10. So, to know which version of Windows 11 you are using, you need to follow up on the methods mentioned below:
Method 1: Use RUN Prompt
This is the first and easiest method that helps you check the Windows 11 version on your PC. Therefore, make sure to don’t miss out on any of the steps we have mentioned below:
- Firstly, press the Win+I button simultaneously to open the Run prompt box.
- After that, type winver and hit the enter key.

- Now, a About Windows screen will pop up. So, here you can check out which Windows 11 version and edition you’re using.


Method 2: Get The Information in Settings App
I think many of you who used Windows 10 previously know a bit about this method. Yeah! Although the interface changed, still the option was found in the same place. So, in case you don’t know about this, follow the steps we have mentioned below:
- Initially, click on the Windows Start button and hover to the Settings option.

- After that, inside the settings window, Go to System > About section.

- There it is. Now, you can note down the Windows 11 version and edition installed on your PC and use it where you want.


Method 3: Check From System Information
Did you know about this tool? Don’t worry! If you don’t know, this is a system information tool of Windows using which you can check the hardware resources, components, software environment summary of your PC. So, here are the guidelines that you need to follow:
- The foremost step is to open the Windows search bar, search for System Information, and open it.

- Now, click on the System Summary option. After that, it will present you with all the information related to your system, including the Windows 11 edition & version you are using.


Method 4: Check Via Command Prompt
You can also use the command prompt to check your Windows 11 version. To do so, you need to follow some simple and easy steps we have mentioned below. So, let’s take a look at them:
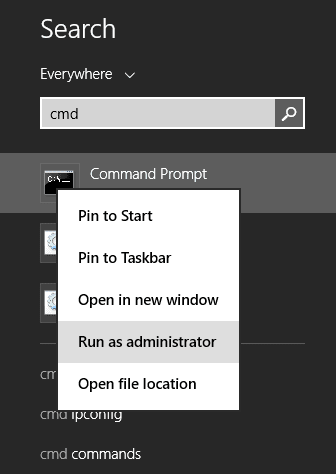
- Initially, hover to the Windows search bar and search for Command Prompt, then select the Run as Administrator option to open it.

- After that, execute the command systeminfo. Then, it will show you the edition and version of your installed Windows. Note it down and use it as per your requirement.


Method 5: Check Via Windows Powershell
This method is just similar to the above one. You can use the Windows 11 Powershell to get all the information related to your OS edition and system. So, let’s take a look at the necessary steps that will help you do so:
- First of all, navigate to the Windows search bar and search for Powershell, then select the Run as Administrator option to open it.

- After that, execute the command systeminfo. Then, wait until the process is completed. That’s it. It will present you with all the information about your system, including the OS version you are using.


Method 6: Use Control Panel
You can also use the Windows 11 control panel to check the Windows version installed on your computer. Here are the guidelines that you need to follow:
- Firstly, search for Control Panel using the Windows search bar and open it.
- After that, click on the View By drop-down button and choose the Large Icons option from the opened list.

- Then, click on the System option. It will automatically redirect you to the About section of your system. Now, you can check out the version of your Windows.


From Author’s Desk
So, these were some methods that will surely help you know which Windows 11 version you are using on your PC or laptop. We hope the above methods have helped you. However, please comment down and let us know if you know of any other methods to help our users.


