Finally, Windows 11 will be released, and we have a release date for it: October 5th, 2021. Well, the update is free for all those who have Windows 10 PC. But, the upgrade itself was pretty much painful because of the TPM 2.0 issue.
In this new OS update, you’ll get a bit of a fancier look at everything: the taskbar, game mode, or Cortana assistant. But today, we are here to talk about Cortana mainly. Although this isn’t enabled by default, and you have to log in first to enable it.
But, many users get frustrated while disabling this feature because they cannot find the right setting to disable it. That’s why we are here with a new guide on disabling or enabling the Cortana assistance in Windows 11. So, let’s see the steps.
Also Read Windows 11 Media Creation Tool (2021) – How to Use it
Steps to Disable Cortana in Windows 11
As mentioned earlier in this guide, Cortana isn’t enabled by default in Windows 11; you need to enable it manually. However, suppose you’ve enabled this option previously but now want to disable or remove it and don’t find a way to do so. Then, follow the steps give below:
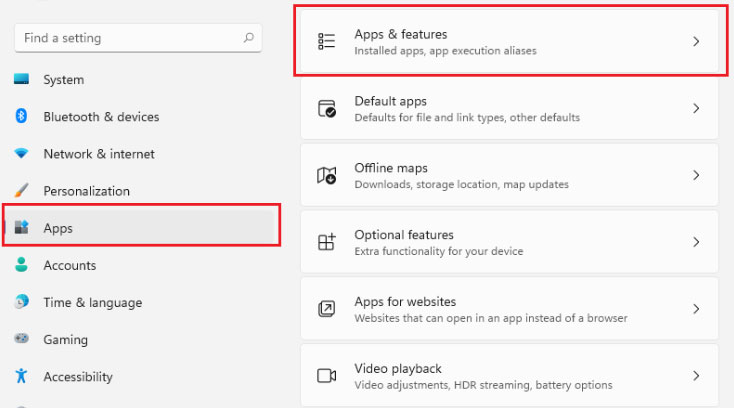
- First of all, press the Win + I button to invoke the Windows settings option. Alternatively, you can search for it using the Windows search bar.
- After that, switch to the Apps tab and click on the Apps & Features.

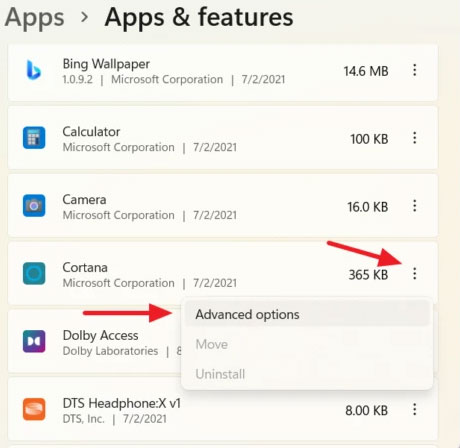
- Now, a list of installed applications will open. From that list, locate the Cortana application and click on the three-dot button.
- Then, select the Advanced option from the drop-down menu.

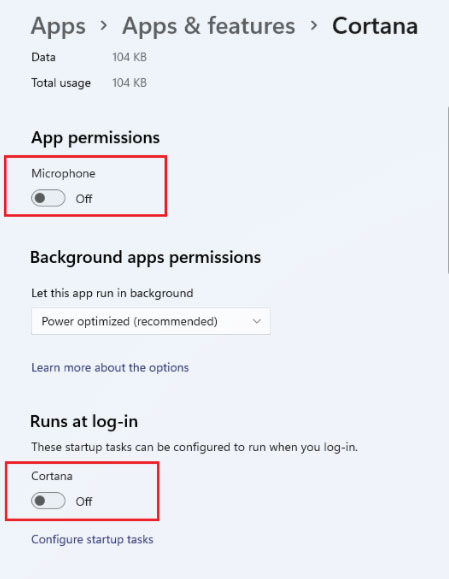
- That’s it. Now, toggle the buttons located in front of the Microphone and Cortana to Off position.

That’s how you can disable the Cortana virtual assistance. Then, if you change your mood and again want to use Cortana, follow the steps mentioned above and toggle the buttons to the On position.
There are some alternative methods available in case the above steps do not work for you. But, then, you may go with these methods.
#1. Via Registry Editor
This method will disable Cortana permanently unless you again enable it using Registry. So, in this method, you must have some knowledge about how to edit the Windows Registry. But, in case you don’t know, then follow the steps mentioned further in this guide.
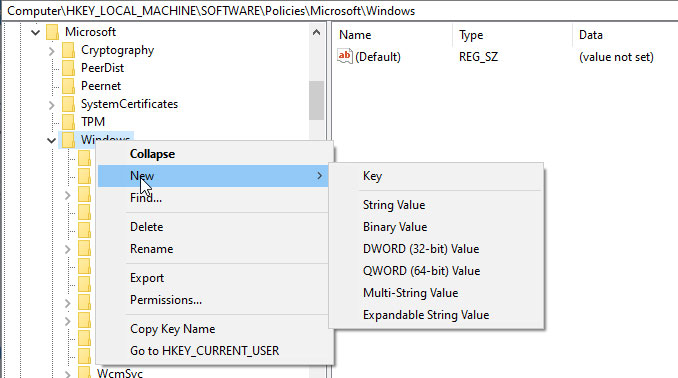
- Firstly, press the Win+R buttons to invoke the Run dialog box and type Regedit. Then, hit the enter key.
- After that, in the address bar, copy and paste this location:
Computer\HKEY_LOCAL_MACHINE\SOFTWARE\Policies\Microsoft\Windows\Windows Search - Then, you need to right-click on the Windows Search folder. Now, from the drop-down menu, select the New followed by DWORD (32-bit) Value.

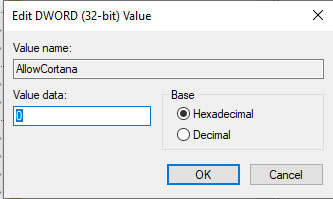
- After that, give it the name “AllowCortana” and double click on it.
- Finally, under the Value Data, give value 0 and hit the enter key.

#2. Uninstall Cortana Using Windows PowerShell
This is another method that you can use to remove Cortana from your Windows 11 PC. But, yeah! Keep in mind that this will permanently remove the Cortana file from your PC, and you won’t be able to enable it further unless you install it again.
- Firstly, open the Start menu and search for Windows PowerShell. Then, run the Command Prompt using admin rights.
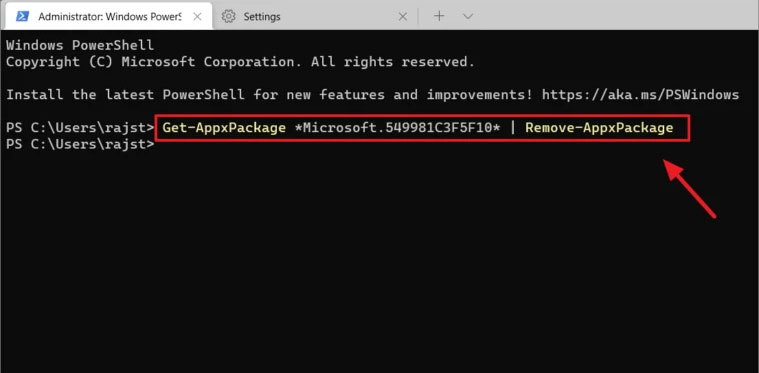
- Now, use this command in case you wish to uninstall the Cortana for the current Windows 11 user:
Get-AppxPackage *Microsoft.549981C3F5F10* | Remove-AppxPackage
- However, in case you wish to uninstall it for all the current Windows 11 users, then this command will help you:
Get-AppxPackage -allusers Microsoft.549981C3F5F10 | Remove-AppxPackage
So, that’s all we have for you on how to disable voice assistance on your Windows 11 PC. However, if this guide helped you, then give us your valuable feedback in the comment section. Also, don’t forget to check out our other latest guides too.


