In this era, it is now very common that we get notifications for almost everything. From Social Media to a Website, in every second, you will get a new text message or an email about your friends, relatives, family members, colleagues’ latest social media posts, and guess what? The notifications never stop.
But, if you are in a situation and need to get work done on Windows 11, it is more important to know how to get rid of these distracting notifications. However, if you are using Windows 11 on your PC, you might already be familiar with its new notification panel. This time Microsoft totally revamped this feature on their eleventh version of the operating system.
Well, I really Like using this feature on my Windows 11 PC, that’s why I highly recommend you to use this once on your system. So, let’s dive into this article and see how you can enable or disable this notification feature on your Windows 11 PC.
Also Read: How to Fix Lsass.exe High CPU Usage Issue in Windows 11
Easy Steps to Enable Or Disable Notifications On Windows 11
As we know, that notification system is slightly changing in the new Windows 11 version. So, it might be possible that users may find it challenging to enable or disable this on their PC. But, don’t worry! Follow this guide till the end to understand what you need to do:
Steps to Enable Or Disable Notifications Via Settings Menu
This is a simple task to do, and you just need to follow the steps given below:
- To initiate the process, press the Win + I key to open the Windows settings.
- Then, navigate to the System tab and click on the Notification option.
- Finally, toggle the Notification button to Off/On as per your requirement.


Steps to Enable or Disable Any Particular Notification Via Settings
If you don’t want to disable your whole PC’s notification, then there’s an option to disable notification for a specific application or website. So, if that’s your need, then follow these steps:
- Again in this method, press the Win + I key to open the Windows Settings.
- Then, hover over to the System tab and click on notifications options.
- After that, locate and go the notifications from the app and other senders options.
- Now, a list of applications will open. So, you just need to toggle the button located in front of each app as per your need.


That’s it. Now, the applications that you’ve selected will not allow to send you notifications anymore. So, now, go and do whatever you want to do without any distracting notification.
How to Enable/ Disable Notifications Using Registry
This is another option available for you, but I think not everyone is familiar with this option as this needs a bit of technical knowledge. So, if you are also doesn’t have any clue regarding this method, follow the steps given below:
- Firstly, press the Win + R button to open the Run prompt box.
- Then, in the Run box, search for regedit.
- After that, press the Ctrl + Shift + Enter key altogether. This will run the Windows Registry with admin rights.
- Now, navigate to this address inside your Windows Registry editor:
HKEY_CURRENT_USER\Software\Microsoft\Windows\CurrentVersion\PushNotifications - Now, select the Push Notification option and right-click on it.
- After that, select the New from the opened menu and click on the DWORD (32-bit) value.

- Then, name it ToastEnabled. After that, double-click on it to edit.
- Now, change the Value Data to 0 or 1 and Base to Hexadecimal.
- Then, hit the OK button to save all the changes and reboot your PC.
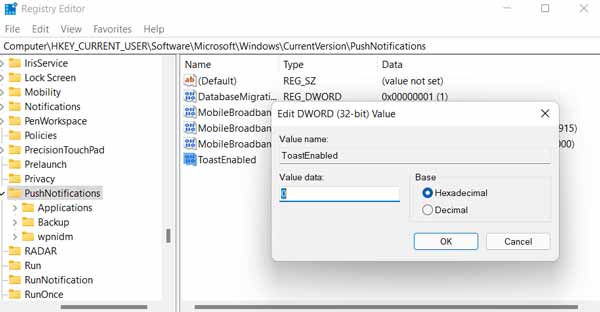
Note: Use the value data 0 to disable the push notification and 1 to enable it.
So, that’s all we have for you on this guide. We hope you find this guide helpful. Meanwhile, if it is your first experience with our website, then make sure to bookmark it on your browser for regular updates. Also, if you get stuck in any of the mentioned steps, let us know in the comment section. Our team will help you out as soon as possible.


