In the trend of work from home culture, everybody needs a computer with audio/video calling software to interact with their colleagues and friends. But sometimes, it happens to some Windows 11 users that their voice is not reaching the recipient.
There may be a chance that your Microphone is somehow disabled. Don’t panic because there is no big issue with this. You can simply enable or disable the Microphone in Windows 11 settings as needed.
Microsoft adds more features in Windows 11 than Windows 10 because now you can manually give or revoke microphone permission from specific apps and microphone devices. You just need to follow up on our simple guide to learn how to turn on / off microphone access in Windows 11.
Also Read- How to Fix Low Microphone Volume Issue in Windows 11
Steps to Turn On or Turn Off Microphone in Windows 11
Let’s start with the basic and all-in-one method to enable or disable Microphone access in Windows 11. let’s dive into it.
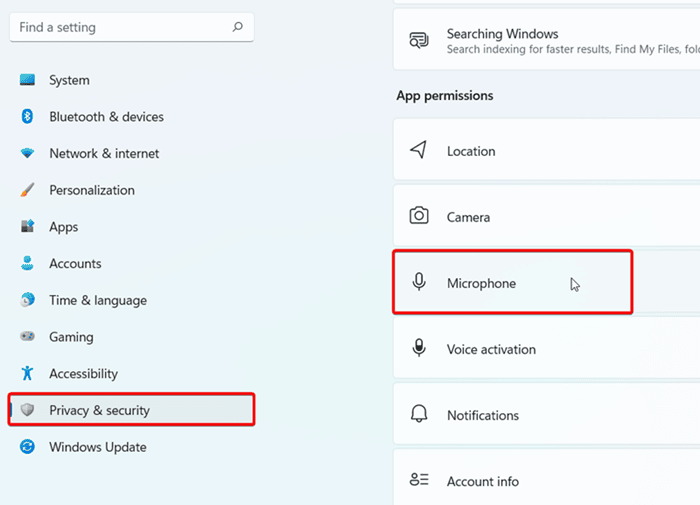
- Click on the start menu and tap on Settings. Either way, you can press Windows + I to open windows 11 settings.

- Now in settings, go to Privacy & Security located on the left menu bar.
- Scroll down to the App Permissions section to see the Microphone Tab; click on it.

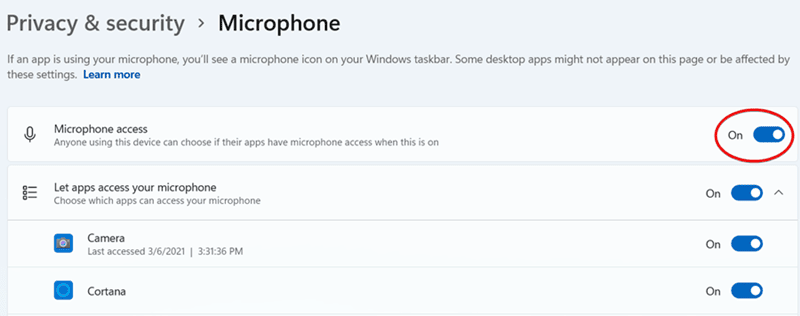
- There is a toggle option for Turn On / Off microphone. Toggle according to your need. This is the broad option to enable or disable microphone access in windows 11.


How to Enable or Disable Microphone Access for Specific Apps
Windows 11 also offer a feature to give or revoke microphone access to specific apps. You can use this to prevent any of the apps from getting your audio so that you can disable it specifically.
- Follow the above steps till reaching the toggle option of the Microphone (Turn On/Off).
- Below that toggle option, you can see Microsoft apps and a third-party apps that you can manually enable or disable microphone access.

- In front of these apps, you can see an individual toggle option to control the microphone access.

Enable or Disable Microphone Using Sound Settings
Here is another way to open microphone permissions via sound settings. It is just like the basic one we previously discussed. Using this, you can control the microphone hardware and control permissions.
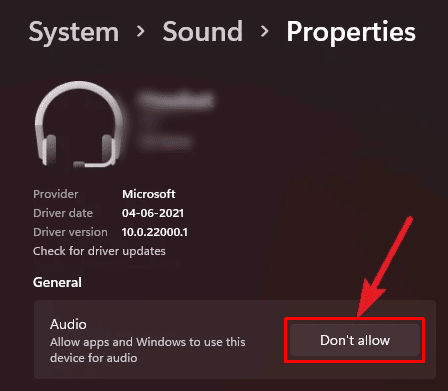
- Press Windows + I to open the Settings app.
- In the settings, windows tap on System on the left menu.

- On the right side, you can see the Sound tab, click on it. Now scroll down to the Input section.

- Click on Microphone > Properties.

- In the General section, you can see Allow option in front of the audio tab. (If already enable you can see Don’t allow in front of the audio section)


From Editor’s Desk
At the end of the article, I hope you will know how to control your microphone access in the Windows 11 operating system. It is now easy and simple to enable or disable microphone permission for specific apps and devices. Suppose you face any problems regarding this article. Let us know in the comment section.


