Enabling Virtualization in Windows isn’t rocket science at all. You just need to know the exact and correct methods to do this. Well, guess what? Today, we are here to clarify some details that will help you understand the Hyper-V concept and enable it on your Windows 11 PC.
As we know, the new Windows 11 brings some fresh and new design with a completely visually changed interface. That’s why some users may get confused when it comes to enabling this type of feature.
So, we are here to reduce your work. Therefore, now, I’m not going to waste your time talking here and directly bring you to the steps that will help you enable Virtualization (hyper-v) in Windows 11.
What is Microsoft Hyper-V?

However, unfortunately, if you have the Windows 11 home version installed on your PC, then you may not be able to use it as it comes on Windows 11 Pro and Windows 11 Education.
Meanwhile, if you don’t know how to check the Windows 11 version, follow the given link. The main purpose of Hyper-V is to let you run virtual machines on your Windows PC.
Talking about the virtual machine is an application that allows you to run numerous operating systems using the same physical hardware in a solitary and protected place.
Steps To Check Whether Your PC Supports Hyper-V or Not
There are two methods that you can use to know if your PC has the support for Virtualization. So, let’s take a look at them:
1. Using Task Manager
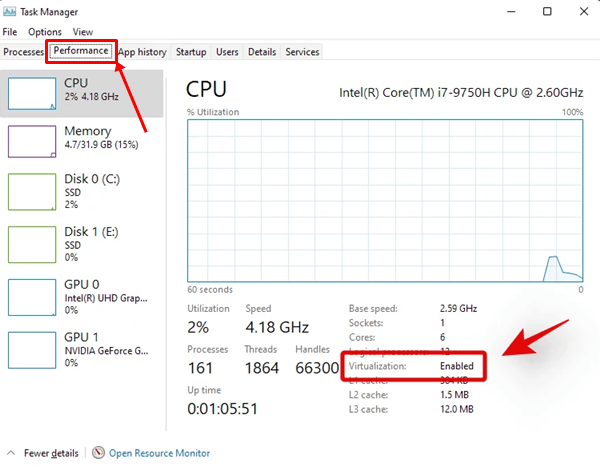
- Firstly, press and hold the Ctrl+Shift+Esc simultaneously. This will launch the Task Manager. After that, navigate to the Performance Tab.
- Now, you will see if your PC has the virtualization feature or not on the right-hand side.
2. Use Command Prompt
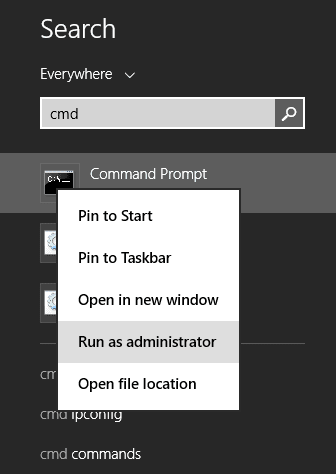
- Firstly, open the Windows Search bar and search for CMD and then run it using admin privileges.
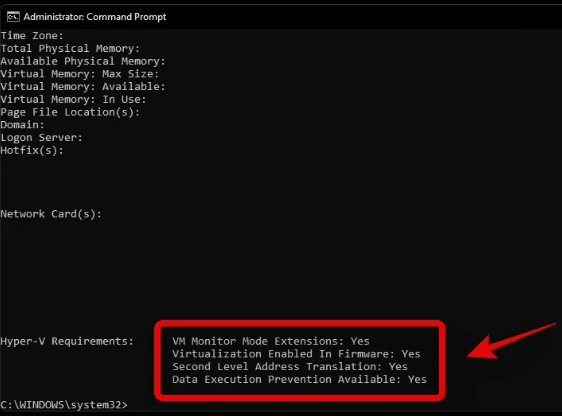
- After that, execute the command: systeminfo
- Now, it will appear there at the bottom of the CMD screen, but only if you have a virtualization feature on your PC.
Steps To Enable Virtualization in Windows 11
So, now you know how to check if your PC supports Virtualization or not. Therefore, now it’s time to enable it.
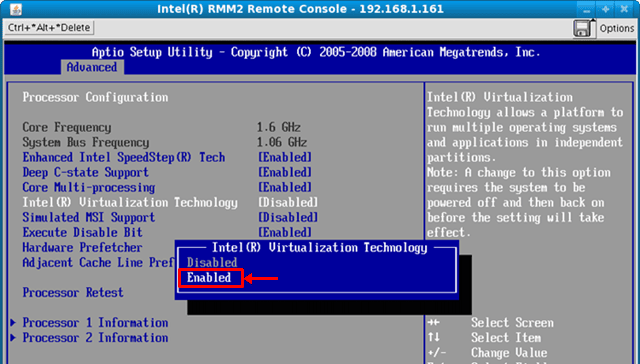
But before we start with it, you need to check if this is enabled on your BIOS/UEFI settings menu or not. To do so, here are the steps that you can follow the path:
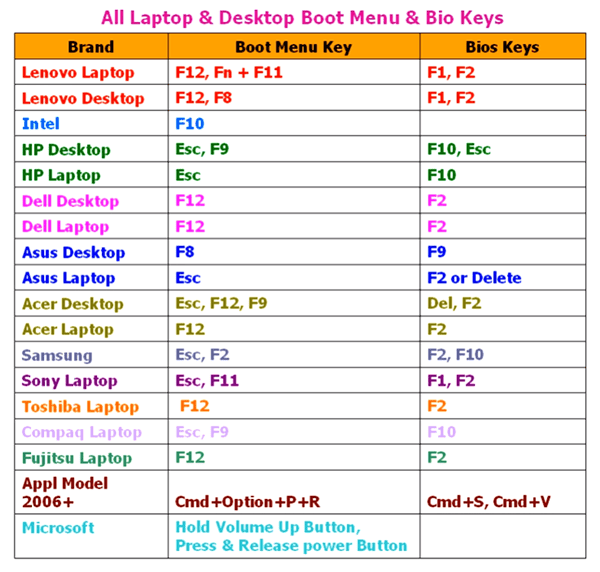
NOTE: Every laptop or Computer brand has different keys to open BIOS settings, so you press the boot key as per your laptop or computer brand and get into the BIOS/UEFI settings.
Reboot PC > Press F2 or F10 function key > System Configuration, or Virtual Technology, or something similar settings and enable it.
So, now you’ve enabled this option on your BIOS/UEFI settings menu; therefore, let’s take a look at steps to enable the Virtualization in Windows 11.
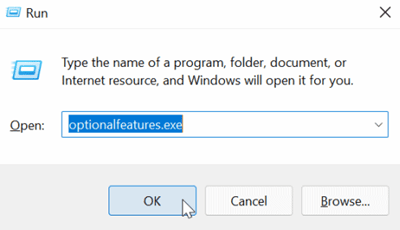
- First of all, open the Run prompt box by pressing the Win+R key simultaneously.
- After that, type optionalupdates.exe and hit enter.
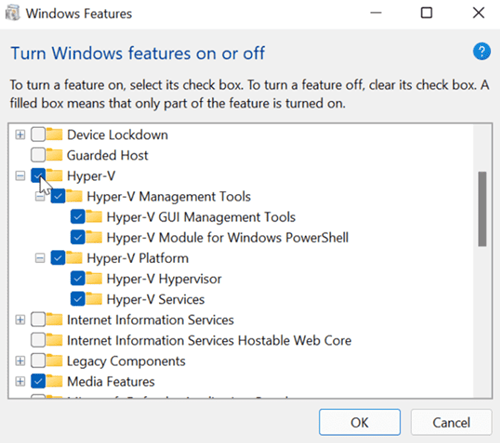
- Now, the Windows Features screen will appear; from here, you are allowed to enable and disable different settings of Windows 11, such as Hyper-V. So, you can simply locate and check if all the Hyper-V-related settings are enabled and then hit the OK button.
- Then, you’ll see that a new progress window will appear; therefore, you need to wait until the process is completed. Once done, hit the Restart Now button.
How To Open The Hyper-V Manager on Your Windows 11 PC
Now, as you have followed the above steps; therefore, once the PC gets rebooted, you will be able to create and manage your Hyper-V machines. So, now let’s take a look at how you can use this feature:
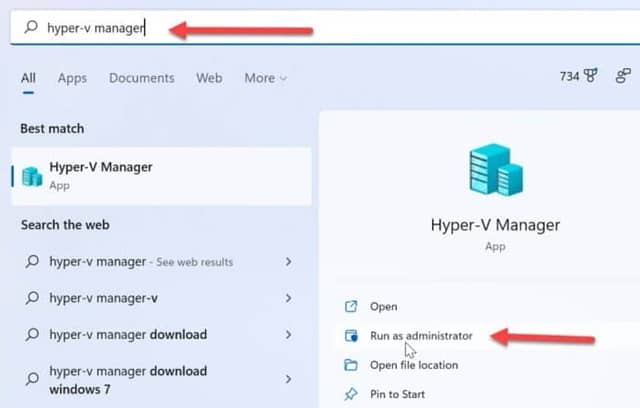
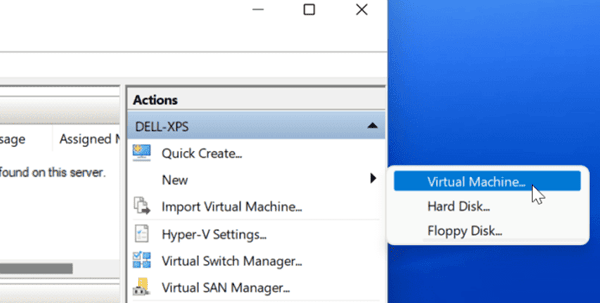
- Initially, go to the Windows Search option and search for Hyper-V Manager, then open it using Run as Administrator.
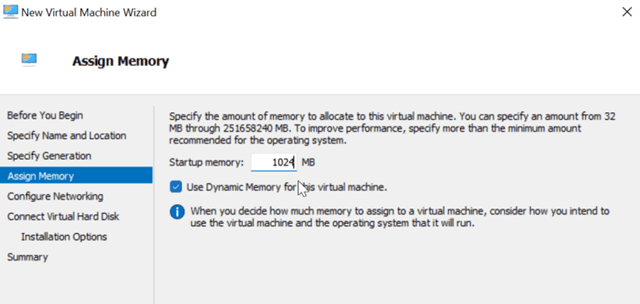
- Now, you are allowed to create and manage your virtual machine using hyper-v. So, create a new virtual machine running on Windows, Linux, or some other OS using the New Virtual Machine Wizard option.
- As the Virtual Machine uses your system’s resources to run properly; therefore, we recommend you do not assign it a larger RAM or storage space.
From Author’s Desk
So, that’s all we have for you on how to enable Virtualization (hyper-v) in Windows 11. We hope that this guide has helped you. However, in case you have any doubts regarding the Hyper-V feature or find it challenging to enable this feature, please let us know in the comment section.

