Registry or Windows registry is a database that contains important information regarding preferences, apps, users, attached devices, and everything on your computer. In the registry, there are two basic elements, keys and values. Whenever you change hardware or install new software, open a program, the changes are stored in keys and values. These changes are known as Registry files.
When you want Windows to work the way you want or improve performance, you can manually change the registry keys using the in-built Windows Registry Editor. While doing this, you need to be careful as your OS can be damaged.
Causes of Broken Registry Items in Windows
As you personalize your computer, Windows creates more registry files, from which most of them are not important. So, with such files registry gets full of unnecessary files like damaged, corrupt, or broken. Registry problems can occur via Malware, Viruses, as even if the virus or malware is removed, it remains in the system, and it can slow down your PC and show error messages.
You should check your Windows computer is not full of broken items in the registry. When you do this, your PC’s performance will not be changed. So, it is better to remove or fix the broken registry files to be on the safe side. Let’s learn how to fix the broken registry items on Windows PC.
How to Fix Broken Registry Items on Windows PC?
If you experience any broken registry items, fix them using the following methods explained below. Here are some ways to fix the error on Windows PC.
NOTE: Before you make any changes, make sure you take a backup of the registry as it contains important files and settings.
Method 1: Using Automatic Repair
Automatic Repair is available in the new versions of Microsoft Windows, and it is beneficial for the users. This feature helps to fix the broken registry items on Windows 10.
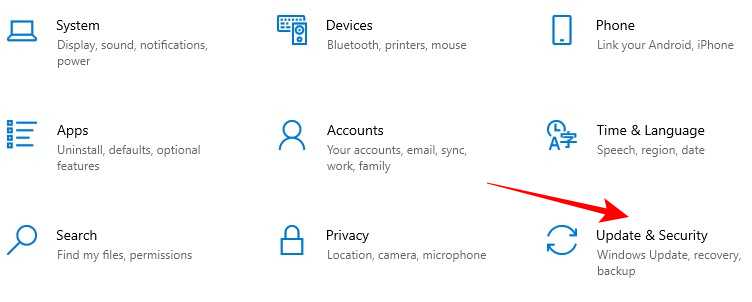
- First, go to the start menu and type Settings, and open the settings panel
- Now, click on the Update & Security option

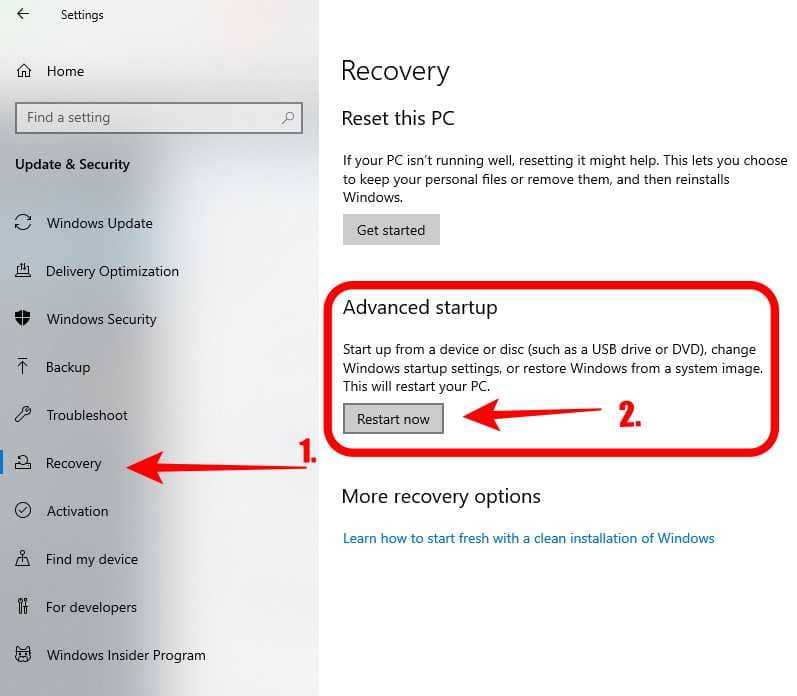
- From the left side menu, click on Recovery
- There, under Advanced Startup, click on Restart Now.

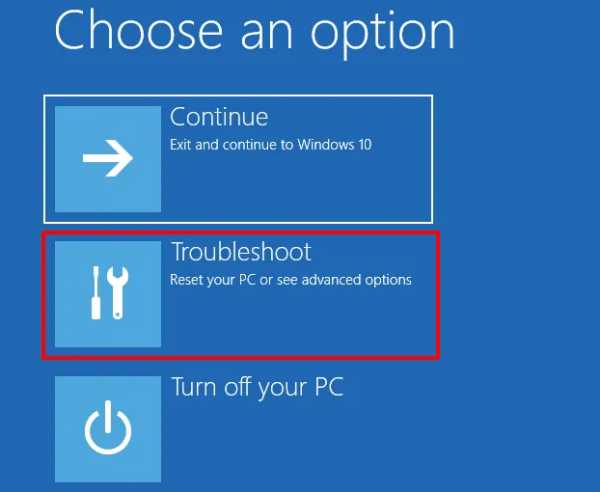
- Wait for few seconds, and you will see few options. Click on Troubleshoot

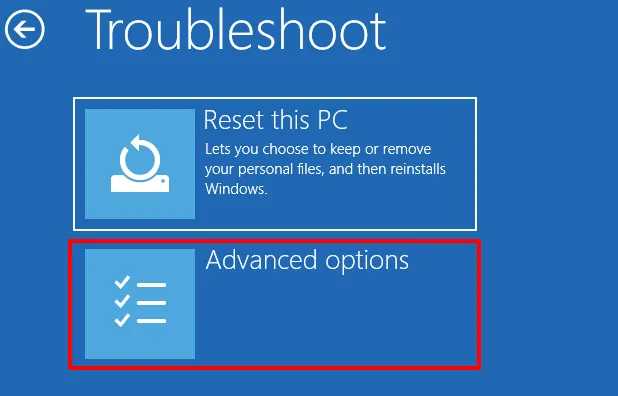
- After that, tap on the Advanced option

- From there, click on Automatic Repair/Startup Repair.

- Select your account and enter the profile password and click Continue.
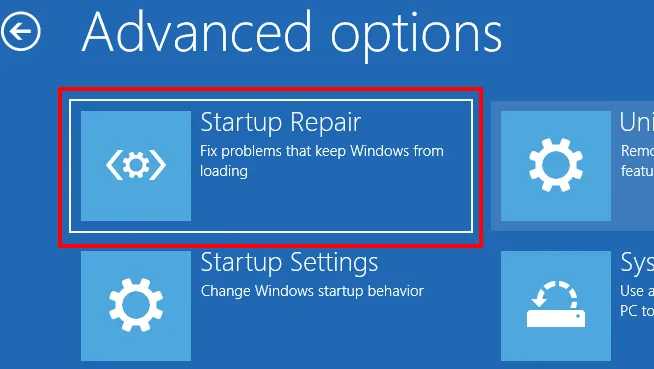
The tool will scan your computer and will fix the broken registry files.
Method 2: Perform Disk Cleanup
The Disk Cleanup tool allows you to remove unnecessary files from your computer. Follow the steps to perform disk cleanup:
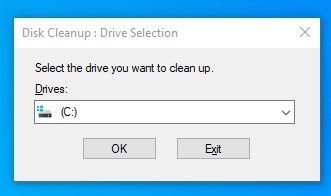
- In the Windows Search box, type disk cleanup, and from the results, click on the disk cleanup option.
- Now, select the drive from which you want to clean up

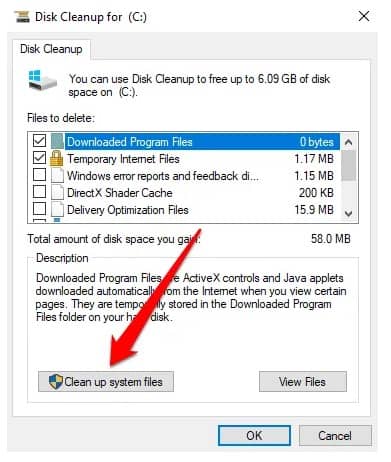
- In the Window, at the bottom left side, click ok Clean up system files

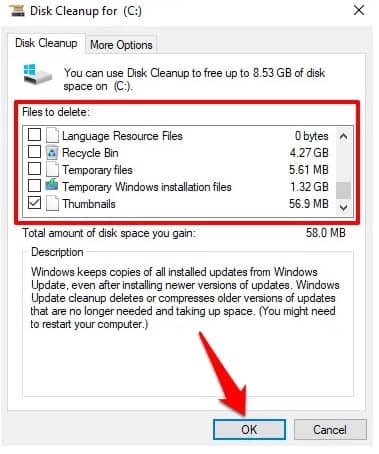
- Check other file options in the window. Click on any file type and check the description to see details. Once you select the file, click OK.

- Confirm the deletion of files, and the files will be deleted permanently.
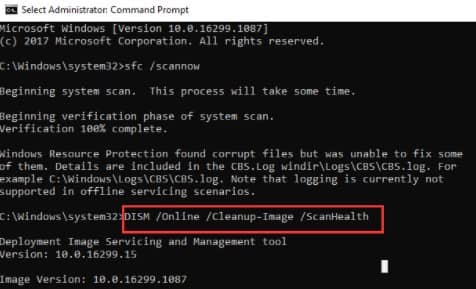
Method 3: Use the System File Checker
The System File Checker (SFC) fixes the broken registry file in Command Prompt. It is an in-built tool for Windows 10 to search for missing or corrupted files in the system file directory.
- Do right-click on the Start Menu or Windows icon and open Command Prompt (CMD).
- Now, do right-click on the Command Prompt, select Run as administrator, and open the CMD interface.
- There, type command “sfc /scannow” and press Enter.

- This command will scan all the system files, and the damaged files will be replaced with cached copies.
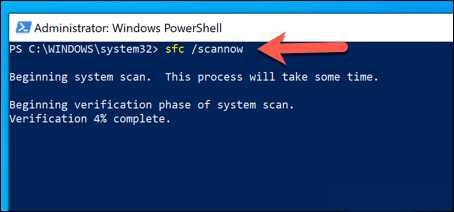
This process will take some time to scan, so wait while the scanning process is done. Once it is completed, now you can reboot your computer.
Method 4: Use the DISM Command
If the above methods cannot fix the error, you can use DISM Command. Let’s check out the steps to scan the computer using the DISM command.
- In the Search Menu, type in Command Prompt and open it.
- Run it with the administrator
- Now type the “DISM /Online /Cleanup-Image /ScanHealth” command and then press Enter.

- It will start scanning, wait for few seconds until the process is finished. Once it is done, the broken registry items error is fixed.
Method 5: Use a Registry Scanner
Using a Registry scanner will help you fix the broken registry items on your computer. For most users, using a registry scanner is not recommended as you might remove the wrong entries. There are many apps and software available on the internet, but not all are genuine. Some of them might bring malware to your system, so better you check the details of the app or software you will use.
If you want, you can use Malwarebytes software to fix the broken registry items on Windows.


