Windows 10 is undoubtedly the best version of Windows until now. It offers all advanced features and a security system. However, most Windows 10 users have complained about unexpected high CPU usage or RAM leakage issues. Now, this must be devastating, as you might have to use a PC with a prolonged performance, which is definitely a greater concern.
But not to worry, there are ways to find out what’s causing such problems and even overcome them. However, people have come up with several ways to fix high CPU usage and RAM Leakage in Windows 10 PC problems. So here we have listed some of the most efficient ways to deal with yours.
Also Read- FIX Memory Leak Issues in Windows 10
Steps to Fix High CPU Usage and RAM Leakage in Windows 10 PC
1. Removing Malware
The most common cause of the maximum system-related problems is malware. And it again plays an important role behind your System getting slow down. So if you are facing any similar situation, you must try scanning for malware.
 For that, you can use any Anti-malware software, but make sure it’s a reliable one. Or you can stick to the fundamental Windows defender. Then, run deep scans to remove such harmful malware, which might help your PC sustain its normal behavior.
2. Check out Driver Updates
As per many Windows forums, an Outdated driver can lead to excessive use of memory. To avoid this, you can check for driver updates and fix the issue. Follow the steps below to update your outdated drivers.
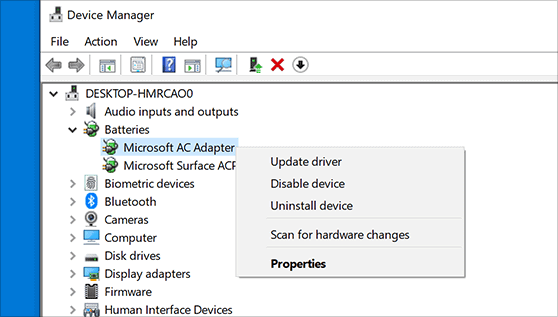
- Open device manager.
- Then check if there are any yellow marks before the divers. (Yellow mark indicates outdated driver)
- In case you come up with any, right-click on the particular drive and select update.
3. Disabling Startup Programs
On starting your Windows System, certain programs get automatically launched at the startup. Hence, any third-party application at the startup can probably consume a high amount of CPU and RAM. In such cases, disable the program using the following steps to free up some space:
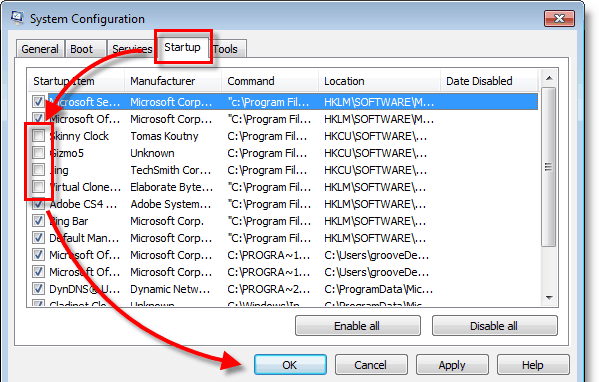
- Try the key combination of Win key + R.
- Next, type “MSConfig” and hit the enter button. This will take you to the task manager.
- Now go to the startup tab.
- You can see a list of your startup programs. Right-click on the ones you don’t want anymore and click the “disable” option.
4. Changing Values In Registry
If none of the options really work out for you, then try changing the values in the Registry. Hopefully, this might deliver you some relief:
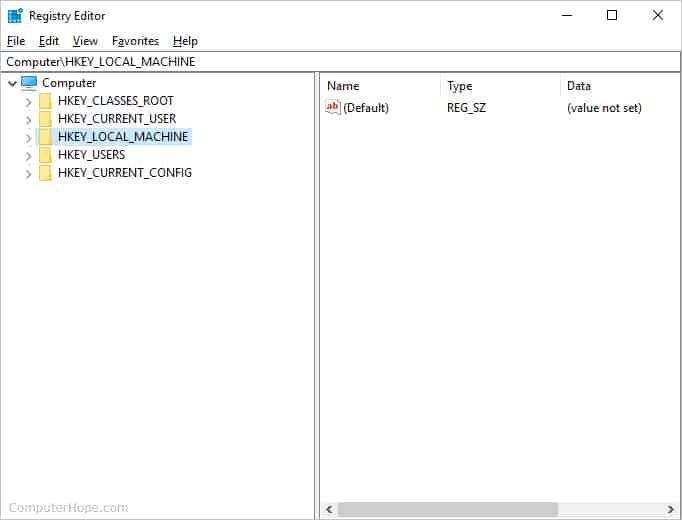
- Press Win + R and type “Regedit”. This will open the Registry Window
- Then move to, HKEY_LOCAL_MACHINE\SYSTEM\CurrentControlSet\Control\Session Manager\Memory Management
- Now look for the “ClearPageFileAtShutdown” option.
- Finally, change its value from 0 to 1 and reboot The PC.
5. Adjusting Windows For Best Performance
By adjusting your Windows for its best performance, you unlock it to an extended level of service. And this might even help you overcome a slow PC performance.
- Right-click on the Computer icon on your desktop.
- Go to Properties and choose Advanced Settings.
- Next, move to System Properties and select Settings.
- Lastly, choose “Adjust For Best Performance” and restart System.
6. Run Windows Memory Diagnostics
If all the above options fail in your case, this option must definitely work out for you.
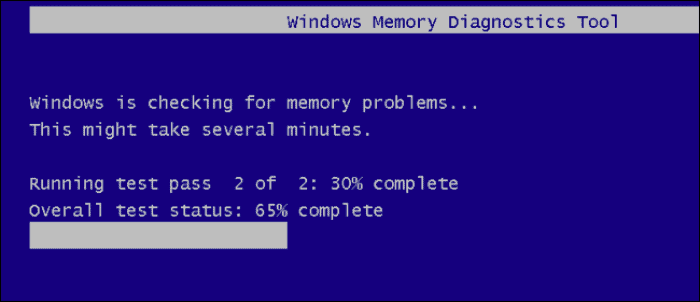
- Press Win key + R. Type mdsched.exe and hit the enter button.
- Click “Restart Now and Check For Problems” on the pop-up menu.
- When your PC gets restarted automatically, choose from any three tests (Basic, Standard, or Extended).
- Hence, this must help you overcome such infection to your system.
From Editor’s Desk
Whether you are a regular user or an occasional one, none of us likes to work with a slow device. Hence, these tricks can help you get your job done. Let us know if any of them works out for you. Also, share if you have better ideas.


