Photographers deal with thousands of photos daily, and even a normal Windows 10 user uses a Preview feature in Windows to check the image. However, the Photos App is set as a default photo viewer in Windows, so the Preview option for the images is not visible. You might have seen this Preview option when you do a right-click on the picture; it shows the photo’s preview. But what can we do now, as the Preview Option is Missing from the Context Menu?
The Preview option will only be seen if the image type is set to Windows Photo Viewer. So, to get back the option, you need to set this photo viewer as a default viewer, as only Windows Photo viewer offers a Preview feature for any image file.
Also Read- Best Photo Viewer for Windows 10
Steps to Fix Image Preview Option is Missing From Context Menu in Windows 10
Let us check out how to set and enable the Windows Photo Viewer as a default viewer in Windows 10 to get back the Preview option in the Context Menu.
Method 1: Make Changes in Registry Settings
Windows Photo Viewer is not removed from Windows 10, but it has been disabled because of the new Photos app. You need to enable it by editing the Windows registry and getting back the Preview option that is not showing in the right-click. So, follow the steps and make changes to the Registry Settings.
- First, you need to open the Run dialog box by pressing Win + R keys.
- In the empty field, type
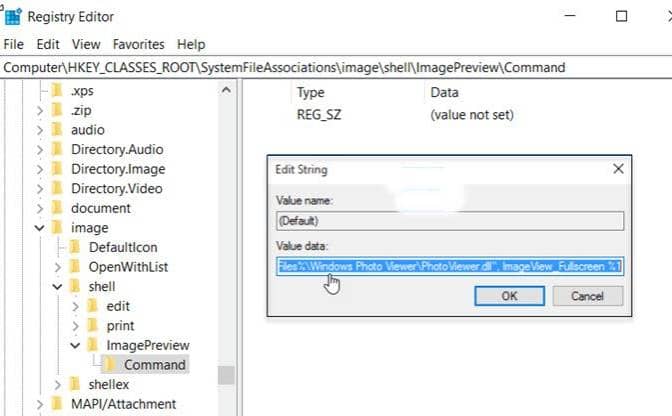
Regeditand press Enter. - It opens Registry Editor; here, look for the path address shown below:
HKEY_CLASSES_ROOT\SystemFileAssociations\image\shell
- If you don’t find it, create it and add 2 more subkeys.
Image PreviewandCommandHKEY_CLASSES_ROOT\SystemFileAssociations\image\shell\Image Preview\Command
- Now edit the string value by double-clicking the Default entry
- Set it to
%SystemRoot%\System32\rundll32.exe "%ProgramFiles%\Windows Photo Viewer\PhotoViewer.dll", ImageView_Fullscreen %1
 Now, exit from the editor and restart your PC. Now, go to File Explorer and do right-click on any image, and check whether the Preview option is available or not.
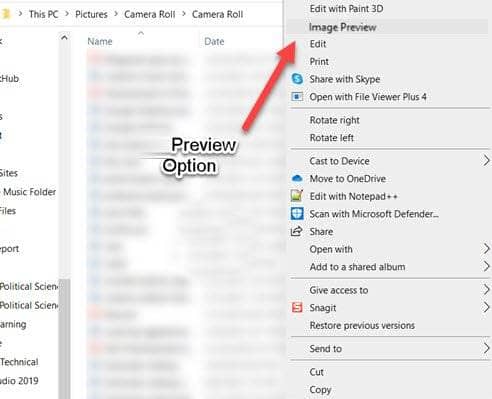
Method 2: Set Windows Photo Viewer as Default for Images
The Preview option is available only for picture-type files, and for it, the Windows Photo Viewer should be the default viewer. If the Windows Photo Viewer is set as default for JPEG files, you will only see the Preview option for JPEG files. So, you must set it as a default for any image file type.
- First, go to the image and do right-click on it
- Select Open With and tap on Choose another app

- From the list, select Windows Photo Viewer and click on the check box. Always use this app to open this type of file and tap on OK.


As you have made these changes, whenever you will open this type of image, you will see the Preview option in the Context menu. Or set Windows Photo Viewer as default for all types of images. Here’s how you can set it as default for all image types.
Set Windows Photo Viewer as Default for All Types of Images
Use the Settings App on Windows 10
- Open Windows 10 PC and go to Start Menu
- Click on the Settings icon OR directly open the Settings app by pressing Windows + I keys.
- Now, click on the Apps option and then Default Apps.

- In the Default apps list, scroll down and look for Photo Viewer
- There you can see, Photos App is the default app. Change it
- Click on Photos and Choose an App
- From the list, click on Windows Photo Viewer and make it a default photo viewer for all types of images.


Also Read- Best Ways to Open WebP Images in Windows 10


