Physical Memory Dump Error is a BSoD error commonly encountered in older generation computers running on Windows 7 and Windows 8. This issue is also encountered in modern-day computers but is less common. This is because all the memory contents are stored safely and displayed on your screen in the memory dump.
Physical memory dump generally occurs when your system crashes and fails to load. In this case, your PC will be stuck in the boot loop. It means your PC will start, you will get this physical memory dump screen, and your PC will restart. First, let’s discuss how to fix the Physical Memory Dump error on your PC.
Fix Physical Memory Dump Error on Windows 11/10
This issue is mainly related to reasons like faulty hardware, hardware incompatibility, as well as due to corrupted system files on Windows. Given below are all the working solutions to fix the physical memory dump error-
1. Run SFC and Check Disk Command
The first troubleshooting step is running the SFC and Check Disk commands. SFC scans your PC for corrupted data files and fixes them, whereas Check Disk Command looks for error in the current partition and fix them.
If the issue is being caused due to corrupted system files, then this will fix this issue. To do so, follow the steps given below-
- Ensure your PC is turned off, and then insert the Windows Installation media on your PC.
- Now, turn on your PC and boot from the Windows installation media.
Note- The steps to boot from Windows Installation media can differ for different PCs. So you will have to check your PC’s guide on how to do so.
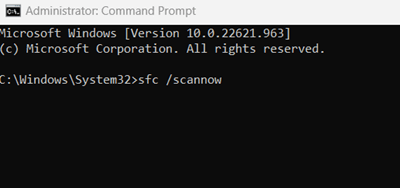
- Press Shift + F10 when the Windows Setup dialog appears. This will open Command Prompt.
- Execute the following command to run the SFC scan-
- sfc /scannow

- sfc /scannow
- Now execute the following check disk command-
- chkdsk c: /r
- Once done, close the Command Prompt and restart your PC normally.
2. Run Startup Repair
If your PC fails to start, you can run the startup repair. This will determine and fix all the errors that occur during the startup. To do so, follow the steps given below-
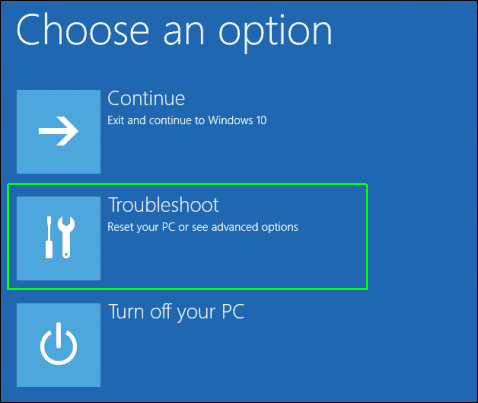
- First, boot your PC with the Windows installation media.
- On the Windows Setup screen, you will see the Repair your computer button; click on it.
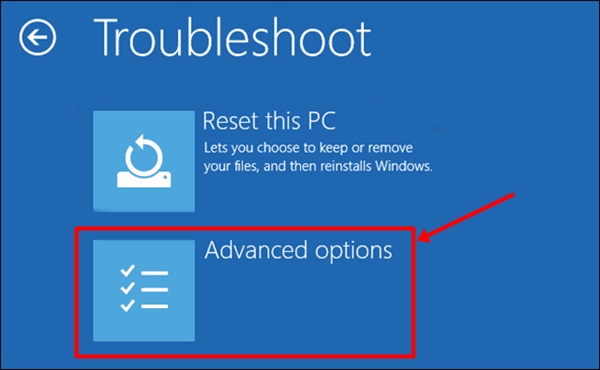
- Next, click on the Troubleshoot option.

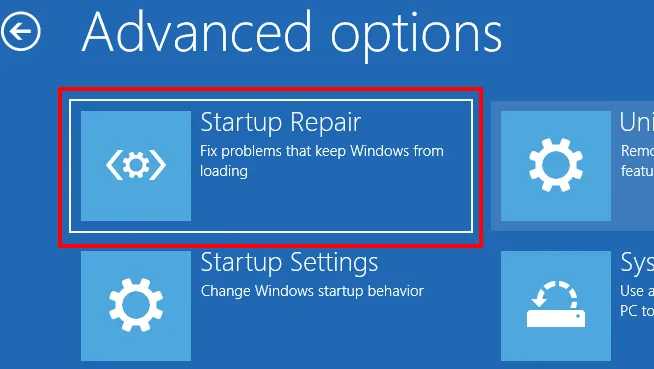
- Now, click on Advanced Options.

- Select the Automatic Repair option. If you see Startup Repair instead of Automatic Repair, click on it.

- Now, follow the on-screen instructions to run the Startup Repair.
3. Run Diagnostics
You can run Diagnostics on your PC to check for any hardware issues. Physical memory dump generally occurs when there’s some issue with your PC’s hard drive or RAM. Diagnostics will scan for hardware issues on your PC. To run Diagnostics, follow the steps given below-
- Firstly, ensure your PC is turned off.
- Now, press the power button on your PC to turn it on. Press the Boot Key as soon as the screen turns on to head to the BIOS Menu.
Note- The boot key in most of the computers will be F1, F2, or F12. You will have to check what’s the boot key for your PC.
- In the BIOS Men, search for the Diagnostics option. Highlight it using the arrow keys and press Enter to select it.
- Wait for the Diagnostics to finish its task. This will report any hardware issues on your system.
4. Use Memtest86+
Like Diagnostics, you can also use Memtest86+ to test your PC for memory-related issues. However, you will need another PC to download and extract this software to a USB drive. Given below are the steps to use Memtest86+ on your PC-
- Plug in the USB flash drive to the system that is working fine.
- Head to the Memtest86+ download page on that PC by clicking this link.
- Click on the download link under the Download section to download the file.
- Open File Explorer and navigate to the location where the file is downloaded.
- Right-click on the file, then click on Extract Here and then extract the file.
- Double-click on the extracted folder, and then double-click on the installation setup to run it.
- In the installation wizard, select the USB Flash Drive to which you want to burn this software; click on Create button.
- After the software has been burned, unplug the USB Flash Drive from your PC.
- Connect the USB Flash Drive to the computer on which you are facing the memory dump error.
- Boot your PC with the USB Flash Drive, and Memtest86+ will start its work.
- If the test is successful, then that means there are no issues with the memory.
5. Perform In-Place Upgrade
If Diagnostics and Memtest86+ report no hardware issues, this is probably a software bug causing a physical memory dump. In that case, you can perform an in-place upgrade to refresh your Windows without affecting your files. To do so, follow the steps given below-
- Connect the Windows installation media to your PC, and boot it with it.
- Click on Next in the Windows setup dialog.
- You will now have to agree to the license agreement; click on Accept to continue.
- The Ready to Install window will open up. Here, ensure the Keep personal files and apps option has been checked.
- If the above option is not checked, click Change what to keep and select Keep personal files and apps.
- Now, click on Install to continue installing Windows.
- Your PC may restart several times during this process.
- Once done, you will see the sign-in screen of Windows.
6. Get the Hardware Checked
If Diagnostics and Memtest86+ reported some issues, you must get your hardware checked. Hard disk failure, corrupted RAM, and hardware incompatibility can be causing this issue. You must take your PC to a technician and get it diagnosed.
They will tell you whether the hardware needs to be replaced; furthermore, they will guide you with what can be done next to fix this issue.
Bottom Line
The physical memory dump error occurs when your system fails to load. We have discussed how to fix this error in the article above. However, if you are stuck in this error, this guide should help you fix this error.


