Windows 11 is officially out and it is a biggie. It has high system requirements, so anyone trying to upgrade from Windows 10 to Windows 11 must meet those requirements to upgrade.
It turns out that although a majority of Windows 10 users will be able to upgrade, citing they have required system hardware, some users have intercepted the message “Something went wrong” along with error code 0x8007007f.
A lot could go wrong here. To sum up, according to most user reports, this issue has affected those who tried Windows 11 Installation Assistant on their Windows 10-powered computers. Users have complaints that the update progresses until 70% and then see the error message.
It turns out the error code associated with this issue is rather generic. To sum it up, the error is allegedly being caused due to insufficient storage, outdated drivers, corrupt system files, or insufficient administrator permissions. Read along to know how you can fix it.
1. Restart Your PC
Your first point of combat to fix the Windows 11 update issue is to restart the PC. There’s no rocket science involved here; simply power down the device by going to Start Menu > tap on the Power option. Select Restart from the menu.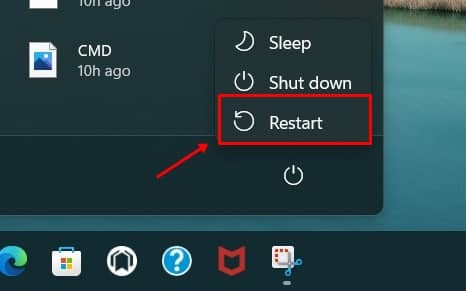
You will have to wait for a few minutes but once the PC reboots itself, check if updating to Windows 11 is any problem even now.
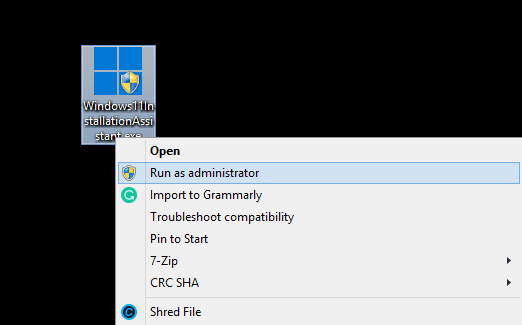
2. Run Windows 11 Installation Assistant as an Admin
The probability of intercepting error code 0x8007007f when upgrading to Windows 11 is higher while using Windows 11 Installation Assistant. It turns out that using an assistant does the job. However, some system files may obstruct their progress as they may not have the necessary access to modify specific system files.
Using Windows 11 Installation Assistant as admin can help bypass the issue while ensuring you repeat the same procedure to upgrade to Windows 11 that you used earlier.
- First, right-click on the Windows 11 Installation Assistant icon, tap on “Run as administrator”.

- Repeat the procedure you did earlier, upgrading to Windows 11. There are high chance that you will be able to install Windows 11 without much hassle.
3. Update Graphics Driver
Outdated graphics drivers would render graphics cards either short of their full capacity or make them incompatible. Therefore, updating the driver that runs the graphics processor is crucial, and almost all OEMs have released updated versions of drivers to support Windows 11.
Assuming that an outdated graphics driver caused the system to not upgrade to Windows 11, here’s how you can upgrade to the latest driver and fix this issue.
- Launch the Run dialog box on your PC by pressing Win + R.
- Enter command devmgmt.msc.

- Find a graphics card under Display adapters and right-click on it.
- Select Update driver, and follow on-screen commands.

- If this doesn’t work out, try uninstalling the driver.
- Once you restart the computer, your system will automatically install the driver for the graphics card you are using.


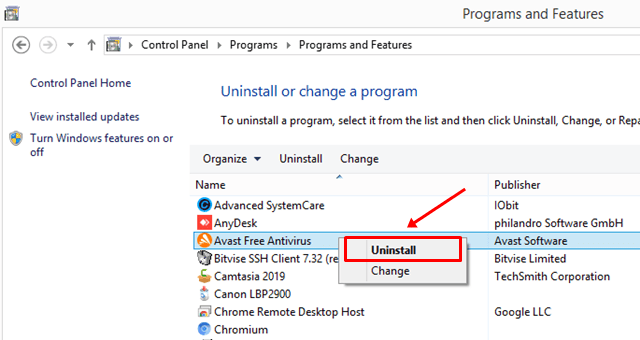
4. Disable Antivirus on your PC
Third-party Antivirus programs installed on your computer can interfere with Windows 11 installation. If that’s a problem, I recommend uninstalling the antivirus so that you can upgrade to Windows 11. You can uninstall third-party antivirus by following the path
- Navigate to Control Panel >> Uninstall a Program and Right-click on antivirus and Tap on the Uninstall button.

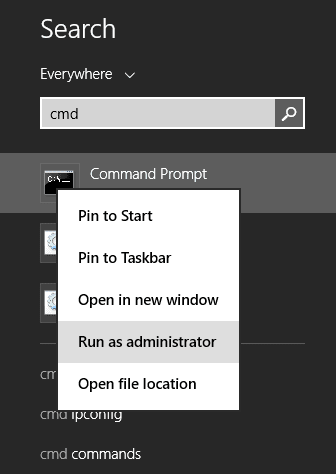
5. Scan for Corrupted System Files
As you can tell, corrupted system files can act as an obstruction towards upgrading to Windows 11 and it has been tied to the error code 0x8007007f of Windows 11 Installation Assistant. Thus, a complete system file checkout is mandatory to verify if there’s a corrupted system file or not.
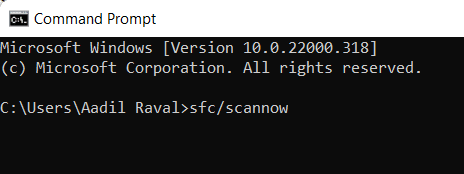
- Press the Windows button on your PC and search for Command Prompt or CMD. Right-click on the listing to select “Run as administrator”.

- Confirm when the system prompts.
- Type the command SFC /scannow.

- The system will automatically run said command to scan for damaged or corrupted files and take necessary measures to fix them.
- You will need to restart the PC do it and try using the Win 11 Installation Assistant again to upgrade.
6. Free Some Storage on Disk
Error code 0x8007007f that you could get during the Windows 11 upgrade is laced with storage issues. It would help if you had quite a lot of space on your PC to ensure Windows 11 is installed correctly. I am talking about keeping at least 100GB or more space clear for the Windows installation drive to do the job without throwing the error.
7. Make Sure Your PC Has TPM 2.0
You’ll need TPM 2.0 on your PC to support Windows 11 because, without it, you won’t be able to upgrade.
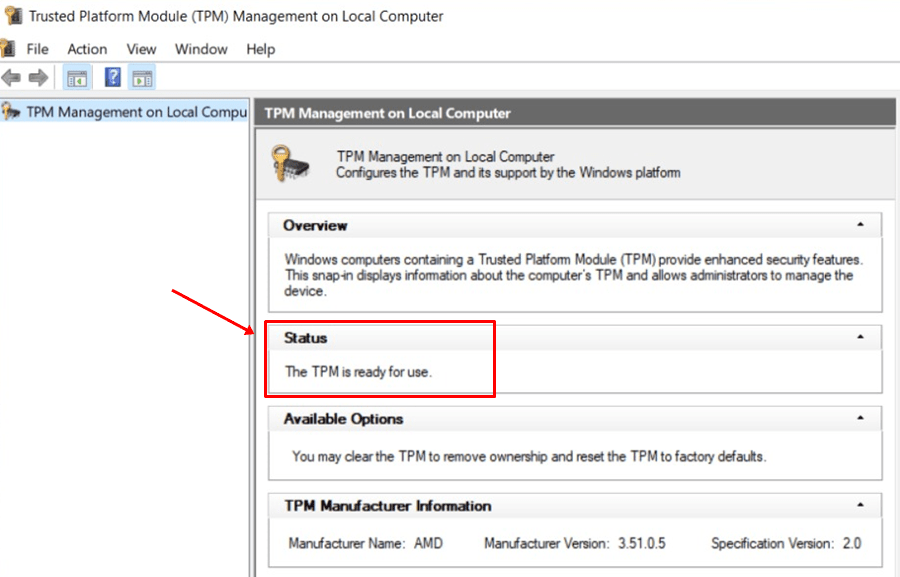
- To verify if TPM 2.0 is enabled or not, press Win+R on your keyboard. Search for tpm.msc, which should open Trusted Platform Module Management.
- Locate the section “Status”. See if it says, “The TPM is ready for use” or not. It must say so, which denotes your PC supports TPM 2.0.

If enabled:
- Reboot the system and press any of said keys to enter BOIS mode – F1, F2, F10, F11, or DEL.
- Navigate to Security > TPM Device, and select Available. Reboot the system and verify TPM.
If not enabled:
- Reboot in BIOS setup mode and proceed to Advanced > Boot Options > go to Secure Boot, enable it.
- Now, turn on the system and proceed to the startup menu.
- Go to Boot Device Option > Select the right drive where Windows 11 OS is available.
Final Words
You can use various troubleshooting methods to fix the Error Code 0x8007007f while upgrading to Windows 11 using its Installation Assistant. You just need to try these one by one and see which method helps you solve your error. If you have any doubts, let us know in the comments.


