The Spotlight feature is a great way to make your Windows 11 visually appealing with different background wallpapers, although many users prefer a simpler look rather than using the Spotlight feature and want to rid of the Learn about this picture icon.
If you’re one of them and wondering how to remove the ‘Learn more about this picture’ icon in Windows 11, let us help you omit the Windows 11 Spotlight feature icon from the desktop.
What is Windows Spotlight Learn More About This Picture Icon
Pretty simple, Windows Spotlight is a personalization feature that downloads images from the Bing image and displays them on the lock screen and desktop. The feature is available from Windows 10.
We’ll get this feature on selected Windows themes, all themes neither show the Learn more about this picture icon on the desktop nor change wallpaper randomly.
Once you select Learn about this picture icon supported theme, it starts to change the background image on a daily basis to give a fresh and vibrant look each day.
Although in the initial few days, Windows Spotlight displays specific installed background images, after some time, it proceeds to use downloaded images in rotation.
Clicking on the ‘Learn more about this picture’ takes you to the Bing search engine. If you right-click on the icon, you can rate the picture, whether you liked it or not. Moreover, you can change the wallpaper if you don’t like the current one.
How to Remove Learn About This Picture Icon in Windows 11
Even though you can change the icon position, Windows doesn’t allow you to delete the Learn more about this picture icon from the desktop in the same way you delete another app icon from the desktop. However, we’ve two simple methods to say goodbye to the Windows spotlight icon.
1. From Windows 11 Settings
This is the simplest and most common method to remove the Learn more about this picture icon in Windows 11.
- Launch the Settings app on your Windows by pressing the Windows + I key.
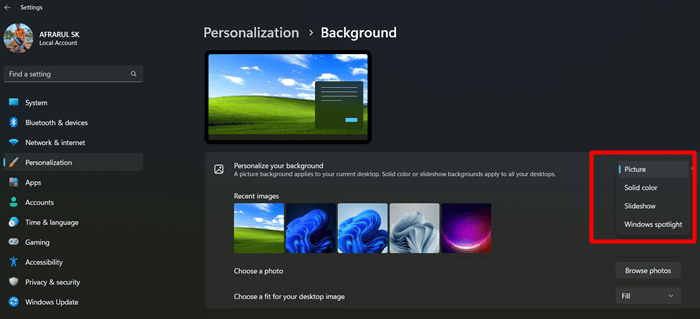
- Then click on Personalization > Background.
- Now select any option like Slideshow, Solid Color, or Picture except Windows Spotlight on the Personalize your background drop-down menu.

2. Using Registry Editor
Registry Editor is a useful program to change any configuration within software and hardware. Using Registry Editor, you can also get rid of the Learn about this picture icon easily. Here’s what you need to follow.
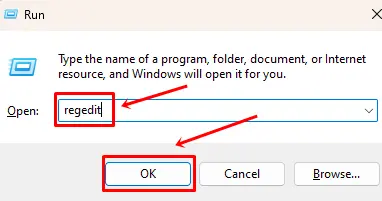
- Open Run and paste regedit; after that, hit the Enter button to open Registry Editor.

- On Registry Editor, paste this path and Enter:
HKEY_CURRENT_USER\Software\Microsoft\Windows\CurrentVersion\Explorer\HideDesktopIcons\NewStartPanel
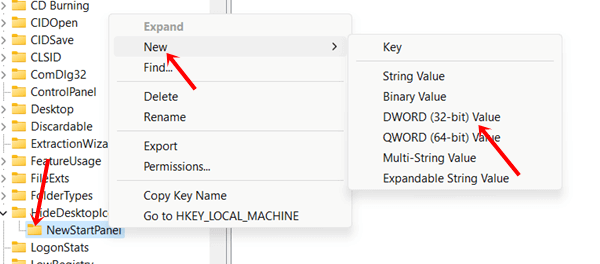
- Next, right-click on NewStartPanel, after that select New and then DWORD (32-bit) value.

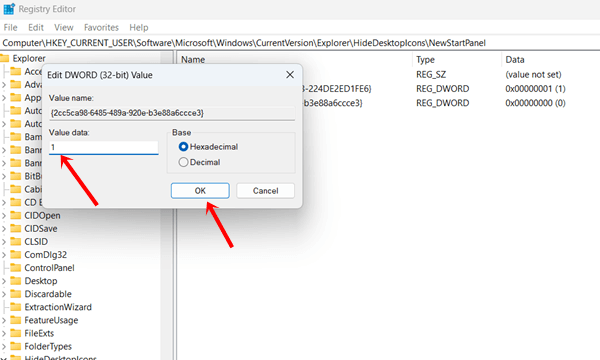
- Lastly, give this {2cc5ca98-6485-489a-920e-b3e88a6ccce3} value name.

- Now double-click on {2cc5ca98-6485-489a-920e-b3e88a6ccce3} and change the value data to 1 by replacing 0.

- Once everything is done, click on OK to execute the changes.
- Close Registry Editor and Refresh the system now you can’t see the Learn more about this picture icon on the desktop.
- If you want to enable Learn more about this picture icon, then simply delete the value you’ve created.
Conclusion
That’s the end, I hope this article comes in very handy for you to remove the Learn about this picture icon from your desktop. However, if you’re facing difficulties in making changes, then let us know your inconvenience in the comment box.


