In this comprehensive guide, we will talk about the methods used to restart Windows Explorer on Windows 11 and the benefits when you do it. Well, talking about Windows Explorer is a file manager that allows you to manage files, search, and navigate through files and folders.
It also lets you know how to work with files and folders, such as create, save and rename the file. However, Windows 11 without Windows Explorer is the same as mother earth without Ocean. So, I think you now understand how precious Windows Explorer is for us.
Restarting it isn’t an easy task because it takes your time and knowledge. But, as long as we are here, there is no need for you people to worry. So, now, let’s directly jump into the guide and check out the various methods.
What Happens When You Restart Windows Explorer in Windows 11 PC?
Don’t worry; it will not affect your PC as it is similar to restarting any other application or software. Generally, when we restart any app, our system shuts down the user’s shell and rerun it by giving it a fresh new start.
So, this means some processes like Taskbar, Start Menu, desktop, File Explorer, etc., all these things get reloaded if you restart the Windows Explorer on your Windows 11 PC. But, the good news is by doing this, issues like freezing, laggings, sudden crashing will automatically get fixed.
But, restarting the Explorer isn’t an easy task as some users find it a bit complicated, especially those who recently updated from Windows 10 to 11. So, if you are one of those, follow the different ways that we have discussed below to reboot the Explorer.
Also Read- How To Fix Random Restart Problems in Windows 11
List of Ways To Restart Windows Explorer on Windows 11 PC
Here we have mentioned a couple of methods to help you restart Windows Explorer on your Windows 11 PC. So, you can use the methods that you find more convenient to you. Therefore, now let’s take a look at the methods:
Method 1: Using Command Prompt/Windows Terminal/PowerShell
The first method that you can do is use the command prompt or Windows Terminal or PowerShell. So, in case you don’t know how to do this, follow the steps that we have mentioned below:
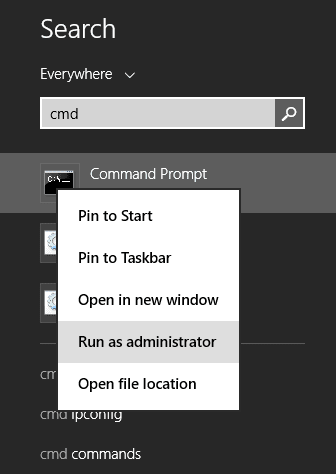
- Firstly, use the Windows Search bar, search for any application, and open it using the admin rights.

- Now, execute the command: taskkill /f /im explorer.exe

- After that, immediately you’ll notice that the Start menu and the taskbar get disappear. This means that you have successfully shut down the Explorer.
- So, now to again start it, execute the following command: start explorer.exe


Method 2: Using a Batch Script
If you find the above method a bit complicated, you can try using a batch script. This is very easy to execute, and minimal effort is needed. So, here are the easy and essential steps that you require to follow:
- First, hover to the desktop and right-click on the empty space. Then, select New > Text Document.
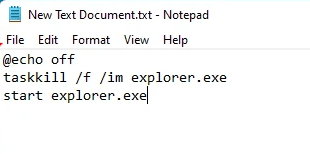
- After that, open that document in the Notepad app and paste the following script:
@echo off taskkill /f /im explorer.exe start explorer.exe - Then, click on the Files > Save as.

- After that, give it a name by putting .Bat at the end. Then, choose Save as Type to All Files.

- That’s it. Now, hit the Save button .Bat file shortcut will appear on the desktop. So, whenever you need to restart Windows Explorer, double-click on it.


Method 3: Using Task Manager
You can also use the task manager to restart the Explorer again on your Windows 11 PC. So, here is the necessary instruction that you require to follow to use it:
- Initially, open the Task Manager using Ctrl + Shift + Esc altogether.
- After that, tap on the More Details button.

- Now, switch to the Processes tab and select Windows Explorer. Then, hit the Restart button located at the lower right corner of the screen.


Method 4: Add Restart Explorer to the Context Menu
We regret if you find the above methods a bit complicated, then you can use the context menu for easier access. But, to use it, you need to add some specific files in Windows Registry. So, in case you don’t know how to do this, follow the steps given below:
- First, hover to the desktop and right-click on the empty space. Then, select New > Text Document.
- Then, open the Document in Notepad and copy-paste the following text: Click Here to Get the Code.
- Now, hit the Save As button and give your file a name using .reg at the end.
- Then, click on the Save as type > All Files > Save.

- That’s it. Now, your Windows Registry file will be saved on the desktop. So, double-click on it.
- Now, if prompted, click on the Yes > Ok.

- Then, to restart the Explorer, you can right-click on the desktop and select Show more options.
- Finally, a drop-down menu will appear. From that, click on the Restart Explorer. Then, select either Restart Explorer Now or Restart Explorer with Pause.


Conclusion
There are various reasons why you must have to restart Windows Explorer as it helps you fix many issues that occur due to some random issues. But now you know how to restart it. We hope this guide has helped you. But, in case you have any doubt while performing the above methods, then let us know in the comment section.


