Instant Search, a feature introduced by Microsoft in Windows Vista more than a decade ago, has become a standard feature. This feature made finding your files and applications faster, easier, and more relevant. Further, even in Windows 11, the Search and Index Control Panel is still an essential component of Instant Search in the current version of Windows.
Microsoft Windows indexes local content on the user’s computer to provide faster results when users search for files, emails, or other types of local content. Indexing options are divided into Windows 11: Classic indexing and Enhanced indexing options.
Using the classic indexing option, you can find all content in the user profile folders, including Documents, Pictures, Music, and the Desktop, are automatically indexed. In addition, users can include additional content by adding additional locations to the index using the Classic indexing option. First, let’s find out how users can disable or enable Windows search indexing in Windows 11.
Also Read- How to Reset Windows 11 to Default Factory Settings
Steps to Disable Windows Search Indexing in Windows 11
As previously stated, Windows Search indexes the content on the user’s computer to provide faster and more accurate results. The search indexer is a service that runs in the background and indexes search results.
You can search Windows without using the indexer that comes with it. As a result, if you disable Windows search indexing, you may not get as fast or as enhanced results as you would otherwise. Here’s how to do it:
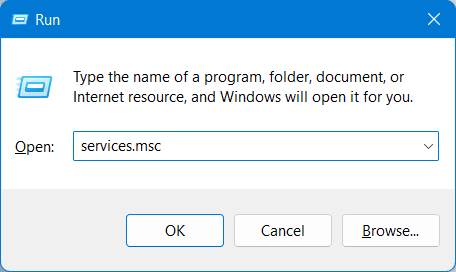
- Press Windows Key + R to open the run dialog box.
- Type: services.msc and Hit the enter button in the Run dialog box.

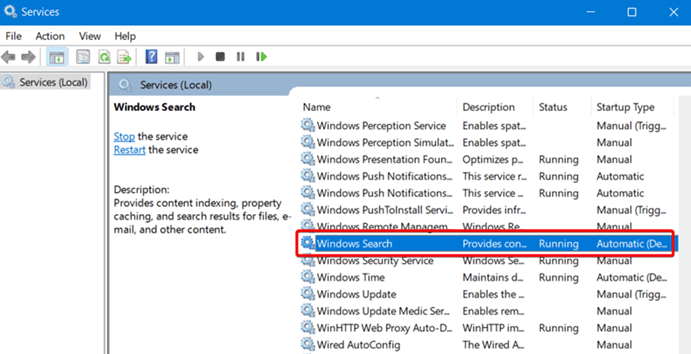
- Now keep scrolling until your find Windows Search Service. Once you find it, double click on it to open.

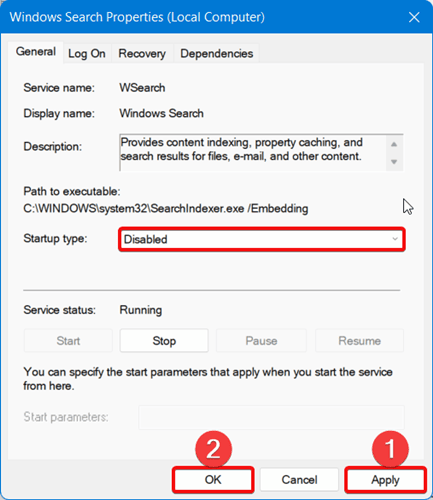
- In the next window, click on Stop and move down to Startup Type and select Disabled from the drop-down menu.
- Finally, click on Apply followed by OK.

That’s it. Now your Windows search indexing is disabled. When you turn off the Windows Search service, the indexing for Windows Search will be turned off as well. However, if you wish to turn it on again, in the next section, we will explain how to do that as well.
Steps to Enable Windows Search Indexing in Windows 11
If you are here, you have already read about how you can disable the Windows search indexing. While you may be uncomfortable after this, it would be wise enough to enable this service to make your lives easier. Follow these simple steps:
- Press Windows + R key to open the run dialog box.
- In the run dialog box, type: services.msc and press Enter.
- Now keep scrolling down until your find Windows Search Service. Once you locate it, double-click to open it.
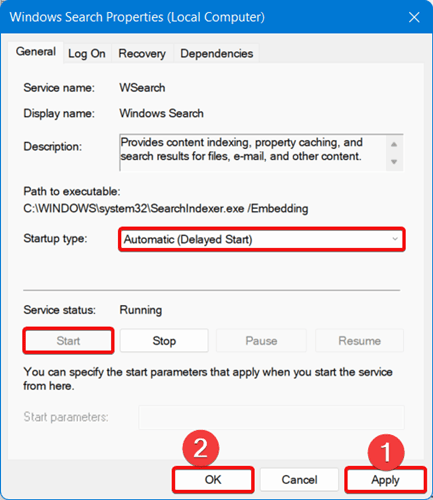
- In the next window, move down to Startup Type and select Automatic (Delayed Start). After that, click on Start.
- Lastly, click on Apply and then OK.
Now you have successfully enabled Windows search indexing. That’s all we have here about enabling and disabling the Windows searching indexing feature and how helpful it is. We hope this guide has helped you.


