Chromebook has been there in the area for a long time, and despite being in such a long time, they have not made a dent in the market. But, several users still use the Chromebook in their daily routine work. Well, Chromebooks aren’t like the normal laptop that is available in the market. This device is run on Chrome OS, which is an operating system made by Google.
Generally, office buddies use the Chromebook. But, sometimes, users find it difficult when it comes to multitasking on this Google device. That’s why we are here with a new guide to help you share one or more tabs on a single screen by using the split-screen mode on Chromebook. So, let’s get started.
Also Read: Google to Roll Out Dark Theme For ChromeOS Soon
List of Best Ways to Use Split-Screen Mode on Chromebook
There are several methods available using which you can easily use the split-screen feature on your Google Chrome. But, here, we mentioned the easiest way to do so. So, let’s look at those methods:
Method 1: Use Shortcut Key to See Two Windows
This method is very simple and handy. You can do this simply by following the steps we mentioned below. So, make sure to use the guidelines carefully, one after the other:
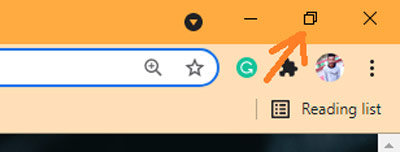
- Firstly, open one of the windows, then click and hold maximize button.
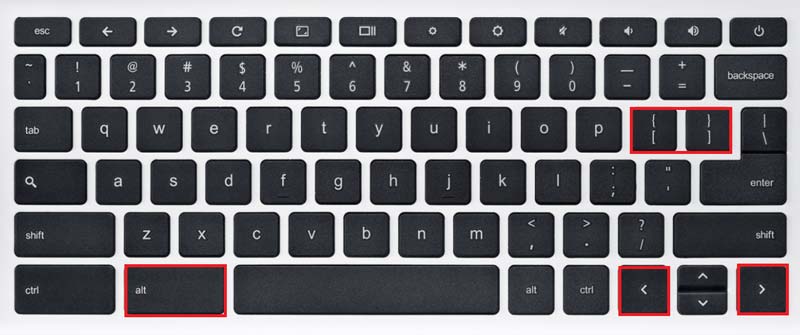
- Then, use the left and right arrows of your keyboard to drag the window accordingly.
- That’s it. Now, repeat the same method for your second window.
Note: One more shortcut is available to drag the window on your Chromebook, i.e., Alt + [ or Alt + ], to move left and right, respectively.
Method 2: Use Drag and Drop
If the above method doesn’t work in your case, then you can simply try this. To use the split-screen mode, you can simply drag and drop the window on the left or right sides of the screen as per your need. To do this, grab the opened screen using the top menu bar, and drag it to either left or right side of the screen.
Method 3: Use Maximize Button
You can also utilize your Chrome’s maximize button. So, to do this, you can simply click and hold the maximize button. After that, you’ll notice two arrows at the left and right of the maximize button, as shown in the picture below.
Therefore, if you hold down the mouse button and switch to the arrows, it will work the same as the dragging and dropping method discussed in method 2.
Method 4: From the Overview Screen
Here are the steps that you need to follow to split the screen from the overview section of the particular screen:
- First of all, run the apps that you wish to use in split-screen mode on your Chromebook.
- After that, press the Show windows button, which is located somewhere near the F5 button.
- Now, hold and try to drag the first app on the left side of the screen, where you’ll get a message Drag here to use split-screen.
- Finally, drag the other application to the right of the screen.
That’s it. Now, you can use both the application at the same time. So, these were some practical ways that you can use to split-screen on your Chromebook. We hope that you are now able to work in full flow on your Chromebook. Meanwhile, sue our comment section and tell us which method you liked the most.


