Windows XP and Vista are quite old and Microsoft ended their support long back. There will hardly be any PCs running on Windows XP or Windows Vista. In fact, the majority of the apps have ended the support for these older Windows (though you can run the older version of the apps).
As of writing this guide, Microsoft only supports Windows 10 and Windows 11. It is best to get either of these Windows if you want your PC to receive the latest updates and security patches and get maximum software support.
If you are currently running on Windows XP or Vista, then you cannot directly upgrade to Windows 10 through the media creation tool. Instead, you will have to go through the hard way if you want to get Windows 10 and want your data to be safe too. Worry not; this article will guide you through the complete process so you don’t face any issues.
Steps to Upgrade to Windows 10 from Windows XP to Vista
It will be a manual process to upgrade the PC from Windows XP/Vista to Windows 10. So you will first have to take the backup of all your files, create a bootable media for Windows 10, and then install the Windows.
But before that, you must ensure your system can handle Windows 10. Given below are the system requirements that your PC must meet to run Windows 10 without any issues-
- Processor- 1GHz or faster or a SoC
- RAM- 1GB for 32-bit system and 2GB for 64-bit system
- Graphics Card- The Graphics card should be compatible with DirectX 9 or the later version and should have a WDDM 1.0 driver
- Display- 800x600px resolution supported
- Storage- 16GB free storage for 32-bit system and 32GB free storage for 64-bit system
If you are system meets the above requirements then you can continue with the steps given below to upgrade it to Windows 10.
1. Take Backup
The first step of the process is to make a backup of your files. You can get an external drive and copy your files to that. If you have a second partition on your PC, then you can keep your files in that partition. If you copy the files to a partition on your PC, then that partition should be left undisturbed till Windows 11 is installed.
Do note that only files will be backed up during the process and there will be no backup of the app. This is because most of the apps supported on Windows XP and Vista won’t be supported on Windows 10.
2. Create Bootable USB Drive
Next, you will have to create a bootable USB drive for Windows 10 which you will use to upgrade your PC to Windows 10. However, for this process you will need a different PC with any Windows 10 or 11 to create a bootable USB drive; you won’t be able to create a bootable drive on Windows XP or Vista.
For the process, you will need another PC and a USB drive with 8GB storage. Once you have all these things, you can follow the steps given below to create a bootable USB drive-
- On another PC, head to the official Windows 10 download page by clicking on this link.
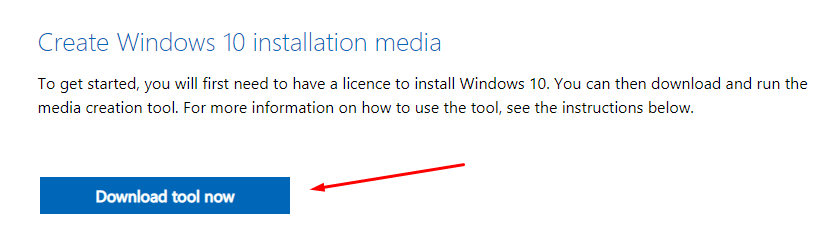
- Under the Create Windows 10 installation media section, click on the Download Tool Now button.

- Open File Explorer and head to the location where the Windows 10 media creation tool is downloaded.
- Double-click on the tool to run it. You will see a UAC prompt; click on Yes to continue.
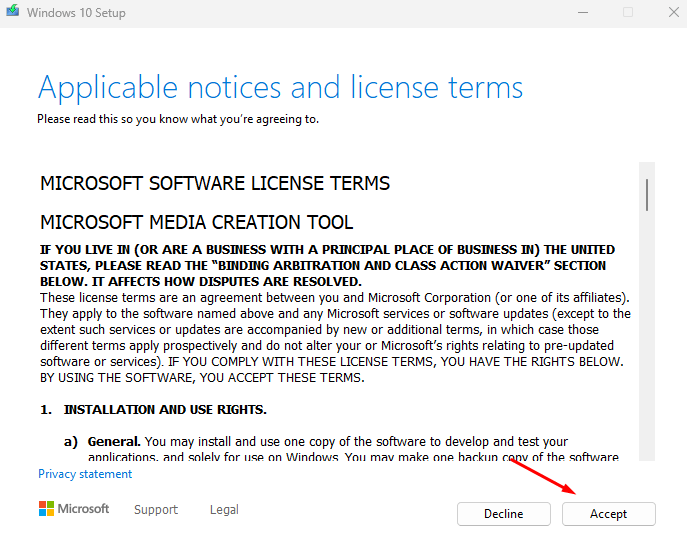
- Click the Accept button on the license terms screen.

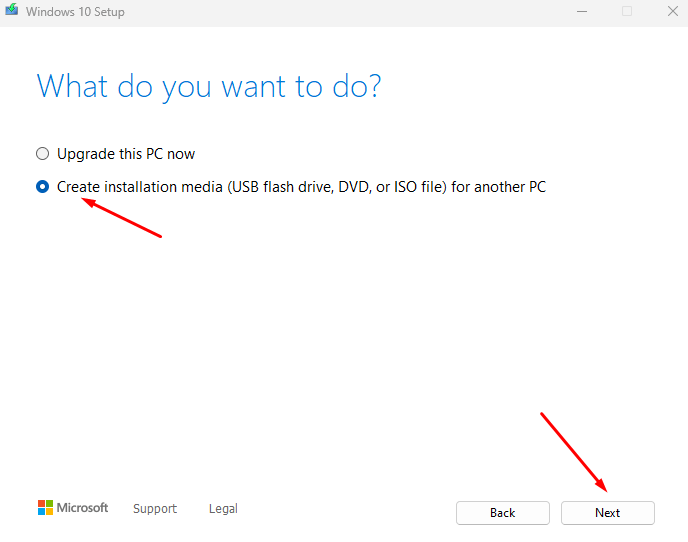
- On the next screen, you will see two options. Select ‘Create installation media (USB flash drive, DVD, or ISO file) for another PC’ and click on Next.

- Next, uncheck the ‘Use the recommended options for this PC’ option.
- After this select the Language, Edition, and Architecture. Once done, click on Next.
- Insert the USB flash drive on the PC and ensure there’s nothing on it.
- Select the USB flash drive option and click on Next.
- From the list select your USB drive and click on Next. If you don’t see the USB drive, click on the Refresh Drive List option.
- Now let the media creation tool do its job and create a bootable USB drive.
3. Install Windows 10
Once you have the bootable USB drive ready, you can begin with clean installing Windows 10 on your system. To do so, follow the steps given below-
- Plug in the USB drive on the PC on which you want to install Windows 10.
- Shut down your PC if it isn’t already.
- Now, press the Power button and press the boot key immediately. The boot key for most computers is generally Esc, F11, F12, and Del. Check your motherboard’s guide to know the boot key for your system.
- Boot your PC with the Windows 10 installation media.
- Select the Language, Time and currency format, and Input method. Once done, click on Next.
- Now, click on the Install Now button.
- You will be asked to enter the product key. Enter the product key and click on Next. If you don’t have the product key, click on I don’t have a product key option.
- Select the Windows 10 version you want to install on your system and click on Next.
- After this select the ‘Custom: Install Windows only (advanced)’ option.
- You will be asked to select the partition to install Windows. Select the partition with Windows XP/Vista, and click format. Select the partition again and click Next. If you want to make changes to the partition, then you can do that from here.
- Continue with the on-screen instructions to install Windows 10 on your PC.
Once Windows 10 has been installed, you can copy the files back to the PC from the external storage. Also, you will have to reinstall the apps once Windows is installed.
Conclusion
That should help you upgrade your PC to Windows 10 from Windows XP or Vista. Before you continue, ensure you have everything ready, including another PC, a USB flash drive, and a backup of your data. Follow the steps carefully to get Windows 10 on an old PC.


