WMPnetwk.exe is a part of the Microsoft Windows Operating System’s Windows Media Player Network Sharing Service. It was created by Microsoft. However, it is usually located in C: Program Files. Moreover, any software and hardware can be damaged by malicious programs named wmpnetwk.exe that malware programmers and cyber thieves create.
As such, if you are experiencing high CPU and Memory usage for WMPnetwk.exe in Task Manager on your Windows PC, please follow the steps discussed here. Let’s now address the fixes to make you free from this bane.
Also Read- How to FIX 100% High CPU Usage in Windows 11
Methods To Fix Wmpnetwk.exe High CPU & Memory Usage
Many users previously reported that their problem is fixed after running the full system file checker and DISM scan to repair the corrupted files. Therefore, you must also try this out and see if it helps or not.
Fix 1: Run SFC & DISM
Many users previously reported that after running the full system file checker and DISM to repair the corrupted files. Therefore, you must also try this out and see if it really helps or not:
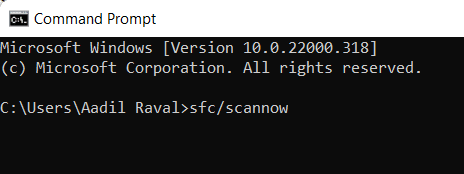
Run SFC Scan:
- Initially, open the Command Prompt using admin privileges.
- After that, execute the command: sfc/scannow.

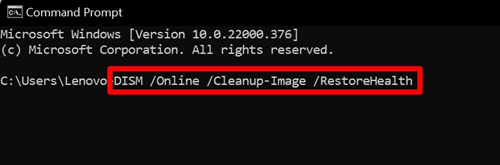
Run DISM Scan:
- Open The Command Prompt using the run as administrator option.
- After that, execute the command: DISM.exe /Online /Cleanup-image /Restorehealth

Fix 2: Disable The Windows Media Player
If you are bothered due to the WMPnetwk.exe error, then disabling the Windows Media Player also be a great option for you. However, these necessary steps will help you do so:
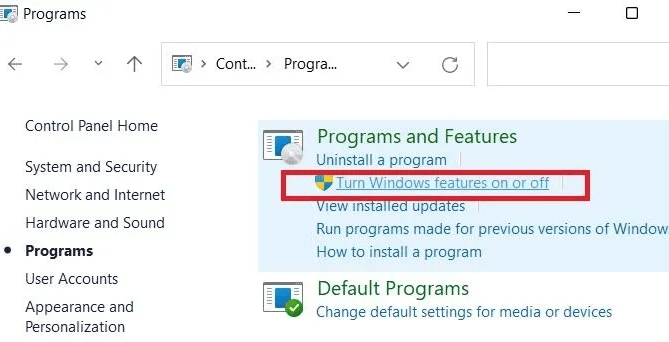
- Firstly, open Control Panel and navigate to the Programs and Features.
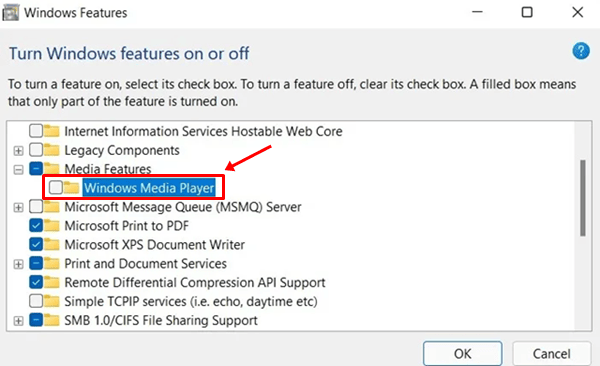
- Now, simply click on the link Turn Windows Features On or Off and expand the Media Features.

- Then, uncheck the box next to Windows Media Player and confirm your action by tapping on Yes > Ok.

Fix 3: Disable Media Streaming
As the Media Streaming app is by default enabled on your device, even if you are using it occasionally. Therefore, you must have to make sure to disable the media streaming service to fix the WMPnetwk.exe. So, let’s take a look at the guidelines:
- Firstly, launch the Windows Media Player and tap on the Stream.
- Now, from the drop-down list, select the More Streaming options.

- Finally, a list of media streaming options appears on your screen used by different applications; therefore, you need to tap on the Block All option. This will block all the application that is using the Media Streaming service.


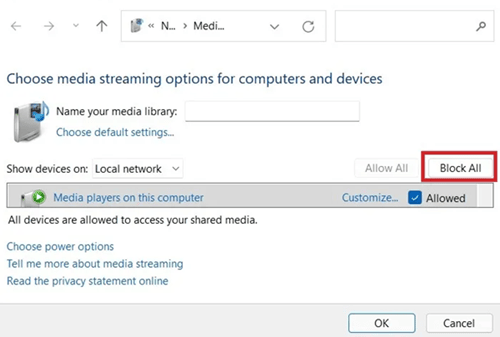
Note: In case you wish to enable this feature again on your Windows Media Player, follow the same 1 and 2 steps, then tap on the Turn on media streaming.
Fix 4: Scan For Virus
We have already stated before in this guide that it is possible that the WMPnetwk.exe may occur due to viruses or malware stored on your PC. Therefore, now to fix this, you must check if there are any relics of harmful content on your PC by using the following steps:
- Initially, use the Windows Search bar and search for the Virus & Threat Protection. Then, open it.
- After that, choose from the Quick, Full, Custom, and Offline scans. But, we suggest you run the Full system scan. Then, leave your PC until the scan process gets finished.
That’s it. Now, again check if the high CPU and Memory usage for WMPnetwk.exe in Task Manager on your Windows PC gets resolved or not.
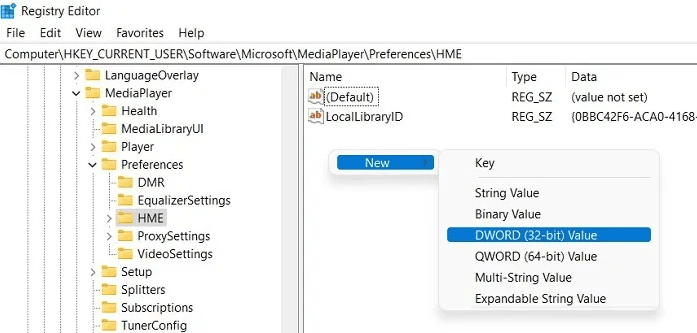
Fix 5: Use Registry to Disable Media Streaming
Users can also use the Windows Registry trick to disable the Media Streaming to fix the high CPU and Memory usage for WMPnetwk.exe in Task Manager on your Windows PC. So, let’s have a look at the instructions:
- First of all, run the Windows Registry using admin privileges.
- After that, navigate to the following:
HKEY_CURRENT_USER\Software\Microsoft\MediaPlayer\Preferences\HME
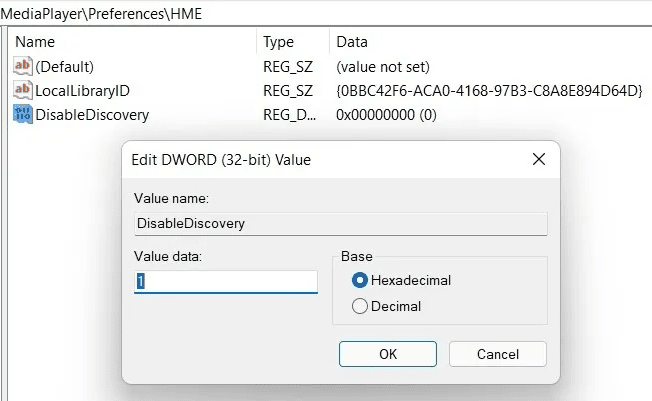
- Now, inside the HME folder, locate the DisableDiscovery key. But, in case you didn’t see this key, make sure to right-click on the empty space and create a DWORD (32-bit Value) key. Then, simply name it DisableDiscovery.

- That’s it. Now, right-click on the newly created key and set the Value Data from 0 to 1. Then, hit the Ok button. This will disable the Windows Media Streaming service.

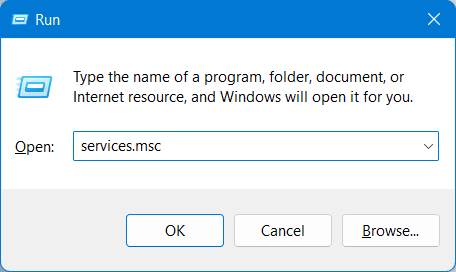
Fix 6: Disable Wmpnetwk.exe Service
It is seen that disabling the WMPnetwk.exe service helped a number of users to fix the high CPU and Memory usage in the Task Manager of Windows PC. Therefore, you must also try this and check if it helps to resolve the issue:
- Initially, open the Run prompt box and search for services.msc. This will open the Local Windows Services of your PC.

- Now, locate the Windows Media Player Network Sharing Service from the standard applications list.
- Then, click on it to open the Properties menu and switch to the General tab.
- After that, tap on the Startup Type to open the drop-down list. Then, change it from Manual or Disabled and hit the Ok button to apply the changes.


So, these were some fixes that will surely help you resolve WMPnetwk.exe high CPU and Memory usage in Windows PC. We hope that this guide has helped you. However, in case you need more info, comment below.


