Ever faced a Blue Screen Of Death Error while using Windows PC? It is one of the most annoying errors you may encounter, preventing you from continuing your work.
This isn’t something new to Windows 11, but users encountered this in the previous version of Windows (including Windows 10). However, the blue screen is now more of a black screen in Windows 11, except for the same error.
BSOD error is easy to fix, but if you face it again and again, it may prove fatal to your PC. Every Blue screen error has some error code that tells which you face this error.
Often, the error is encountered due to hardware issues, whereas sometimes, the issue may be due to software-related reasons.
Incompatible drivers, outdated Windows, faulty Windows updates, third-party applications, and such may be why you face the issue.
With some workaround, you will be able to fix this issue easily. This article discusses some troubleshooting steps to fix Blue Screen on Windows 11.
Best Ways to Fix Blue Screen On Windows 11
Given below are the steps to help you fix the Blue screen on Windows 11-
1. Update Windows 11
If you face this issue, then the first thing you should do is update the Windows. To do so, follow the steps given below-
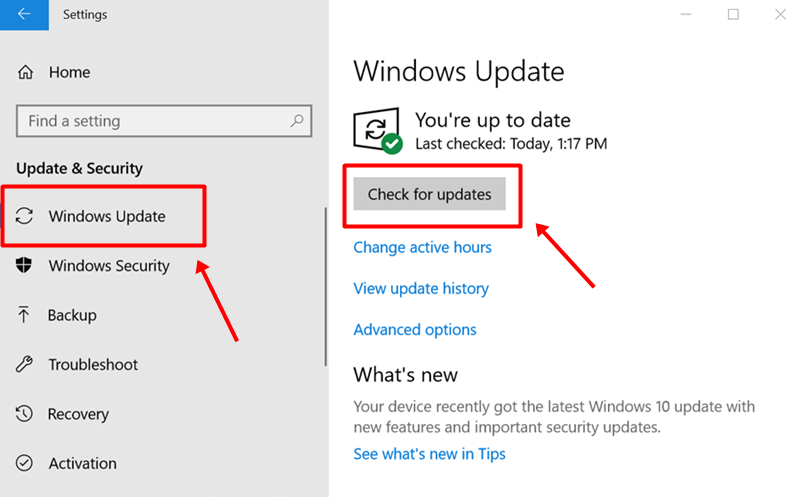
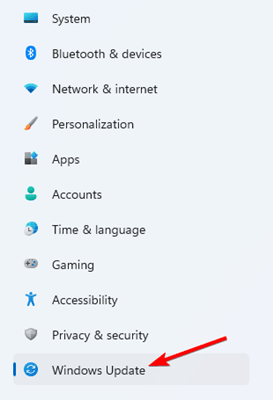
- Press the Windows key and then click on Settings to open it.
- Here from the left sidebar, head to the Windows Update section.
- Now click on Check for Updates. Download and install all the updates and then restart your PC.

- This should fix the Blue screen on Windows 11.
2. Run SFC And DISM Scan
Corrupted system files are also a possible cause of facing a blue screen on Windows 11. If the issue is due to corrupted files, you can try running the SFC and DISM scan. To run an SFC scan, follow the steps given below-
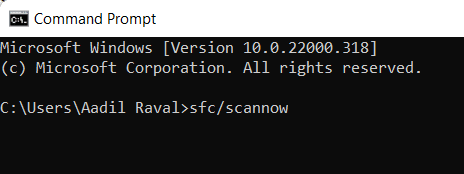
- Open Start Menu, search for CMD and run it as administrator.
- Type and execute the command sfc /scannow

- Wait for the process to complete, and then restart your PC.
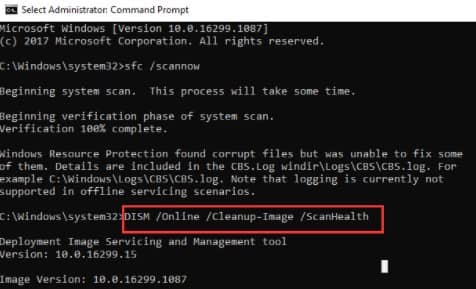
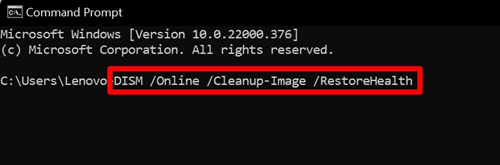
This should most probably fix the issue you have been facing, and if it does not, you should try running the DISM scan. Given below are the steps to run the DISM scan-
- Run the Command Prompt as administrator.
- Now, execute the following commands-
- DISM /Online /Cleanup-Image /CheckHealth
- DISM /Online /Cleanup-Image /ScanHealth
- DISM /Online /Cleanup-Image /RestoreHealth


- Once done, restart your PC and the issue should be fixed.
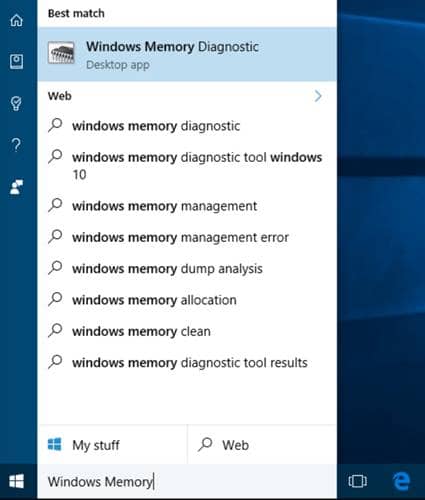
3. Use the Windows Memory Diagnostic Tool
Many times the issue may be caused due to issues with the RAM. If you encounter a blue screen due to RAM issues, you can run the Windows Memory Diagnostic Tool to fix it. To do so, follow the steps given below-
- Click on the Search Icon, search for Windows Memory Diagnostic and open it.

- Next, click on Restart now and check for problems.

- Your PC will now reboot, and after it starts, you will no longer face the issue.

4. Run Antivirus Scan
Malware and viruses on your PC may also be the cause behind facing this error. If that is the reason behind facing the error, you should try running the Antivirus scan.
Windows Security does the work in most cases, but we recommend using third-party antivirus software.
If you have a third-party antivirus on your PC, then you can use it to scan your PC for viruses and malware infections. However, if you don’t, using Windows Security will also work.
5. Update Driver
The outdated driver may also cause the blue screen issue in Windows 11. You should try updating the driver to fix the problem. Given below are the steps to help you update drivers-
- Press the Windows + I key combo to open Settings.
- Click on the Windows Update option.

- Next, head to Advanced Options > Optional Updates > Driver Updates.

- From here, download and install the driver updates.

6. Uninstall Update
After installing the Windows update, uninstalling the update will help you if you start facing this issue. To uninstall the update, follow the steps given below-
- Open the Settings app on your PC by pressing the Windows + I key combo.
- Head to the Windows Update section on the left sidebar.
- Now, click on Update History and then on Uninstall Update.

- Select the recently installed update and click on Uninstall to uninstall the update.


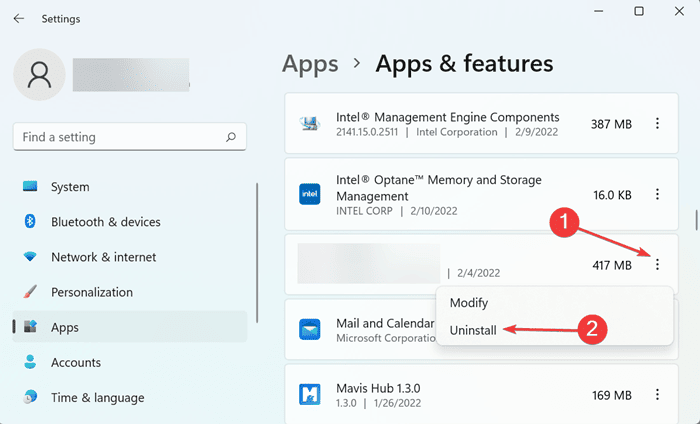
7. Uninstall Recently Installed Application
Many users have reported facing this issue after installing some third-party applications on their PCs. If you encounter a blue screen on Windows 11 after installing a third-party application, then you can try uninstalling it and check if you still face the issue or not.
- Press Windows + I key combo and this will open the Settings app.
- Click on Apps, click on the left sidebar, and click on Apps & Features.

- Click on the three ellipses next to the recently installed app and click on Uninstall.

- Uninstall the app, and then restart your PC. After doing so, the issue will be fixed.

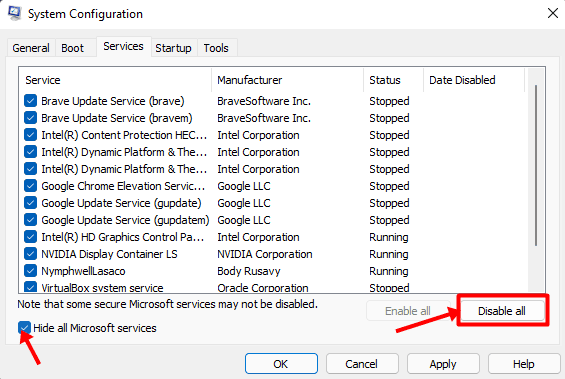
8. Perform A Clean Boot
Many times performing a clean boot may also be a fix to the issue you have been facing. You can perform a clean boot by following the steps given below-
- Click on the Start Icon, search for System Configuration and open it.
- Head to the Services tab, tick the Hide all Microsoft Services and click on Disable All.

- Open Task Manager and Head to the Startup tab.
- Right-click on the service, and then click on Disable. Do this one by one for all the services.

- Restart your PC to clean boot.

9. Perform System Restore
You can also perform a system restore to fix the issue. However, to continue ahead with this step, you will need the restore point to the time when your system was working fine. The steps below will guide you in performing system restore.
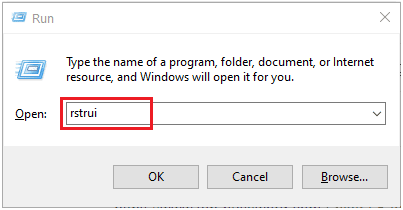
- Press Windows + R key combo, type rstrui, and click OK.

- Next, select Choose a different restore point and click on Next.

- Select the restore point, and click on Next.
- Note- If you want to know what programs will be uninstalled and installed after performing the system restore, click on Scan for affected programs before clicking on Continue.
- Now click on Finish and wait for the system restore to complete.

10. Reset Windows PC
If you still face the issue, the last option would be to reset your PC. Before continuing with this step, ensure you take a backup of your data. To reset your Windows PC, follow the steps given below-
- Press Windows + I key and this will open the Windows 11 Settings.
- Click on System on the left side, and then click on Recovery.
- Click on the Reset This PC button. You will be given two options- Keep My Files and Remove Everything.

- Keep my files- This will remove all the apps and settings but keep your files.
- Remove Everything- This will remove all the files, your apps, and settings.
- Select your preferred option and follow the on-screen instructions to reset your PC.

Final Words
BSOD errors can easily be fixed by following the steps in this article. This error prevents users from using their PCs normally. If you somehow encounter this error, refer to the steps mentioned in this article to help you fix them.


