Windows 10 can create a virtual machine, which is the most potent feature Windows 10 has. A virtual machine competes with the computer system to run different operating systems and programs. It is beneficial while testing out new features without any risk. With a virtual machine, you can install anything you want to on your central system.
However, not all computers can run a Virtual machine. But if you want to run, then you can create one with the help of Windows 10. Windows 10 has hardware virtualization support, which can be done via Hyper-V, a virtualization platform. On your Windows 10, once you enable Virtualization, you can create a virtual machine.
To create a virtual machine, you must first enable hardware virtualization on Windows 10. So, to do this, your computer system needs some requirements, and if the system meets all the requirements, you can go ahead and follow the steps.
System Requirements for Hardware Virtualization
- 64-bit processor with Second Level Address Translation (SLAT)
- Minimum 4GB RAM or more in the system
- Windows 10 Pro or Enterprise
- BIOS-level Hardware Virtualization support
- Space in the Hard drive for the Operating system will be added
What is Hyper-V?
To handle Virtualization in Windows 10, it uses software called Hyper-V. You must activate Hyper-V to add a virtual machine.
Check Hardware Virtualization Support
Before enabling Virtualization, first, check whether your device has the support of hardware virtualization or not. You can also check that it is enabled in the BIOS firmware settings.
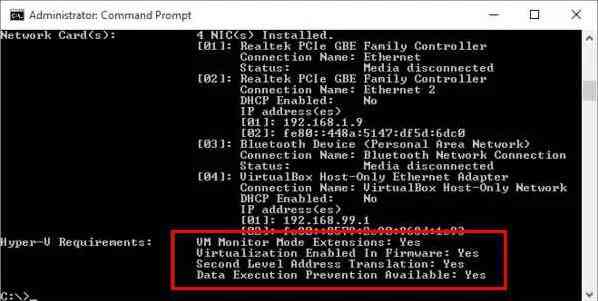
- Go to the start button and search for Command Prompt.
- Open Command Prompt or Windows PowerShell Window
- Now, enter the given command –systeminfo.exe
- Please wait for a few seconds ( It is gathering all the information about your system)
- Now, search for Hyper-V Requirements.
- There you must see that Virtualization Enabled in Firmware reads YES.
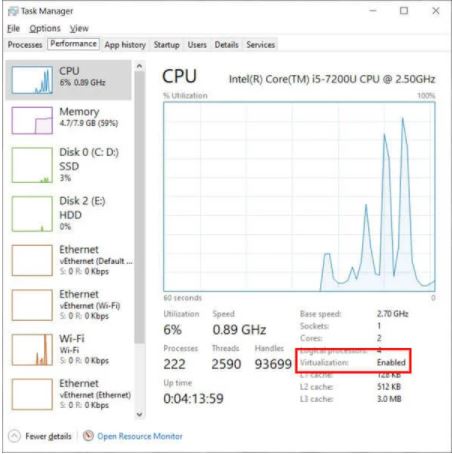
You can check the same thing by different methods also. You must open Task Manager and click on the Performance tab. There on the right-hand side, you will see Virtualization: Enabled.
Steps to Enable Virtualization on PC BIOS Setting
All the PCs have a different version of the BIOS screen and settings. However, the steps to enable Virtualization to depend on the PC manufacturer. Usually, during boot, BIOS settings can be accessed using the function keys (F1, F2, F3, F10, or F12). And other PCs have ESC or Delete Key.
If you don’t know the correct Key for your system, then you must search on Google. And when you boot your PC, tab the key two times per second when the screen turns on. One of the easiest ways to do this is from Windows 10 Settings.
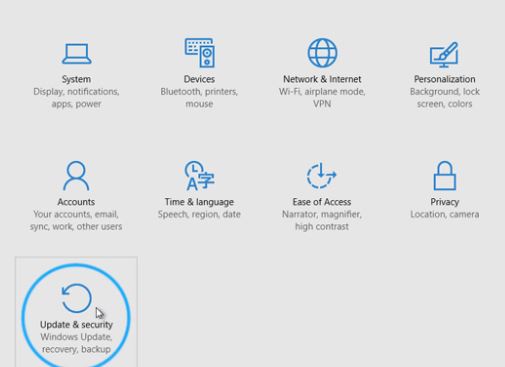
- First, go to Windows Settings.
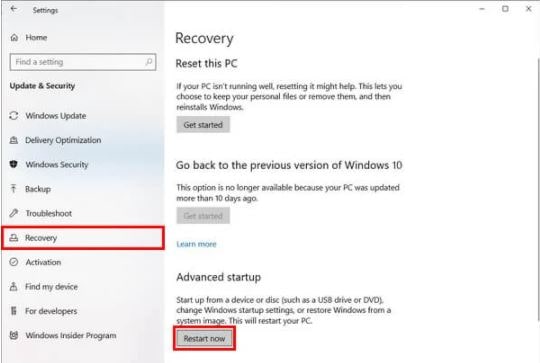
- Tab on Update and Security > Recovery.
- Under Advanced Startup, click on Restart Now.
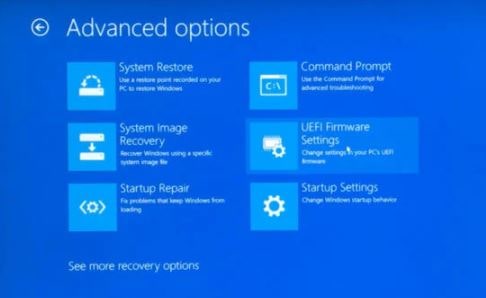
- Then go to Troubleshoot > Advanced Options.
- Tab on UEFI Firmware Settings
- Click on Restart.
If you are using UEFI-boot, then only this method will work. You can also change the setting from BIOS. However, you don’t need to worry about it if you don’t know, as all Windows PCs ship with UEFI boot enabled by default only.
Under the Advanced tab or menu, you will find the setting where you must turn it ON. It can be Advanced Mode or Configuration and can be labeled differently. You have to look for the settings Virtualization and see whether it is ON or not. The name can be different depending on your processor and other factors.
The most common names are used as below:
- Intel Virtualization Technology,
- AMD-V,
- Hyper-V
- VT-X
- Vanderpool
- SVM
Steps to Enable Hyper-V Virtualization in Windows 10
Let us see the steps to enable Virtualization in Windows 10.
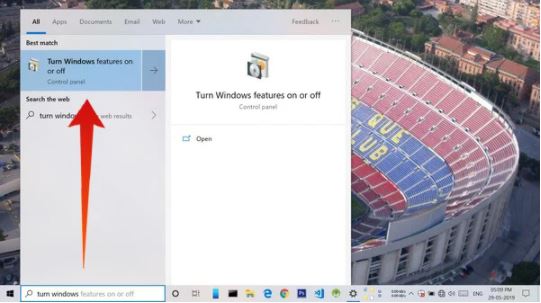
- On your device, click on the Windows Key and go to the Search box.
- Enter “turn windows features on or off.”
- Click on it and open it.
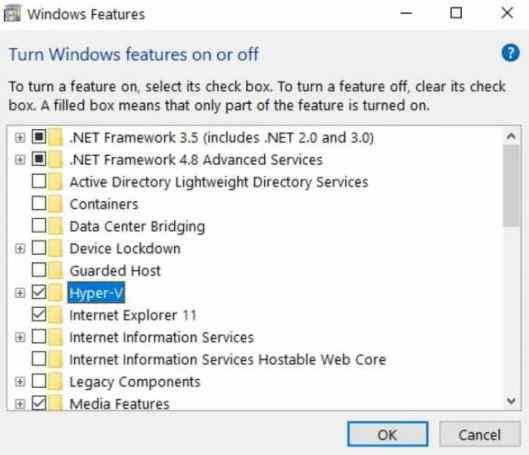
- Please scroll down and look for Hyper-V. Check on the box next to it.
- Click on OK
- All the necessary files will be installed to enable Virtualization.
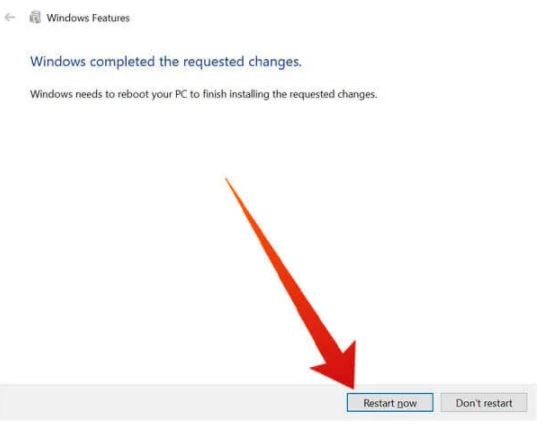
- It will ask you to reboot the PC
- Now, click on Restart Now.
So, this is how you can enable Virtualization on Windows 10 and start creating a virtual machine.
The first Windows version to support Hardware virtualization was Windows 8. Windows 10 also supports it and has many features like Enhanced Session Mode, high fidelity graphics, USB redirection, Linux secure boot, etc.

