Event ID 41 error is a common system error that you may encounter in Windows 11. This error is also known as Kernel-power 41 error. When this error occurs, the system randomly restarts without even shutting down properly. The full error message may read-
The system has rebooted without cleanly shutting down first. The error could be caused if the system stopped responding, crashed, or lost power unexpectedly.
You may face this issue due to various reasons such as conflicting third-party software, corrupted system files, or issues with power settings. Many times the Event ID 41 error may arise due to software-related reasons but many times faulty hardware may also be the reason behind facing this error.
The error may be a critical one and may prevent your PC from shutting down properly. In this article, we will be discussing how to fix the Event ID 41 error in Windows 11.
Also Read- How to Fix Sleep Mode Not Working on Windows 11
Fix Event ID 41 Error in Windows 11
There are various troubleshooting methods to fix the Event ID 41 error in Windows 11. Some of the methods are briefly described below-
1. Run Power Troubleshooter
You can run the Power Troubleshooter if you have been facing this issue. The power troubleshooter fixes the Event ID 41 error if it is due to incorrect power settings. To run Power Troubleshooters, follow the steps given below-
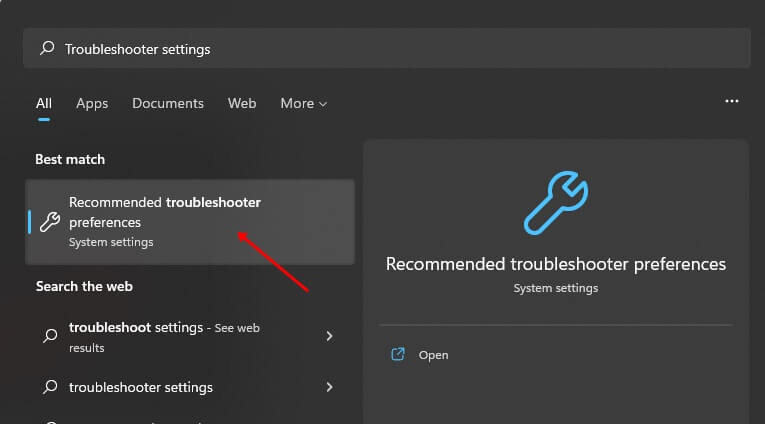
- Go to the Start menu, search for the Troubleshooter settings and open it.

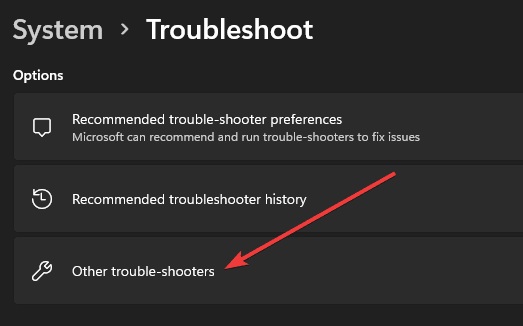
- There, select the Other Troubleshooters option.

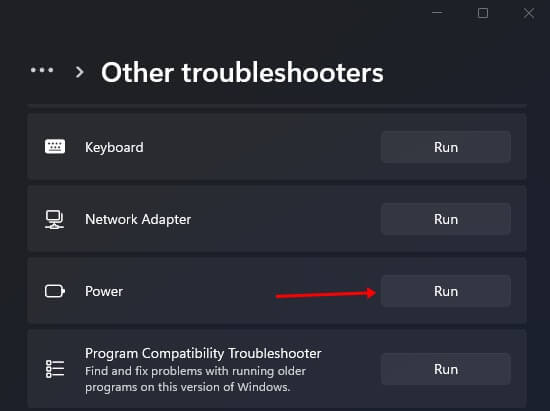
- Then check for the Power option and click on the Run button next to it.

- Follow the on-screen instructions to run the Power troubleshooter and fix the issue.
2. Run SFC and DISM Scan
The Event ID 41 error can also be fixed by running the SFC and DISM scan on your device. The steps given below helps you run SFC and DISM scan on your PC-
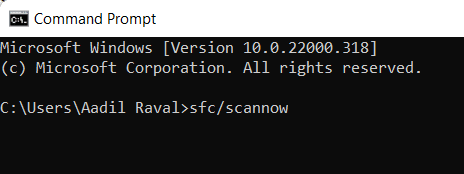
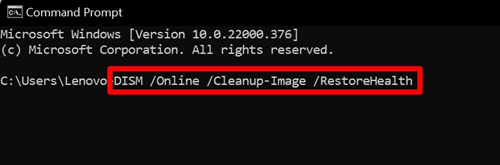
- Go to the Start menu, search for Command Prompt and run it as administrator.
- Here, execute the command-

-
sfc /scannow
-
- Wait for the process to complete and then restart your PC.
- If that doesn’t fix the issue, then run the following command in the Command Prompt-

-
DISM.exe /Online /Cleanup-image /Restorehealth
-
- After the process completes, restart your PC and see if you face the issue or not.
3. Undo Overclocking
Sometimes, when you do the overclocking on your PC it can show the Event ID 41 error. If you started facing this issue after overclocking your PC then you should try to undo the overclocking. Most probably that should fix the issue, and if you still encounter this error you can follow the next step in this article.
4. Update Windows
Many times updating the Windows to the latest version can also fix the issue. To update the Windows, follow the steps given below-
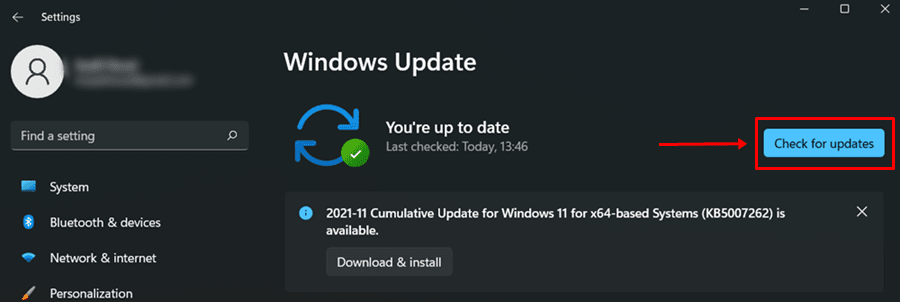
- Press Windows + I key combo to open Settings.

- Head to the Windows Update from the left sidebar, and then click on Check for updates option.

- Download and install all the updates available, and restart your PC.

5. Turn Off Fast Startup
You can also face this error due to fast startup being enabled. Fast Startup boosts the startup of your PC and sometimes it shows the Event ID 41 error. Turn off Fast Startup by following the steps given below
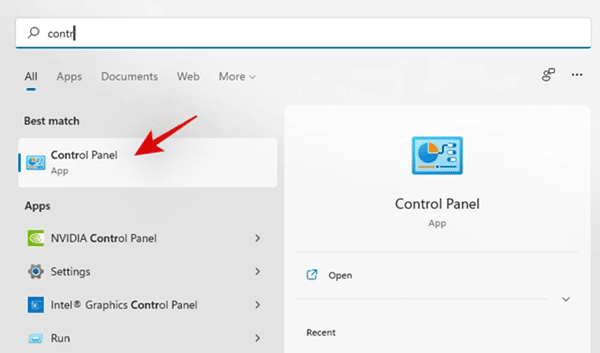
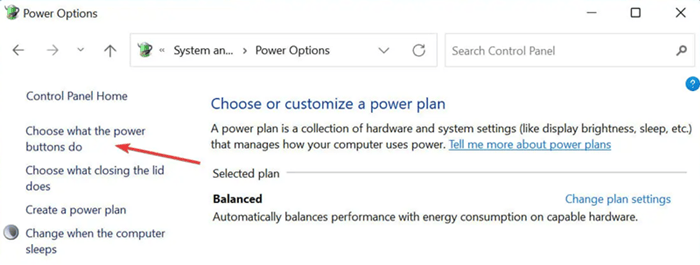
- Go to the Start menu, search for the Control Panel and open it.

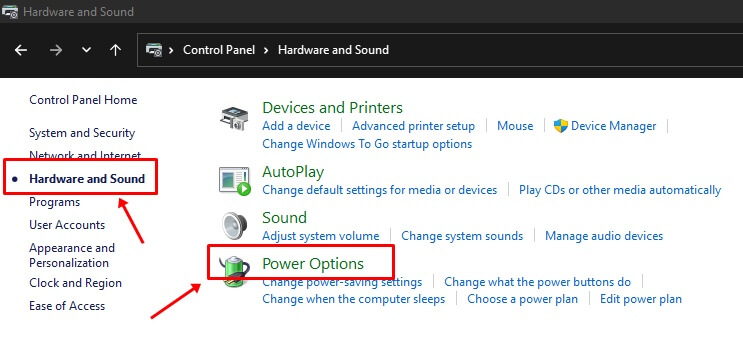
- There, click on the Hardware and Sounds option, and then click on the Power Options.

- Now, click on the Choose what the power button do option on the left sidebar.

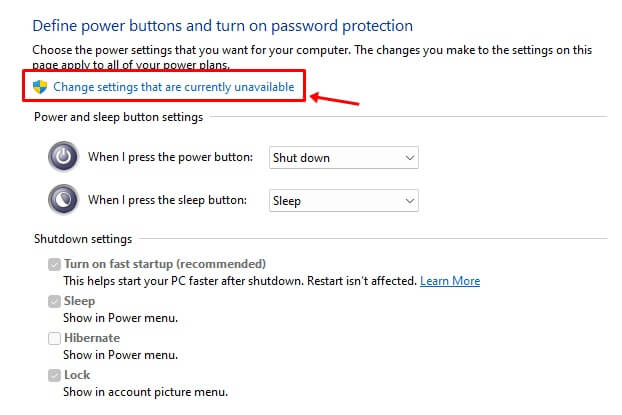
- Then in the next window click on the Change settings that are currently unavailable.

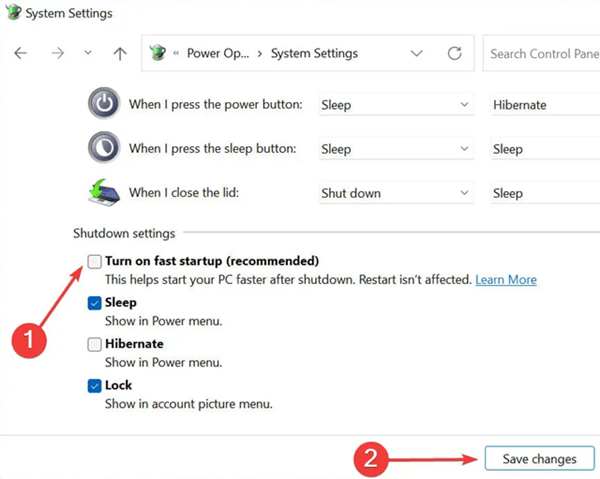
- At last, uncheck the checkbox for Turn on fast startup and click on Save Changes.

6. Change Power Settings
The power settings can be the main reason behind the Event ID 41 error. Try adjusting the power settings and then see if you still face the issue or not. To do so, follow the steps given below-
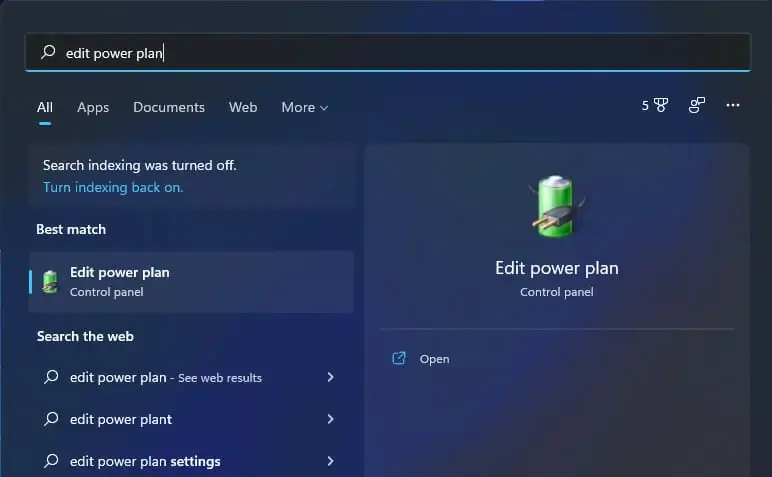
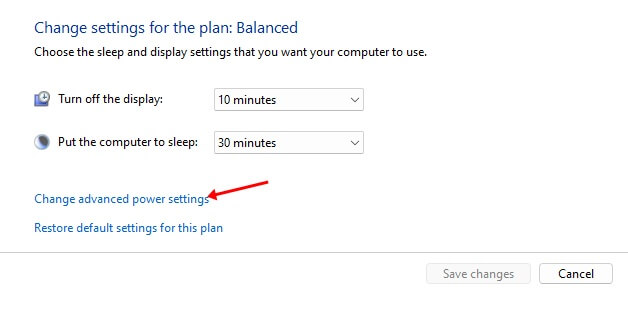
- Go to the Start menu, and there search for the Edit power plan and open it.

- Next, click on the Change advanced power settings option.

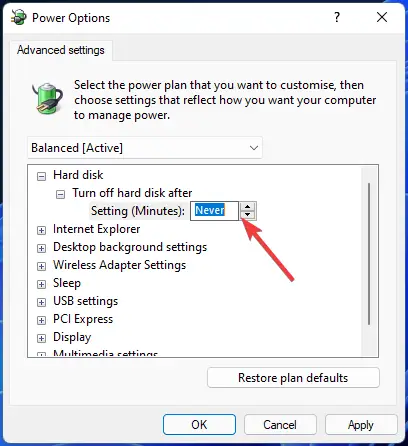
- Now, double-click on the Hard disk to expand it.
- Set Setting (Minutes) to never.

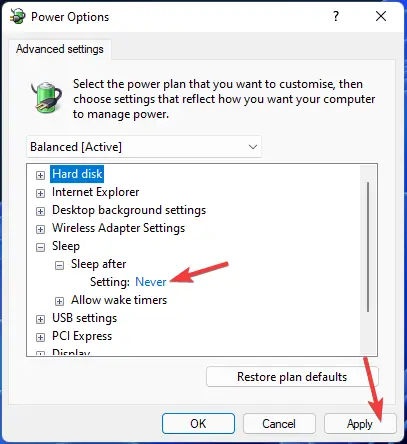
- Now, expand the Sleep option.
- Now, double click on the Sleep after option to expand it.
- Here, set Setting to Never.

- Click on Apply and then on OK to save the changes.
- Restart your PC and check if you still face the issue.
7. Update Drivers
Another reason to face this issue can be outdated drivers. You must try updating the drivers and then check if you still face the issue or not. To do so, follow the steps given below-
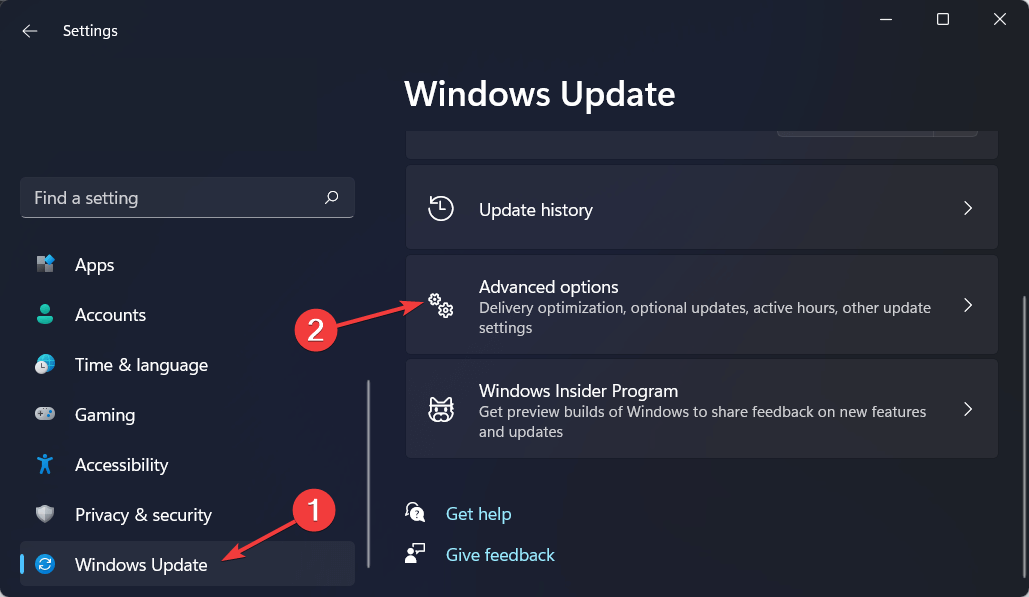
- Go to the Start menu, there search for, and open Settings
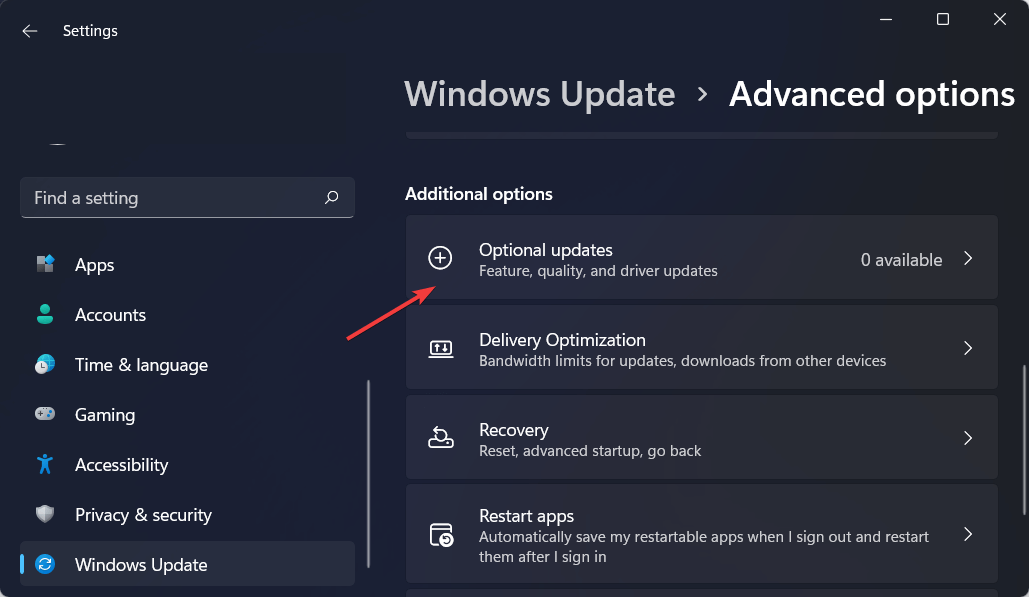
- Head to the Windows Update tab and then click on the Advanced options.

- Now, click on the Optional updates option.
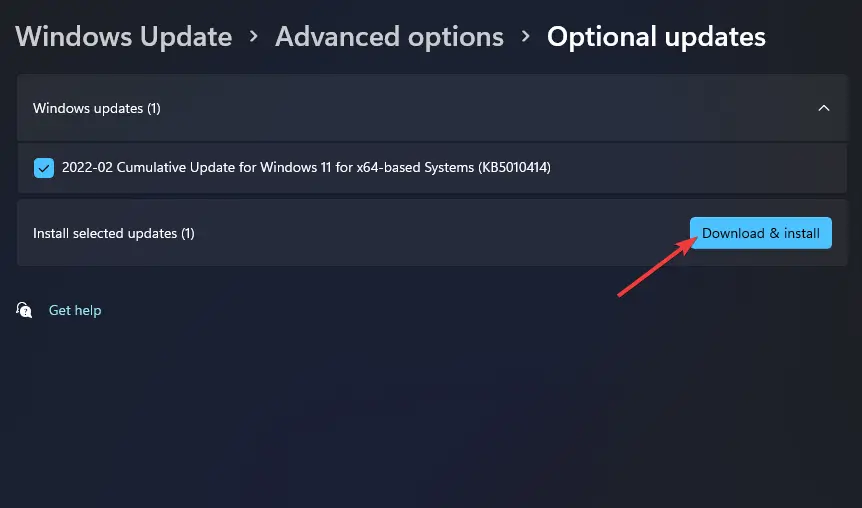
- From here, download and install all the optional updates available.

- Restart your PC and the issue will be fixed.
Conclusion
Above were the methods to help fix the Event ID 41 error on Windows 11. We have also discussed why you may face the issue and how you can fix it.


