Every Windows user may encounter the Blue Screen of Death (BSOD) error at some point. Often, when this error appears, we are unsure what to do. If you are facing the ntoskrnl.exe BSOD error on your Windows 11 system, this article is for you. Although this may happen rarely, it can happen more frequently, causing frustration.
There can be many reasons behind this error, including hardware issues, malware infection, and others, which we will discuss below. we have mentioned some of the best ways to Fix the ntoskrnl.exe BSOD error on Windows 11. So, without further delay, let’s look at the main points.
What is ntoskrnl.exe BSOD Error?
The Ntoskrnl.exe BSOD error is a Blue Screen of Death that anyone can encounter while using Windows. Ntoskrnl.exe stands for the NT Operating System Kernel, an important component of Windows OS responsible for memory management.
So, if any of you are getting this error repeatedly, it could be caused by corrupt files, viruses, or hardware issues.
1. Check for Memory Errors
RAM is one of the most important components of a computer. Without RAM, a PC cannot perform any task or process. If you encounter the ntoskrnl.exe BSOD error, it is advisable to check your RAM. Follow the steps below to learn how.
- Press the Windows key and type Memory, then select Windows Memory Diagnostic.

- In the Windows Memory Diagnostic popup window, select Restart Now and check for problems(recommended).
")
- After this, your PC will restart using the Windows Memory Diagnostic tool to check for problems in your RAM.

")
If you get any error, try switching your RAM slots to see if it resolves the issue. If you still getting the error, try another method.
2. Run SFC & DISM commands
Corrupted files could be the reason for the ntoskrnl.exe BSOD error. Running SFC and DISM scans can detect all corrupted files and fix them immediately. To do this, follow the steps given below.
- Press Windows + X and click on Terminal (Admin), or press the Windows key and search for PowerShell, then click on Run as Administrator.
")
- Copy and paste the following command into the terminal window and press Enter:

DISM /Online /Cleanup-Image /RestoreHealth
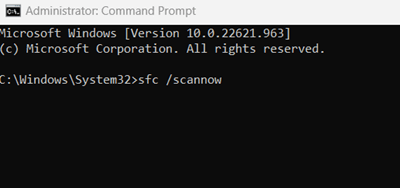
- After the process completes successfully, type the SFC command mentioned below:
sfc /scannow
")

If corrupt files are the cause of this error, an SFC/DISM scan will resolve it. If you still encounter the ntoskrnl.exe error, consider trying another method.
3. Check for Disk Problems
As you know, the hard drive is also important for the proper functioning of Windows. To check hard drive errors, use the Chkdsk utility.
- Press the Windows key and type PowerShell, then click on Run as Administrator.

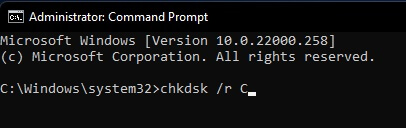
- In the command prompt, type the following command and hit Enter.

chkdsk /r /f
- It will prompt you to restart, press Y, and then Enter.
- Now, it will automatically scan your hard drive during the restart.

4. Check for Virus/Malware
Ntoskrnl.exe BSOD error in Windows 11 can also be caused by a virus or malware. Although Windows 11 has its own security app that protects our computer from viruses, sometimes, for various reasons, it may fail. But you can rely on Windows Security to fix this error. Follow the step-by-step guidance below to resolve this issue.
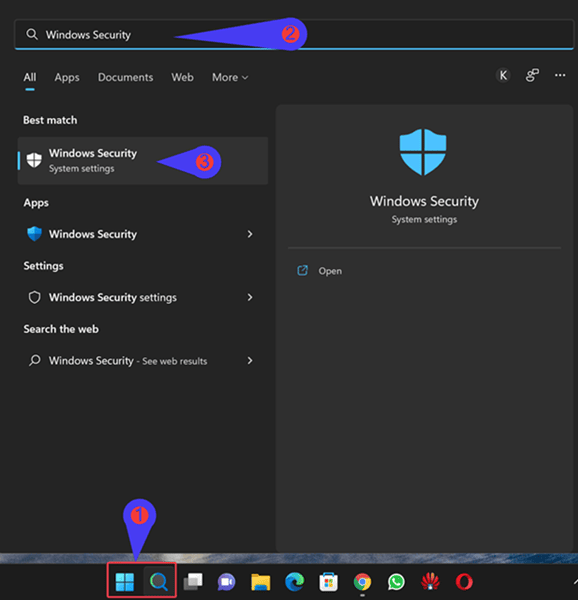
- Press the Windows key and type Windows Security.

- On the Windows Security page, click on the Virus & Threat Protection option.

- Click on the Scan option, then select Full Scan.

- Finally, click on the Scan Now button, and you’re done.


5. Update Your Device Drivers
An outdated or damaged driver can cause BSOD errors in Windows 11. So, make sure that your device drivers are up to date. If they are not updated, update them with the latest version now. For those who don’t know the way, follow the steps below:
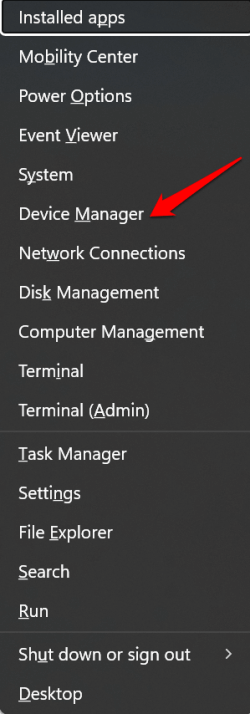
- Press Windows + X and select Device Manager.

- Find the driver that is causing the issue, then expand that specific driver, right-click on it, and select Update driver.

- Click on Search automatically for drivers.


After this, Windows will automatically download the driver and install it on your device. Once the process is complete, restart your computer.
6. Disable Overclocking
Many people enable overclocking on their computers to improve performance, but it also comes with risks, including overheating, system crashes, and hardware damage.
These issues can cause a Ntoskrnl.exe error in your Windows 11. To resolve these issues, turn off overclocking on your device and return your system to its default settings.
7. Try Clean Boot Using MSConfig
A clean boot will help you identify services and applications that cause problems on Windows 11. This gives you more control over the services and applications you want to run during Windows startup. Follow the steps and information below to know more.
- Press the Windows key and type msconfig, then click on Run as administrator.

- Go to the Services tab and check the Hide all Microsoft services option.

- Once you’ve hidden all the Microsoft services, disable all the services you see on the list by selecting all and clicking the Disable All button.
- Now, go to the Startup tab and click on the Open Task Manager option.

- Disable all the startup apps that usually start when your computer boots up. Simply right-click on each app and click on the Disable option.

- Click OK to apply the changes and restart your computer.


If this method helps to fix the BSOD error, then it is clear that the problem is with the programs and services that you have disabled. To identify the main culprit, start by enabling all services and programs one by one and check which one is causing the problem.
8. Update Windows 11
If you are using an older version of Windows 11, there is a high chance that you may face this BSOD error again and again. Windows updates often include new features, bug fixes, and security patches. If you haven’t updated your Windows 11, there’s a high chance that updating will help resolve this error.
- Press the Windows key and type Windows update settings.

- Click on the Check for updates button. If there is an update available, you will see a Download and Install button, click on it.


Conclusion
That’s all for this article. All these methods are working perfectly so far. After applying these solutions, people who are facing the ntoskrnl.exe BSOD error on Windows 11 will be able to fix it. We hope you found this article informative. If it is, please consider sharing it with others.
If any of you have any issues regarding any of the methods, please let us know in the comments section. We will definitely provide you with the best and easiest solution as soon as possible.


