There are times where you need some additional resources than what’s being provided by your vendor for completing your task. In terms of creative work on your PC, like Photoshop, you may have installed fonts to widen your options to create designer texts. And if you did, and now wanting to remove any of them, here’s our guide on who to do.
System fonts are useful for not making our lives boring. They’re the ones who let us keep our presentations interesting and depict our taste. While Microsoft gives enough font styles to play within Windows 10, creative users wanting more may often install additional fonts from external resources. And if you did, you know exactly where you have added.
But if you forget and looking how to uninstall some of the fonts, here’s how;
Also Read- How to Use Different Fonts on Instagram
Steps to Remove Fonts in Window 10
There are two ways of doing this,
- First, go to Settings > Personalisation and go into the Fonts section to see all the available fonts in your system.

- Here, you can click any of the font styles to see how many variants are available and more details on it.
- You’ll also see Uninstall button for every font style. Clicking on it will remove the particular font from your PC.


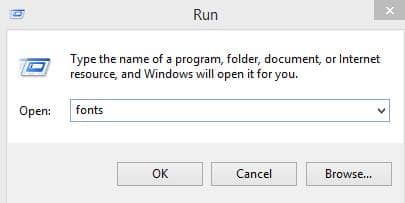
If not this, you may try this secondary method;
- Go Start Menu and open Run shell.
- Here, in the Run dialogue box, type Fonts and click Enter.

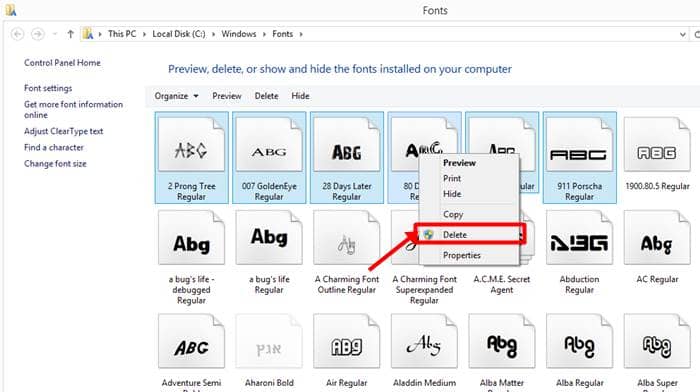
- Your search will take you to the place where all your fonts are stored on your PC. This is in C drive.
- Here, you can see all the fonts available in your Windows 10, which came by default.
- Choose the one you wanted to remove and press delete from the options (right-click) or use the delete button on the keyboard.

- Else, you can select all the unwanted fonts and delete them all at once for bulk deletion.
")

