Skype is proprietary telecommunication and video-conferencing application developed by Skype Technologies. This VoIP-based videotelephony, voice calls, and video-conferencing service is a division of Microsoft.
However, along with these services, Skype also offers instant messaging, debt-based calls to landlines and mobile phones, and file transfer faculty. It is made by Niklas Zennström and Janus Friis back in 2003. But unfortunately, Skype is currently facing a lot of criticism because, for some users, Skype keeps crashing on their Windows 11 PC.
However, although the reason behind this is still unclear, we still have some workaround that may help you fix the issue. So, let’s start with them and check if the issue gets fixed using these workarounds or not.
Also Read- Windows Explorer Keeps Crashing – How To Fix It
How To Fix Skype Keeps Crashing On Windows 11
So, here are the fixes that will help you get rid of the Skype keeps crashing issue on your Windows 11 PC. Therefore, make sure to perform them one after the other and do not stop until you find a perfect fix for your PC. So, let’s get started with them:
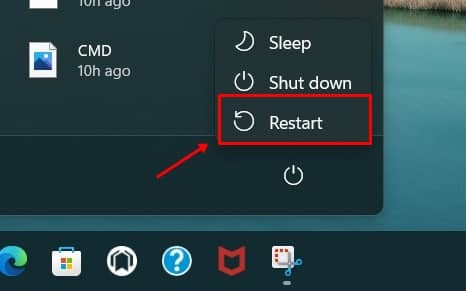
Fix 1: Restart Your System
It is generally seen that when the RAM can no longer hold any more data resulting in slowdowns, our PC’s performance, and various other types of errors. But, at the same time, when you restart the computer, all programs come to a rest, the power is turned off, and the RAM gets cleared.
This will give your Windows 11 system a clean and fresh start to handle the processes more efficiently. Therefore, we recommend rebooting your System before performing any given methods.
Fix 2: Run Windows Troubleshooter
If just by rebooting your System, the Skype keeps crashing issue won’t get resolved, then you should try running the Windows troubleshooter as it has a huge potential to resolve this type of issue. Furthermore, the process is automated as it will automatically find and resolve the issue (if any). So, to use this feature, you must follow the given steps:
- Firstly, open windows settings from the start menu or by pressing Windows + I key.

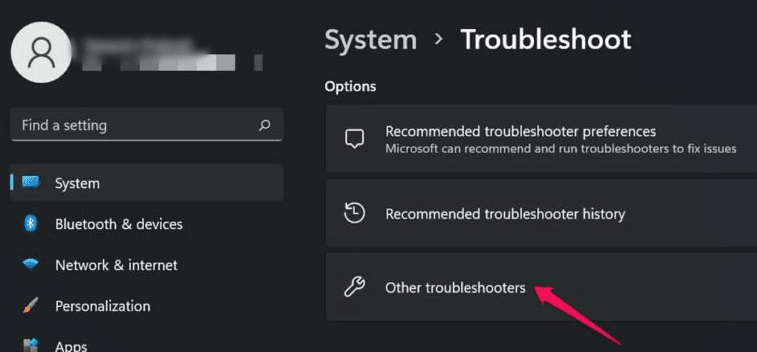
- After that, go to System > Troubleshoot.
- Then, locate and tap on the Other troubleshooters option.

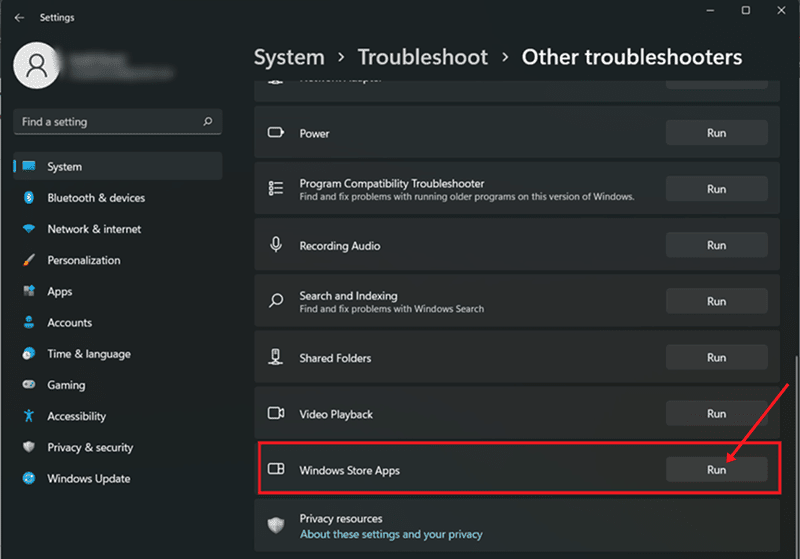
- Finally, locate the Windows Store Apps option and click on the Run button located in front of this option. Then, until the process gets completed, reboot your System to apply the changes once done.


Fix 3: Install the Media Feature Pack
You should also try this method as many users previously reported that after installing the Media feature pack on their Windows 11 PC, Skype again starts working correctly. So, to install this feature, follow the instructions given below:
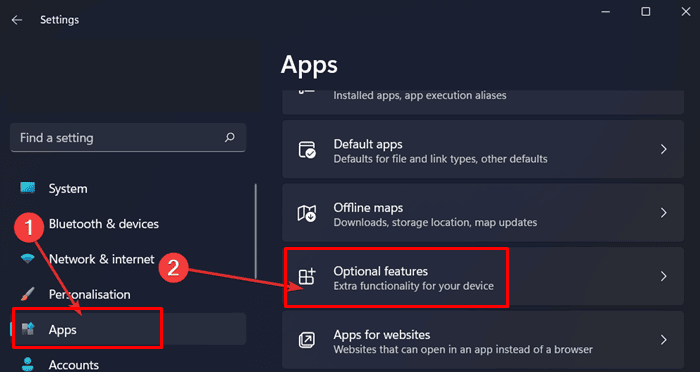
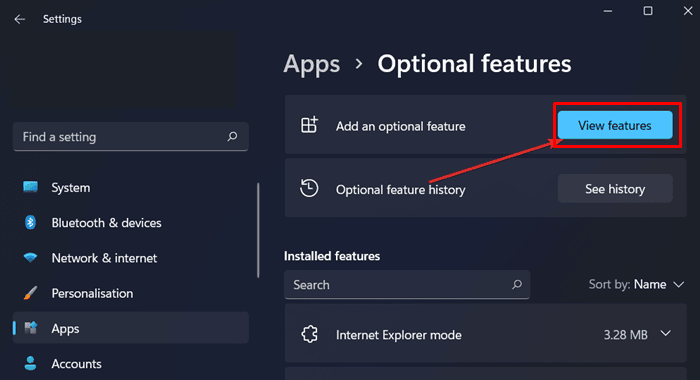
- Firstly, press the Win+I key to open the Windows 11 settings App.
- Then, go to the App section > Optional features.

- After that, click on the View Features located in front of the Add an optional feature option.

- Now, search for the Media Feature Pack and Next button. Then, hit the Install button to install it on your Windows 11 PC. Once done, check if the Skype keeps crashing issue resolved or not.


Fix 4: Run Skype Using Admin Rights
If you haven’t tried this method, I’ll suggest you try this out because there are chances that the Skype app may not get the proper resource to function properly on your PC as it doesn’t have the permission to do so. Therefore, running the App using admin right will help you resolve the issue.
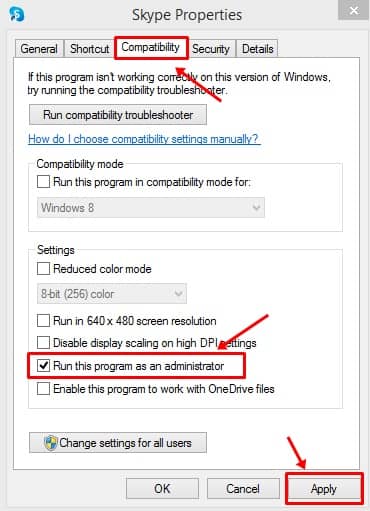
- Firstly, right-click on the Skype shortcut icon and select the properties option from the list.
- After that, shift to the Compatibility tab and checkmark the box next to Run This Program as Administrator. Then, hit the Apply and then Ok button to save the changes.

Fix 5: Reset The App
Still, no luck? Well, don’t worry! There are still some potential fixes that will surely help you fix the Skype keeps crashing issue. First, you can try resetting the App and then check if the issue gets fixed or not. So, let’s take a look at the steps:
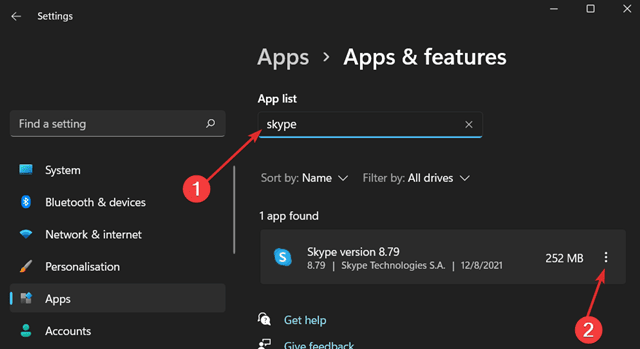
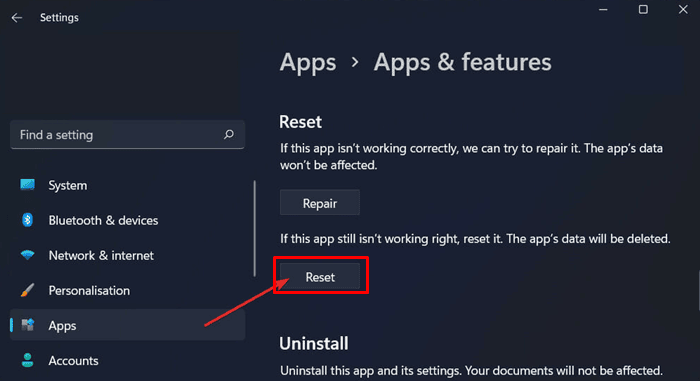
- Firstly, press the Win+I key to open the Windows 11 settings App.
- Then, go to the App> Apps & features.

- Now, locate the Skype app and hit the three-dot button next to the Skype app.

- Then, a drop-down menu appears; select the Advanced option. That’s it. Now, hit the Reset button located under the Reset section.


Fix 6: Reinstall The App
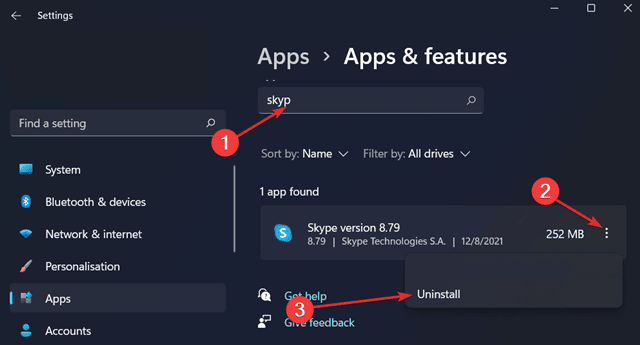
Sadly, if nothing helps you fix this painstaking error, the last option you can try is to reinstall the Skype application on your Windows 11 PC. So, here is the needy instruction for that:
- Firstly, press the Win+I key to open windows settings.
- Then, go to the App> Apps & features > Skype app.
- Then, hit the three-dot button next to the Skype app and select the Uninstall button.

That’s it. Now, download the Skype app from the given link and install it on your Windows 11 PC.
Fix 7: Contact The Support Team
Now it’s time to contact the official support team of Skype. So, in case you get frustrated and annoyed trying the perform different fixes and still getting the same error, then contacting Skype Team will be the right choice. Therefore, contact them and ask them for help.
So, that’s all on how to fix the Skype keeps crashing on their Windows 11 PC. We hope that this article has helped you. But, in case you need more info, comment below.


