We all know that Windows 10 users who have compatible PC already get the free update to Windows 11. This time Microsoft includes a new UI, redesigned Start menu, an overhauled Microsoft Store, and much more.
But, you know what? Although this new Update brings many good things, still Microsoft unable to give a bug-free environment to its users. It’s now been regular since users face glitches and errors after upgrading to Windows 11. However, one of those errors is the taskbar not showing.
We all know how vital the taskbar is for us to access most things on our desktops. So, this needs to be fixed. So, of course, that’s why we are here with a new guide to help you guys fix this issue. So therefore, make sure to stick with the guide and read till the end.
Best Ways To Fix Windows 11 Taskbar Not Working
Well, fixing this isn’t a challenging task to do. You can get rid of this problem by following some easy methods explained here in this guide. So, make sure to follow them one after the other with care.
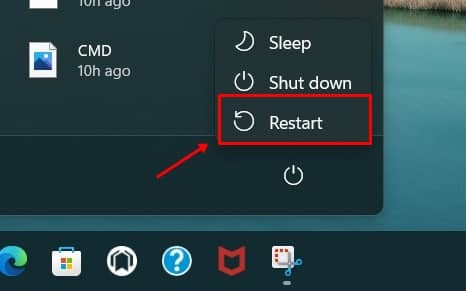
1. Restart PC
This is not a fix, as we consider it a necessary step that you need to take before performing any of the below-mentioned fixes.
Rebooting your PC will make sure that no process is going on in the background and give your PC a fresh new start. So, it is suggested to restart your PC once before doing anything.
- Click on Windows Button and Click on Restart.

2. Restart Windows Explorer And Other Essential Processes
If you have already rebooted your PC several times, simply close Windows Explorer and other related essential processes. So, if you don’t know how to restart your Windows Explorer, then follow the steps given below:
- Firstly, right-click on the Start menu and click on the Task Manager from the drop-down list.

- Now, locate and right-click on the Windows Explorer process under the processes tab.
- That’s it. Now, right-click on Windows Explorer and click on the Restart Option.


3. Reset Windows 11 Taskbar
Here are the guidelines you require to follow to reset your Windows 11 Taskbar.
- Initially, you can simply copy and paste the below-mentioned codes in Notepad and save them as a .bat file format.
REG DELETE HKCU\Software\Microsoft\Windows\CurrentVersion\Explorer\Streams\Desktop /F taskkill /f /im explorer.exe taskkill /f /im shellexperiencehost.exe

del %localappdata%\Packages\Microsoft.Windows.ShellExperienceHost_cw5n1h2txyewy\Tem State\* /q start explorer.exe
- Then, right-click on the file and run as administrator.
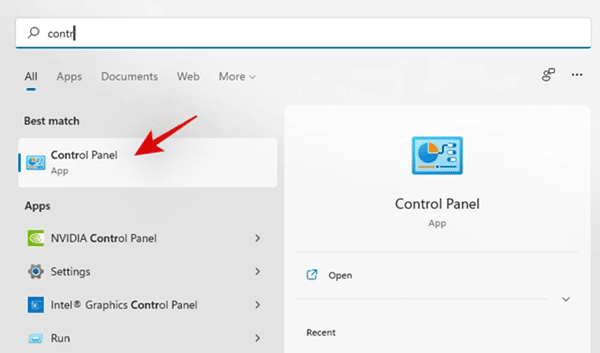
4. Perform System Restore
Many users reported that performing a complete system restore helped them fix this issue. So, you can also try this out.
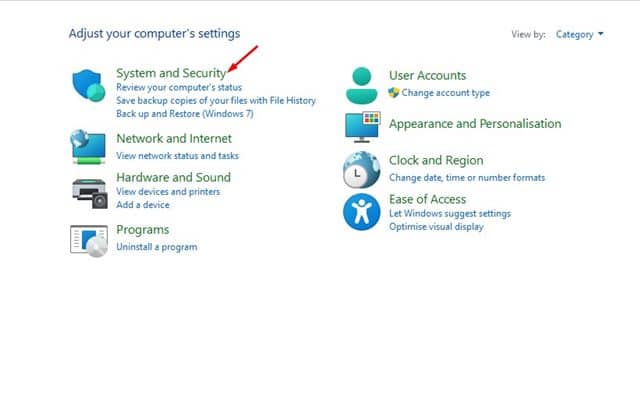
- Initially, use the Windows search bar and open the Control Panel.

- Then, navigate to the System and Security option.

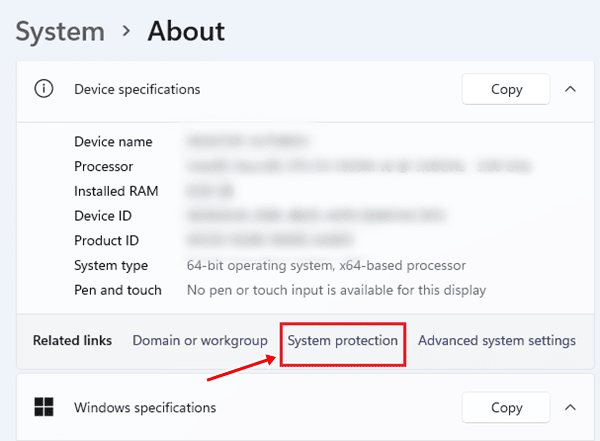
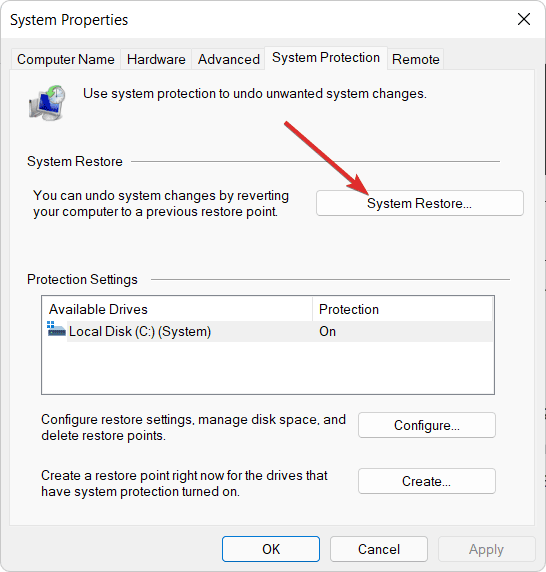
- After that, tap on the System followed by System Protection.

- Hit the System Restore button found under the System Protection tab in the System Properties window.

- That’s it. Now, simply follow the on-screen instruction to complete the restoration process.
5. Uninstall the Update
Now, if the taskbar is still not showing, even after performing the system restore, we recommend you try to uninstall the latest install version of Windows. So, let’s take a look at the steps that you need to follow to do so:
- First of all, you must navigate to the Start menu and open Windows 11 Settings.
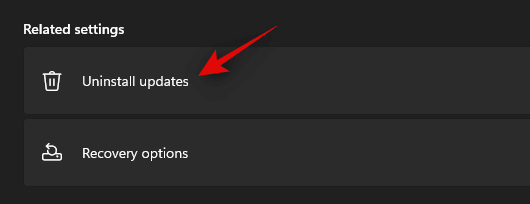
- Then, hover over to the Windows Update located at the left side of the window. Then, hit the Update History button.
- Now, locate the Uninstall updates button under Related settings.

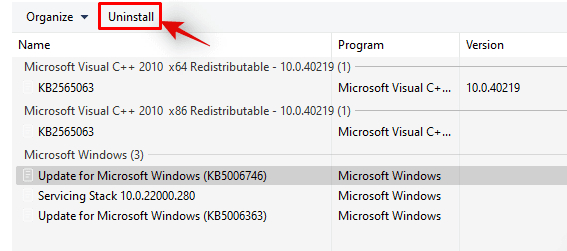
- After that, all the install updates will be listed. Then, right-click on the Update and select Uninstall.

6. Modify Registry
Did you try this before? Well, if not, then we recommend you take help from someone who knows about editing Windows registries. But, no worries if you don’t know about this anything; you can still do this by performing the steps given below:
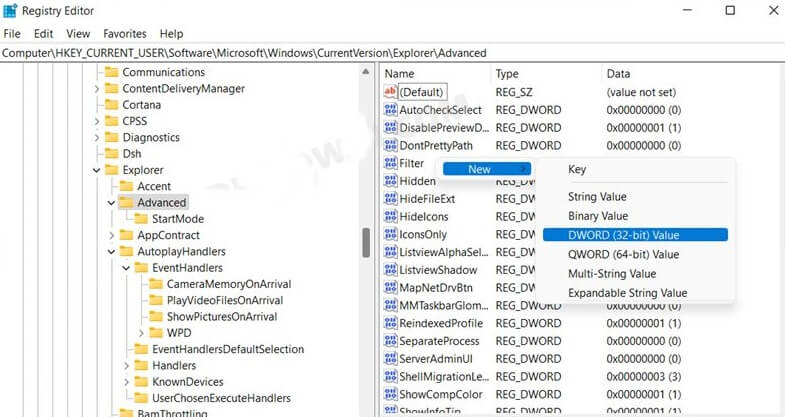
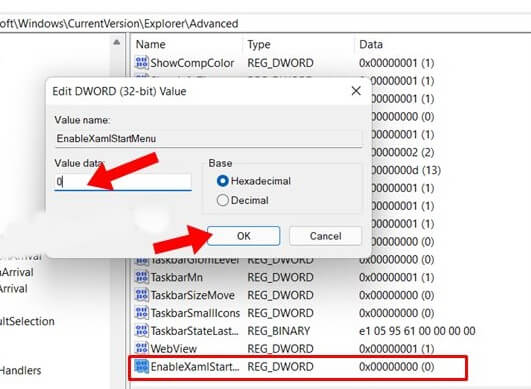
- Firstly, press the Win+R button to open the Run prompt box and search for regedit.
- Then, navigate to the following path:
HKEY_CURRENT_USER\Software\Microsoft\Windows\CurrentVersion\Explorer\Advanced
- Now, right-click on the blank space and select New.

- After that, tap on the DWORD (32-bit) Value. This will create a Registry key and rename it as EnableXamlStartMenu. Then, hit the enter key.
- You have to double-click on the new entry to edit its properties.
- Then, set the Value Data to 0 and hit the Ok button.

- That’s it. Now, save changes and exit Registry Editor.
7. Disable Auto Hide Taskbar
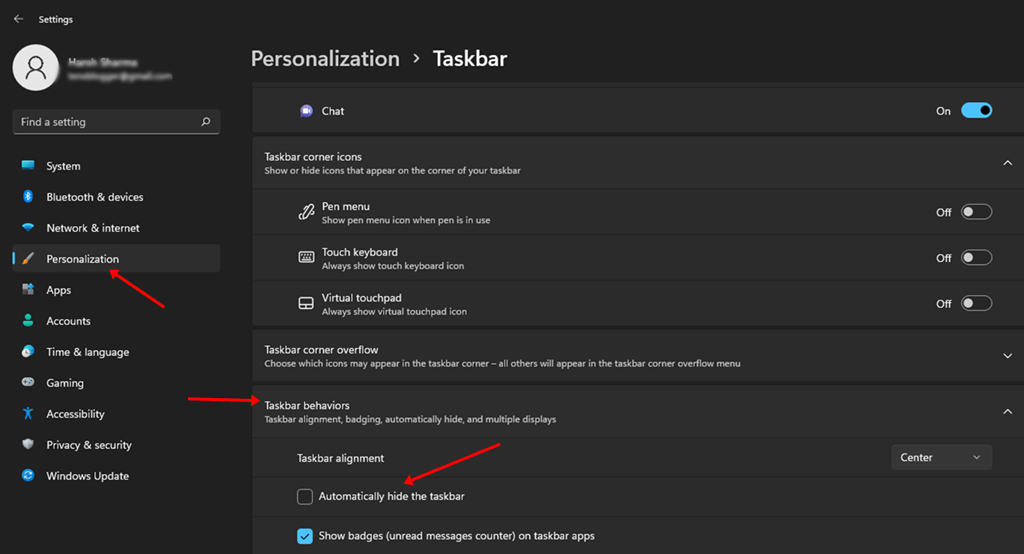
- Press Windows + I button to open Windows Settings.
- After that, Click on Personalization > Taskbar.
- Expand the Taskbar behaviors option and Disable Automatically hide the taskbar.

8. Repair System Files
- Press Windows + R button to open Run Dialog Box.
- Type CMD and hit enter.
- Now type the below commands, and execute each command line by line.
Dism /Online /Cleanup-Image /ScanHealth
Dism /Online /Cleanup-Image /RestoreHealth
sfc /scannow
Conclusion
So, these fixes will definitely help you if you are also getting bothered after upgrading to Windows 11 and the taskbar is not showing up. We hope this guide has helped you. However, if you know of any other method to help our users fix this issue, use the comment box and let our readers know.


