DisplayLink helps connects multiple monitors to a single PC. You can use various monitors connected through USB docking stations to the PC. However, you will have to install the DisplayLink drivers to use this technology.
Installing this driver is easy and this article explains the steps to install and enable the DisplayLink drivers in Windows 11. Let’s dive into the guide and see where to download this driver and enable it in our windows system.
Install and Enable DisplayLink Driver on Windows 11
DisplayLink technology will come in handy if you want to use multiple monitors along with your PC. However, you will have to install DisplayLink drivers and enable them. Given below is the complete step-by-step guide to doing it-
1. Install DisplayLink Driver in Windows 11
Before we start, you must know that the driver can be installed on Windows 7 and all the above versions. However, your system must meet the minimum requirements to install the driver. You can use the System Compatibility Check Tool to check system requirements.
To install the DisplayLink drivers on Windows 11, the user can follow the following steps-
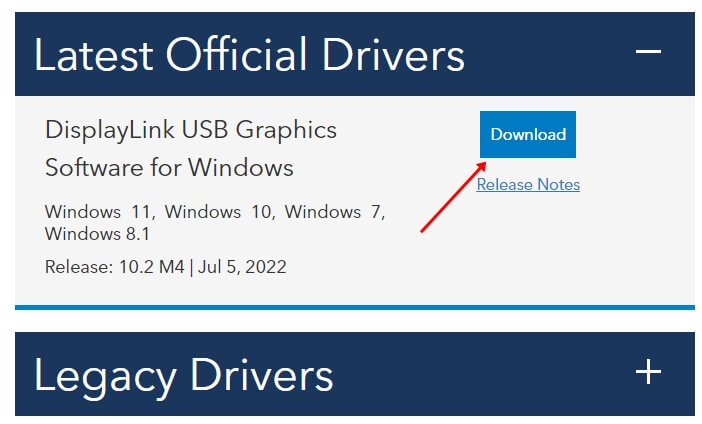
- Open the browser on your PC and head to the official page of DisplayLink Drivers.
- Select the operating system from the list and download the drivers on your PC.

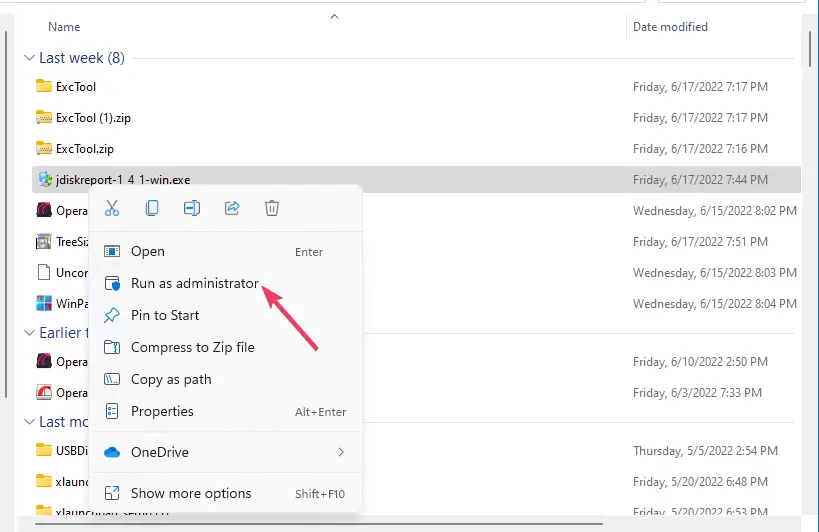
- Press the Windows + E key to open File Explorer and head to the location where the file was downloaded.
- Right-click on the downloaded file, and then select Run as Administrator and click on Install Button.

- Now, follow the on-screen instructions to install DisplayLink Driver on your PC.
- Once the process completes, restart your PC to save the changes.
2. Enable DisplayLink on Monitors
After you have installed DisplayLink Drivers, you will have to enable the technology to use multiple monitors. For enabling the DisplayLink on the monitors, the steps are as follows-
- Connect the Monitor with the PC.
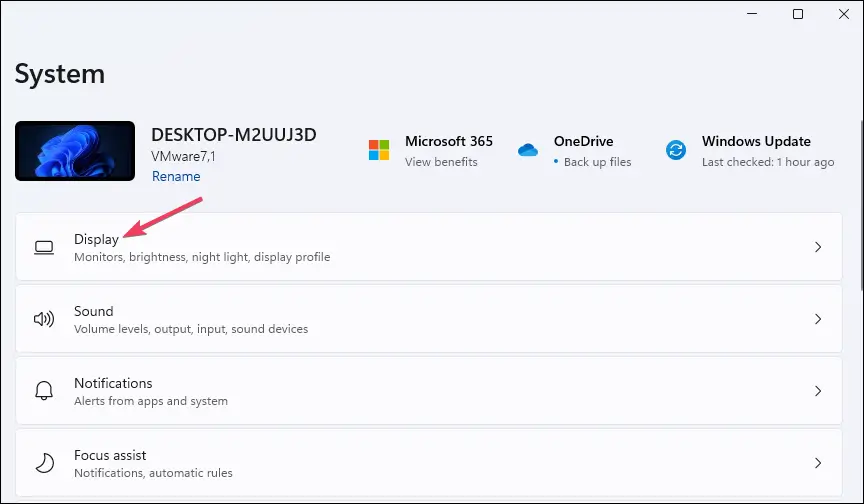
- Go to the Start menu, and click on Settings.
- There, in the System section, click on Display.

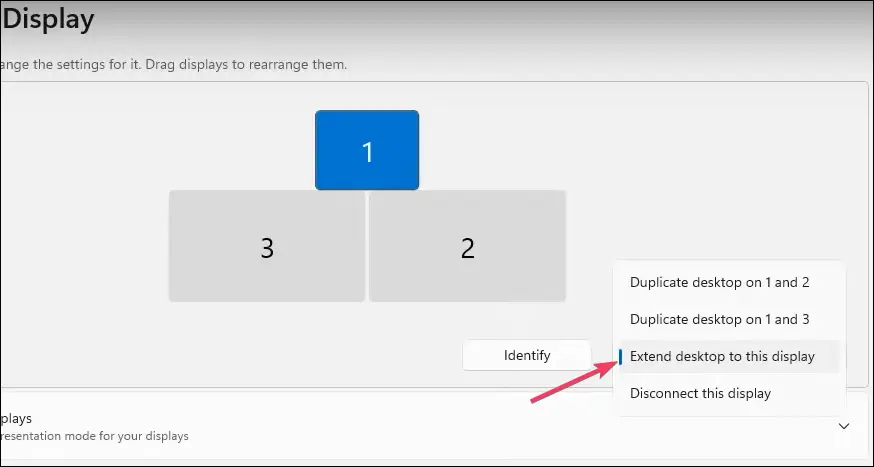
- Here, click on the drop-down menu right next to Identify, and then click on Extend desktop to this display.

- Now, click on Keep Changes to extend the display. Do not click on revert else; the changes will not be saved.
Another way to do so is through the DisplayLink software. To do so, follow the steps given below-
- On the system tray, right-click on the DisplayLink icon and click on ON.
- Clicking on the Off option will disable multiple monitor usage.
Conclusion
This was the complete guide to installing DisplayLink Drivers on your PC. Following the above steps, you can install and enable DisplayLink drivers and use this technology to connect multiple monitors to your PC.
FAQ
1. What is DisplayLink Driver?
DisplayLink driver works like normal for the display. This will detect the device with DisplayLink, and you can use it.
2. How do I Get my DisplayLink to Work?
You will need DisplayLink software for the device to work. You must connect a cable between the device with DisplayLink and your PC. Once done, the software will configure the monitor, and you can use it.
3. Do I Need DisplayLink Drivers?
The software will not be installed automatically even if you have a DisplayLink device. You will have to install the driver manually for the device to work.
4. How do I Install DisplayLink Drivers?
We have discussed the complete step-by-step guide to installing DisplayLink drivers, so you can follow the above steps to install them.
5. Does Windows 10 Have DisplayLink Drivers?
Yes, Windows 10 have DisplayLink Drivers. It can be installed on any PC with Windows 10 Anniversary Update 2016 or higher.


